Sw itc h po we r on l o gin/ l ock cf net – Q-See QT17DVR4C User Manual
Page 10
LCD WITH BUILT-IN DVR USER MANUAL
LCD WITH BUILT-IN DVR USER MANUAL
-e8-
LCD WITH BUILT-IN DVR USER MANUAL
LCD WITH BUILT-IN DVR USER MANUAL
-e15-
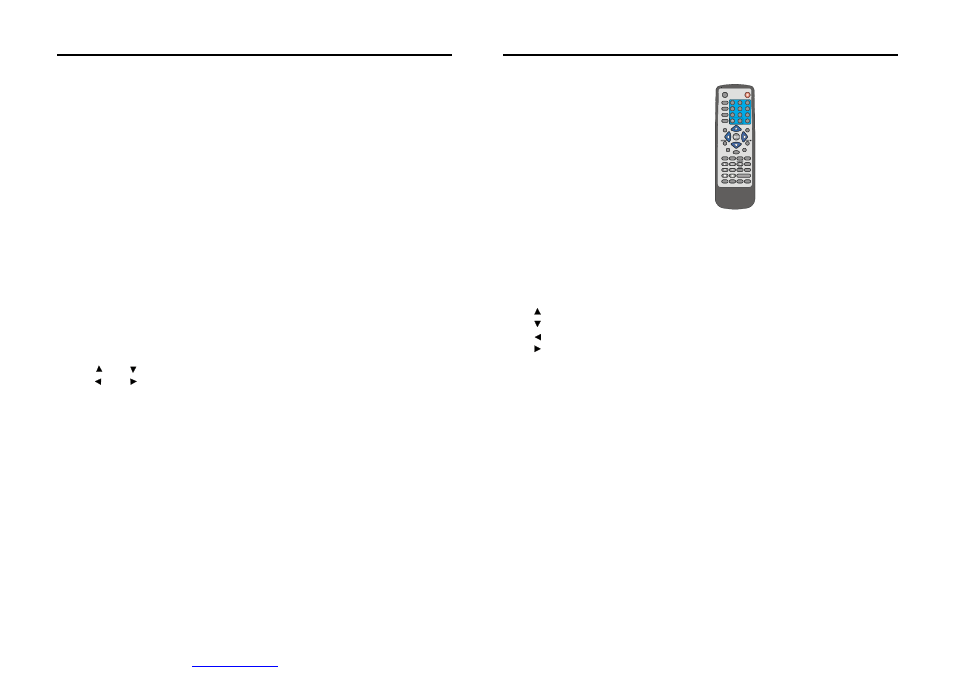
3.1.2 Remote Control Unit
1
2
3
4
5
6
7
8
9
0
PL AYBA C K
P A RAMET E R
ZOOM +
QUAD
ZO OM-
FO CUS+
FO CUS-
EXIT
AU TO
REC ALL P R ESET
PLAY
SLOW
REV
F WD
SE T UP
R ECOR D
ST OP
+
F1
ANAL O G
F 2
F1
F3
F4
1
2
3
4
5
6
7
8
9
0
+
SW ITC H
PO WE R ON
L O GIN/ L OCK
CF
NET
Buttons
Remote Control Unit and their functions:
①
②
③
④
Digital Buttons Area
【0-9】Button:
【+】、【-】Button:
Digital buttons,used for using digit input or video switch,when under the
built-in quad state, press 1、2、3、4 digit buttons mean to switch the picture
output to the first, second, third and forth channel video single picture;
Adjusting
parameters;
for confirmation,choosing the menu items, and press this button to enter
into the selected sub-menu;Pressing this button can display the real time
of the system when
;
Adjust the distance of the picture;
Adjust the brightness of the picture;
Adjust the sharpness of the picture;
Control automatically;
standby button in control of platform;
Preset control on platform, standby button;
control on some assistant switch;
Play the
;
Play the images slowly,at speed of Ч1/2、Ч1/4、Ч1/8 times,or press
button to return to normal playing speed;
Play fast forward of the playback picture,at the speed ofЧ2、Ч4 times,press
Button to return to the normal speed of playing;
Play fast backward of the playback pictures, at speed ofЧ2、Ч4 times,press
Button to return the normal speed of playing;
Menu Operating Buttons Area
:
:
:
:
【ENTER】button:
Platform control function buttons
【ZOOM+】、【ZOOM-】Button:
【APERTURE+】、【APERTURE-】Button:
【FOCUS+】、【FOCUS-】Button:
【AUTO】Button:
【RECALL】Button:
【PRESET】Button:
【SWITCH】Button:
Play function buttons
【PLAY】Button:
【SLOW】Button:
【play】
【PAUSE/SETP】Button:
【FWD】Button:
【Play】
【REV】Button:
【Play】
playing back the recording
the recording on the hard drive
on
various
DOWN Directional button;
LEFT Directional button;
RIGHT Directional button;
UP Directional button;
Press one time to Pause the picture ,and then press continuously,
picture will be displayed frame by frame, press
button to
return to normal speed of playing.
【
】
Play
【 】、【 】
【 】、【 】
【
】、【
】
【
】、【
】
【
】、【
】
【
】
【
】
【
】
【
】
Washer switch and light assistant switch control, display character:
Washer switch;
Pressing [F2] and [Pan/Tilt] once more will exit Pan/Tilt operation, and return to single image
monitoring state; Switch monitoring image and pressing [F2] key can enter into another channel
Pan/Tilt operation.
When operating Pan/Tilt function, system can't startup manual video recording
function.
When operating Pan/Tilt function, once system startup video record (timing or
alarm startup), temporarily can't affect Pan/Tilt operation.
When Pan/Tilt doesn't operate normally, Please check RS-485 (see "Alarm
Port lead line definition") and Pan/Tilt parameter
Lens up and down motion, display character: up and down;
Lens left and right motion, display character: Pan/Tilt left and right;
Adjust image far and near extent, display character:
Change times + and change times -;
Adjust image bright and dark extent, display character:
Aperture + and aperture -;
Key:
Key:
Change times +
Change time - Key:
Aperture +
Aperture - Key:
Focus +
Focus - Key:
Automatic Key:
Transfer Key:
Pre-set Key:
Washer switch/Light Key:
Adjust image clarity extent, display character: Focus + and focus -;
signifies automatic control, display character: Automatic
Pan/Tilt transfer control, display character: transfer 00, back key;
Pan/Tilt preset control, display character: preset 00, back key.
Warning 1:
Warning 2:
Troubleshooting:
E. After
all item selection, move cursor to [RETURN] and press [ENTER] key will
return toprevious menu, and save Pan/Tilt parameter setting.
Attention: Pan/Tilt protocol, baud rate, Pan/Tilt serial number three items must be
accordance with outer Pan/Tilt (quick ball) setting parameter.
Pan /Tilt operation: After setting Pan/Tilt parameter correctly, press [F2] key
remote
control under single monitoring state, the top left corner of screen will display "Pan/Tilt control"
character, temporarily, we can operate this channel's Pan/Tilt by using press
key
remote
control and panel.
setting up
in
on
[F2]
on
3.3.5 Housing setting
Moving cursor upon [Pan/Tilt setting] and pressing [ENTER] key can enter into quad channel
Pan/Tilt port setting interface
A. Channel: Denotes system's channel number.
B. Protocol: Denotes the communication protocol between system and decoder. Moving cursor
to this selection item and pressing [ENTER] key can make selection among different protocol
(Pe1co-D/P/09-15/Dscp/FastDome/PIH1016-1017/JECFastD/RM110/Neocam) Selected
protocol must match to the protocol of decoder, only can it control front equipment correctly.
C. Baud rate: Denotes communication speed between system and decoder. Moving cursor to this
item selection and pressing [ENTER] key can make selection among different baud rate
(1200/2400/4800/9600), selected baud rate must match decoder's baud rate, only can it control
front equipment correctly.
D. Pan/Tilt code: Moving cursor upon this selection item and pressing [ENTER] can make
selection among different Pan/Tilt serial number (01-63), system's 01 code number match
to decoder's first address code, that is address code "01"
PDF created with pdfFactory trial versi