Electrical connection, Electrical requirements, Warning – Beko DVG 695 User Manual
Page 9: Ignition, Important, Fitting a different plug, A/lains cable routing, Use of grill pan handle, Grilling guidelines
Attention! The text in this document has been recognized automatically. To view the original document, you can use the "Original mode".
electrical connection
I
Electrical requirements
Before you insert the plug into the wall
socket make sure that the voltage and the
frequency shown in the rating label corresponds
to your electricity supply.
We recomiTiend that this appliance be
connected to the mains supply via a suitable
switched and fused socket in a readily accessible
position.
Should the mains lead of the appliance
become damaged or need replacing at any
time, it must be replaced by a special purpose
made mains lead which can only be obtained
from a Веко Authorised Service Agent.
Warning
This appliance must be earthed
If the fitted moulded plug is not suitable for
your socket, then the plug should be cut off
and an appropriate plug fitted.
Destroy the old plug, which is cut off as a
plug with a bared cord could cause a shock
hazard if inserted into a socket elsewhere in
the house.
The moulded plug on this appliance
incorporates a 13А fuse. Should the fuse need
to be replaced an ASIA approved BS1362 fuse
of the same rating must be used. Do not forget
to refit the fuse cover. In the event of losing
the fuse cover, the plug must not be used until
a replacement fuse cover has been fitted.
Colour of the replacement fuse cover must be
the same colour as that visible on the pin face
of the plug. Fuse covers are available from any
good electrical store.
Ignition
The ignition system is reliant on the cooker
being plugged into suitable mains power supply
which is switched on.
f
Important
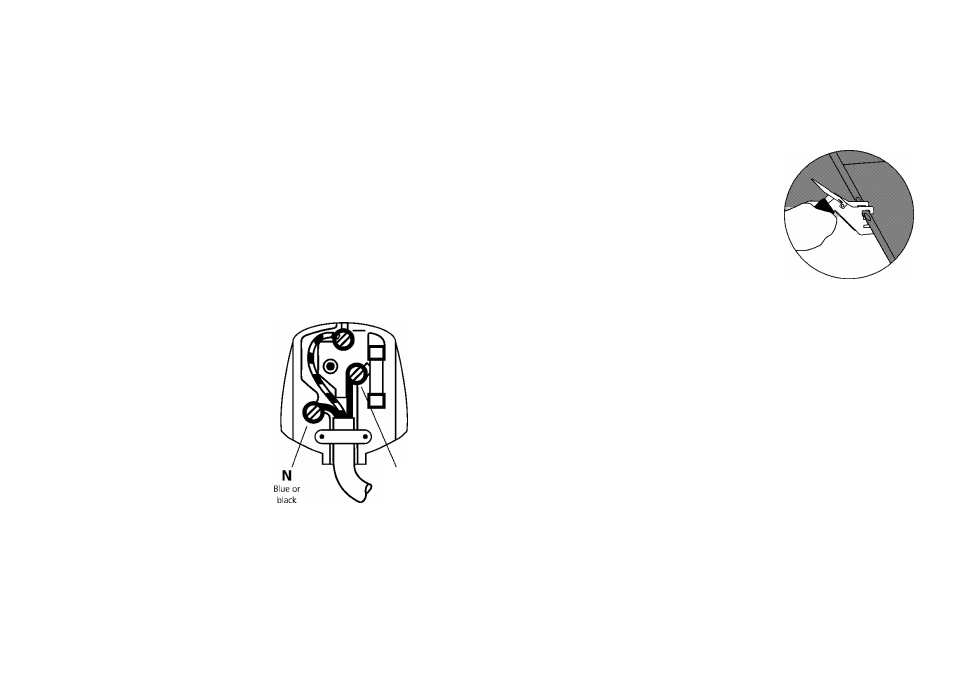
Fitting a different plug
As the colours of the wires in the mains
lead of this appliance may not correspond with
the coloured markings identifying the terminals
on your plug, proceed as follows:
1
Connect the green - yellow or green (earth)
wire to the terminal in the plug marked 'E'
or with the symbol or coloured green
and yellow or green.
2
Connect the blue (neutral) wire to the
terminal in the plug marked 'N' or coloured
black.
3
Connect the brown (live) wire to the terminal
in the plug marked 1' or coloured red.
With the alternative plugs a 13A fuse must
be fitted either in the plug or adaptor or in the
main fuse box. If in doubt contact a qualified
electrician.
Green and yellow
or green
f
L
Brown or red
A/lains cable routing
The mains cable should be routed away
from the appliance, the ventilation slots and
the vent outlet. It should not be obstructed
when pushed in to position between the
appliance and the wall.
Use of grill pan handle
Warning! Always use an oven glove to protect your
hand when using the grill as all metal parts can become
very hot.
The grill pan has a detachable handle. Make sure the
handle is securely located between the raised profiles
across the front of the grill pan. See the diagrams for
fitting the handle. To remove the handle, reverse the
sequence of operations.
Always take care not to touch hot surfaces when
using the grill pan handle. Ensure when using the grill
pan handle that it is centralised and secure. If the handle
is left in position when grilling, it will get very hot.
Grilling guidelines
Use the following chart for guidelines.
For thicker foods requiring longer cooking, turn the
control to a lower setting after the initial sealing on both
sides. The thicker the food, the lower the control should
be set. When grilling thicker food, the grill rack should be
turned over to its lowest position.
18