A. gutoe barand chain, 1, chain maintenance, A. guide bar and chain – Poulan PRO 305 User Manual
Page 16: General maintenance
Attention! The text in this document has been recognized automatically. To view the original document, you can use the "Original mode".
GENERAL MAINTENANCE
A good maintenance program of regular inspection
and care will increase the service life and help to main
tain the safety and performance of your saw.
• Check saw for loose bolts, screws, nuts, and
fittings regularly. Loose fasteners can cause an
unsafe condition as well as damage to your saw.
• Make all aiiyustments or repairs (except car
buretor a^ustments) with:
— spark plug wire disconnected.
— engine cool as opposed to a saw that has just
been run.
A WARNING
Have all chain saw service performedi by a quali
fied service dealer other than the items listed in
the maintenance section of this manual.
A. GUTOE BARAND CHAIN
Increase the service life of your Guide Bar and
Chain by;
— Using the saw properly and as recommended in this
—- Maintaining correct chain tension, page 8.
— Proper lubrication, page 10.
—• Regular maintenance as described in this section.
1, CHAIN MAINTENANCE
• Sharpen the chain when:
--wood chips are small and powdery.
Wood chips made by the saw chain should be
about the size of the teeth of the chain.
— saw has to be forced through the cut.
— saw cuts to one side.
I CAUTlONi I Always wear gloves when handling the
chain. The chain can be sharp enough to cut you
even though it is too dull to cut wood.
a. SHARPENING INSTRUCTIONS
Items required:
Gloves
4.5mm Diameter File
Flat File
Depth Gauge
6” File Holder
1.
) Stop the engine and discohnect the
sparkplug.
2.
) Adjust the chain for proper tension. Page 8.
3.
) Work at the midpoint of the bar, moving the
chain forward by hand as each cutter is filed.
4.
) Sharpen Cutters.
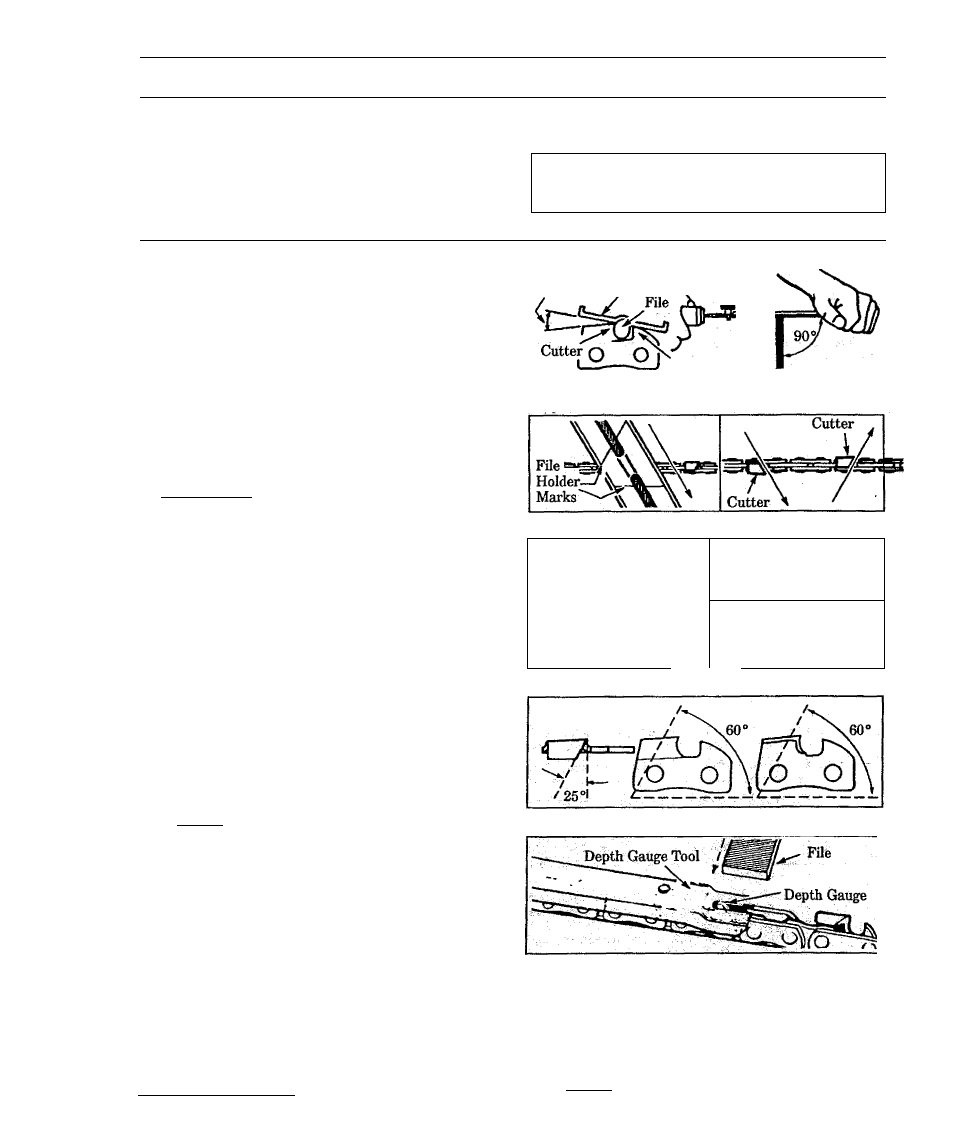
a.) Position the file holder level at a 10
angle on the top plate of the cutter and
depth ^uge. Figure 28.
h.) Align the 25® file holder marks with the
bar and parallel to the center of the chain.
Figures 29 & 31.
NOTE; If your file holder has a 30 ® markj disre
gard this mark and file at a 25® angle.
c.
) File from inside toward outside of cutter,
straight across on forward stroke in one
direction only. Use 2 or 3 strokes per cut-
tingedge. FigureSO.
d.
) Keep all cutters the same length. Fig
ure 30 .
e.
) File enough to remove any damage to the
cutting edges (side plate add top plate) of
the cutter. Figure 30.
f. ) File chain to meet specifications shown in
Figure 31.
A WARNING
Maintain the proper hook angle accordingto the
ni^ufacturer*» specMcation for the chain you
using. Too much hook angle will increase the
chj^c^ of kickback which can result in serious
iidury« Figures 31 & 33 .___________________
File Holder
Depth Gauge
Figure 28
Figure 29
Cutters
Same Length
Remove Damage
1 1^ 1
r^/
\
{o\
Ш
Side Plate Top Plate
Figure 30
Figure 31
Figure 32
5.) Correct bepth Gaug^
a. ) Kace depth
eaph cutter
depth gauge. Figure 32 .
b. ) File depth gauge with a flat file until it is
level with the top of the depth gaii^ tool.
c. ) Maintain rounded front comer of depth
gauge with a flat file. Figures 32 & 33 ,
NOTE: The veiy top of the depthgauge should be
fiat with the front half rounded off with a flat file.
1 6 -