Drive belt maintenance, Warning, A. measuring and adjusting drive belt tension – Troy-Bilt 12087 User Manual
Page 49
Attention! The text in this document has been recognized automatically. To view the original document, you can use the "Original mode".
To Drain and Fill the Tine
Attachment Transmission:
1. The tine attachment transmis
sion is not equipped with an oil
drain plug. To drain just a small
amount of gear oil, remove the dip
stick and tilt the attachment for
ward (first uncoupling it from the
Power Unit).
2. For complete drainage, remove
the left-side tine assembly (refer to
Bolo Tine Maintenance for instruc
tions), then remove just one of the
lower screws from the tiller hous
ing cover (Photo 5-10). To speed
drainage, remove the tine attach
ment dipstick to vent transmission.
Photo 5-10: Remove housing cover
screw to drain tine attachment
transmission gear oil.
Note: If you find a plastic washer
on the cover screw you remove,
discard the washer. There is no
need to install a replacement
washer.
3. Once all gear oil has drained,
reinstall the housing cover screw
securely (first coat its threads with
non-hardening gasket sealant).
4. Be certain to refill the transmis
sion with the correct amount of
gear oil before operating the tiller
again.
DRIVE BELT MAINTENANCE
A
WARNING
To help avoid personal injury,
stop the engine, wait for all
moving parts to come to a
complete stop, remove the
electric start key, disconnect
the spark plug wire and move
the wire away from the spark
plug, and let the engine and
muffler cool before inspect
ing, adjusting or replacing
the drive belt.
A. Measuring and Adjusting
Drive Belt Tension
On a new tiller (or if a new belt
is installed), the belt tension will
probably need to be adjusted after
the first two (2) hours of operation.
Thereafter, check belt tension
every ten (10) operating hours.
Maintaining the right tension is
important to good tiller perfor
mance and long belt life. If too
loose, the belt will slip on the pul
leys, and be unable to deliver full
power to the wheels and tines. A
loose belt will also wear prema
turely.
While checking belt tension,
also inspect the belt for cuts,
cracks, deterioration, etc. Don’t
continue using a belt that isn’t in
good shape. You’re sacrificing
tiller performance by doing so.
Tips on keeping the drive belt in
top condition include:
• Always put the Wheels/Tines/
PTO Drive Lever in NEUTRAL
when the tiller is not in use.
• Keep tension adjusted correctly.
• Don’t “speed shift” when mov
ing the Wheels/Tines/PTO Drive
Lever between FORWARD and
REVERSE.
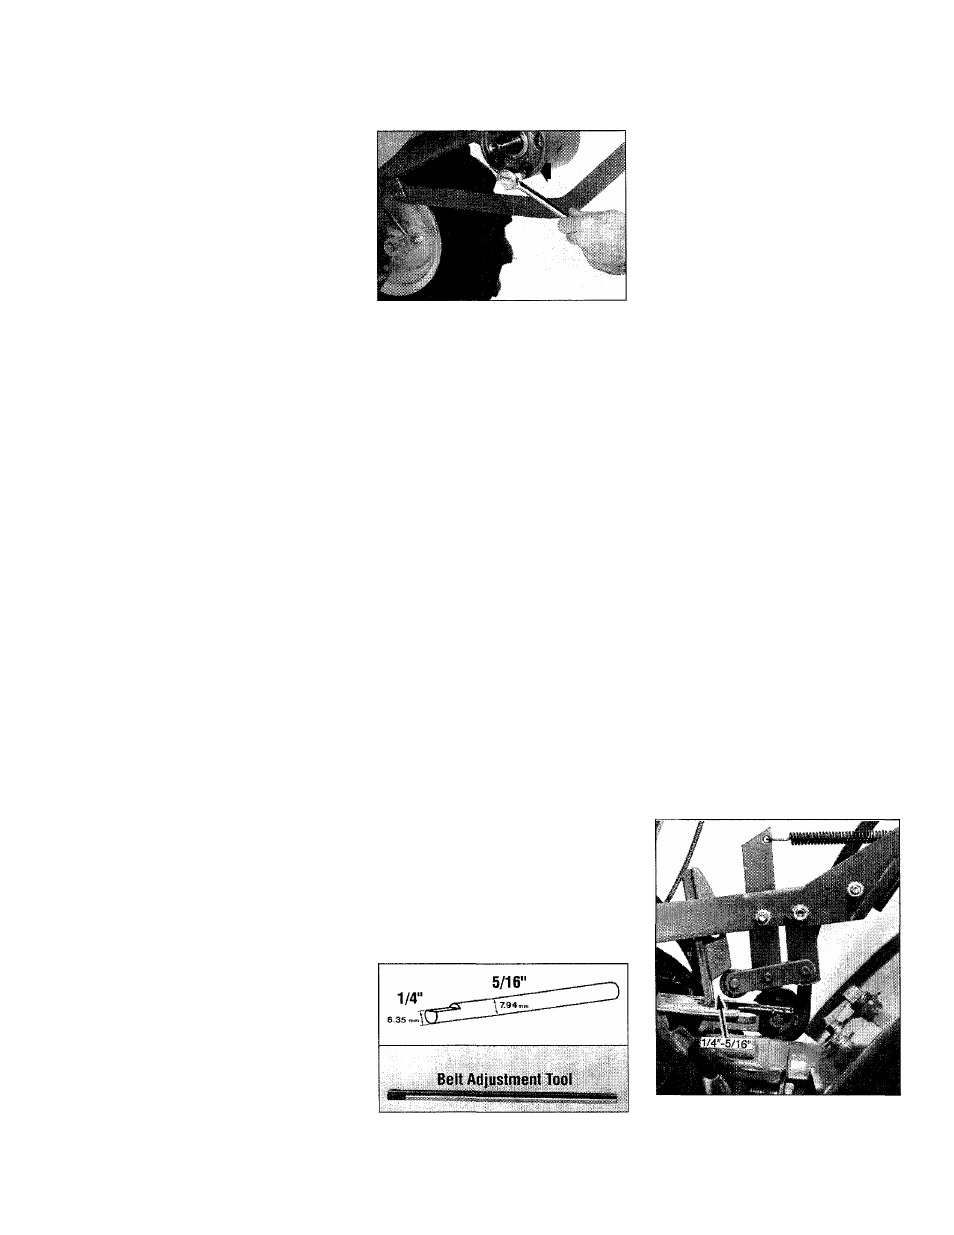
How to Measure Belt Tension:
1. Before taking a measurement,
be sure the linkages and pivot
points on the Wheels/Tines/PTO
Drive Lever are clean and lubri-
Photo 5-11: Use this belt adjust
ment tool to measure and adjust
drive belt tension.
cated. If there is any binding, you
won’t get true measurements.
Also, you’ll need the belt adjust
ment tool you received with your
new tiller (see Photo 5-11).
2. Move the Wheels/Tines/PTO
Drive Lever fully down to the
EORWARD position. The clutch
roller at the bottom of the lever
should be positioned underneath
the belt adjustment block (Photo
5-12). Don’t let the clutch roller
move during the next few steps. If
it moves, you’ll get a false belt ten
sion reading.
Photo 5-12: Shift into FORWARD
and measure distance between
roller and upright bracket using the
belt adjustment tool.
49