Starter rope, E. starter rope – Poulan 1600 User Manual
Page 18
Attention! The text in this document has been recognized automatically. To view the original document, you can use the "Original mode".
£. STARTER ROPE
•
This is a complicated and potentially hazardous
task.
It is recommended Uiat only a qu^ifled service
dealer perform this repair.
A
warning
Always wear eye protection and gloves when servicing
the starter rope. The recoil spring, located beneath the
pulley, is under tension. If the spring flies out, serious
injur}" can result.
• To repair or replace:
1- Disconnect spark plug wire.
2. Drain all fuel from tank.
3. Remove the two screws and two washers from the
fuel tank. Figure 24. Set fuel tank aside.
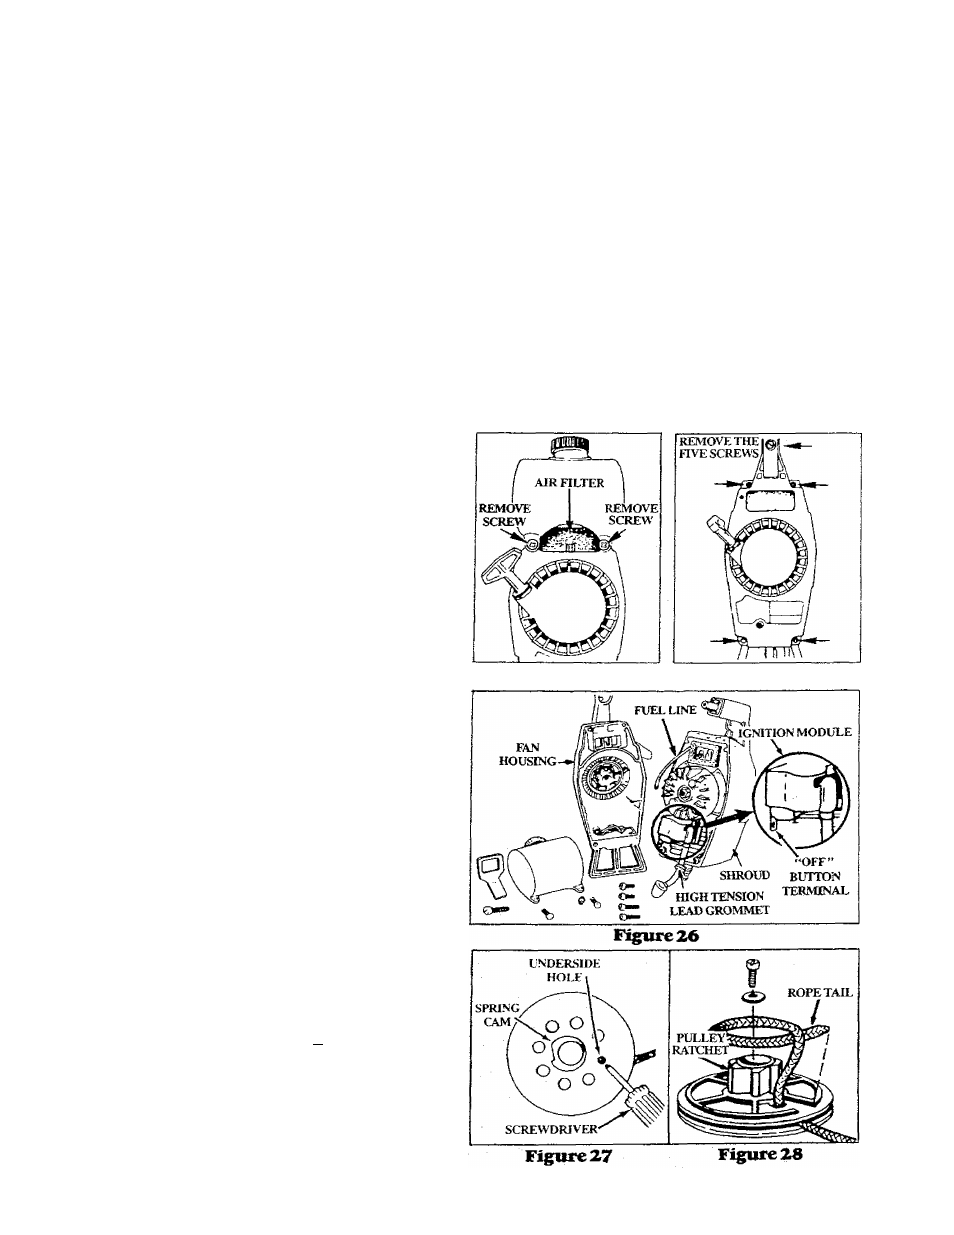
4. Removethefivescrewsfrornfanhousing,Figure25.
5. Separate fan housing from shroud about 2 inches.
6. Slide high tension lead grommet from slot in fan
housing. Figure 26,
7. Separate fuel line leaving the connector in the end
attached to the fuel tank. Figure26.
8. Separate the fan housing completely from the
shroud. Figure 26.
9. If the starter rope is not broken, release the spring
tension by pulling about 12 inches of rope from the
pulley and catch the rope in the notch as shown.
Figure30.
jCAUTlON:
} Be sure the tension on the starter
spring is released by rotating the pulley clock-
лу15е —rk with your finger while pushing down
on the pulley ^vith your hand.
10. Remove screw from the starter pulley veiy carefully.
Rotate the pulley clockwise until no spring
tension is felt and carefully lift the pulley out of the
fan housing. Figure 29. Remove the old rope.
11. Move away from the fuel tank with the rope to be
installed. Use amatch and melt both ends of the rope
to prevent fraying.
12.
Pullthemeltedendsthroughathick,cleanrag
while
the rope is still hot to obtain smooth, pointed tips.
Б. Insert one end of the rope through the handle and
secure with a knot.
14. Insert the free end of rope through rope exit hole into
the inside of the fan housing,
15. GuideropeinsidepuUey, then up through the pulley
ratchet side of pulley hole to the outside by pushing
the rope through from the hole on the spring cam side
with a small Phillips screwdriver. Figure 27.
16. Wrap rope counterclockwise Л around pulley
ratchet and tuck loose end back under rope where it
comes out of hole. Leave a 1/4 to 1/2 inch tail laying
flat on the top of the pulley. The rope tail must not
extend beyond the edge of the pulley. Figure 28.
17. Carefully replace pulley in the housing. Be sure the
pulley is aU the way down. Replace washer and screw
and tighten. Figure 29.
18. Turn the puUey clockwise
until all the rope is
wrapped onto the pulley.
19. Pull out the rope by the handle (approximately 12")
and hold the pulley,
20.
Pullthe
12inchslackintheropeintothemsideofthe
fan housing and catch rope in pulley notch. Figure
30.
21. Hold the rope taut and make 2 complete turns of the
pulley counterclockwise
to place tension on
the spring. Continue to hold the pulley to retain
tension.
22. Aligh pulley notch with rope exit hole, release slack
in the rope and puli starter handle to the full extent
of the rope. Releasethepulley and slowly allow the
rope to wind around the pulley.
23. Reverse procedure for re-assembly of fan housing
to shroud.
Figure 24
Figure 25
18