Replacing the halogen o ven light – CDA SV310SS User Manual
Page 20
19
Fig. 4
26
Replacing the Halogen O
ven Light
W ARNING: Ensure the applian
ce is switched o before replacing
the lamp to avoid the
possibility
of electric sho
ck.
– Let the o
ven cavity and the heating elements
to cool down;
– Swi
tc
Top Right Lamp:
– Remove the p
rotecti
ve cover
C (fig. 8);
– Replace the
halogen lamp
B with a new
one suitable
for high
temperatures
having the following
specifications:
230V and same power (check watt
power as s
tamped in the lamp itself) of the
replaced lamp.
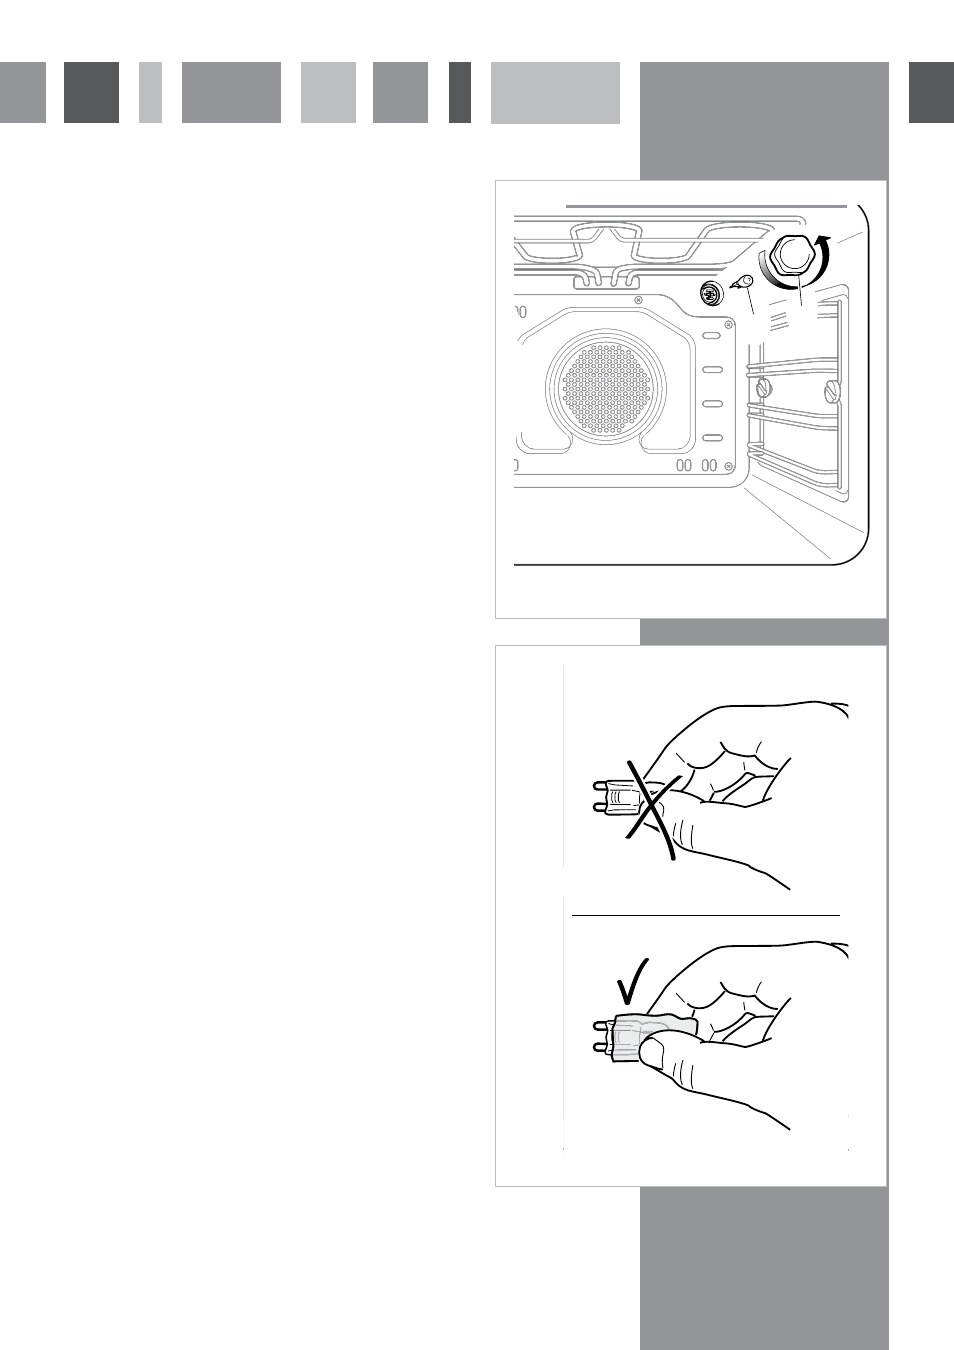
IMPORTANT W ARNING: Never replace the bulb with bare hands;
contamination f
rom your finge
rs can cause p
remature failu
re.
Always use a clean cl
oth or gl
oves.
– Refit the p
rotecti
ve cover;
Left Lamp:
– Remove the left wi
re rack by unsc
rewing the fixing sc
rews.
– Press down from the top the protecti
ve cover
A (fig.
8) and remove it by
rotating
on the lower side.
IMPORTANT : never use screwdrivers or other
utensils
to remove the cover
A. This could damage the enamel of the oven
or the lampholde
r. Ope
rate only by hands.
– Replace the halogen
lamp
B with a new
one suitable
for high
temperatures
having the following
specifications:
230V and same power (check watt
power as s
tamped in the lamp itself) of the
replaced lamp.
IMPORTANT W ARNING: Never replace the bulb with bare hands;
contamination f
rom your finge
rs can cause p
remature failu
re.
Always use a clean cl
oth or gl
oves.
– Refit the p
rotecti
ve cover
A operating in
reverse o
rder.
ATTENTION: the notch in the inner
edge of the cover must be orien
ted
toward the lamp.
– Assemble the left wi
re rack.
Note: O
ven bulb
replacement is n
ot covered by your gua
rantee.
A
B
B C
1
2
A
A
Fig. 8
W RONG
CORRECT
Changing the Oven Lamp
Before any maintenance is started involving electrical
parts, the oven must be disconnected from the power
supply.
If the oven has been in use, let the oven cavity and the
heating elements cool down before attempting any
maintenance.
Never replace the bulb with bare hands as
contamination from your fingers can cause premature
failure. Always use a clean cloth or gloves.
Changing the bulb (fig. 3)
Unscrew the protective cover.
Carefully remove the bulb and replace with a new one
suitable for high temperatures with the same specification as
the original bulb.
Refit the protective cover.
Fig. 3
26
Replacing the Halogen O
ven Light
W ARNING: Ensure the applian
ce is switched o before replacing
the lamp to avoid the
possibility
of electric sho
ck.
– Let the o
ven cavity and the heating elements
to cool down;
– Swi
tc
Top Right Lamp:
– Remove the p
rotecti
ve cover
C (fig. 8);
– Replace the
halogen lamp
B with a new
one suitable
for high
temperatures
having the following
specifications:
230V and same power (check watt
power as s
tamped in the lamp itself) of the
replaced lamp.
IMPORTANT W ARNING: Never replace the bulb with bare hands;
contamination f
rom your finge
rs can cause p
remature failu
re.
Always use a clean cl
oth or gl
oves.
– Refit the p
rotecti
ve cover;
Left Lamp:
– Remove the left wi
re rack by unsc
rewing the fixing sc
rews.
– Press down from the top the protecti
ve cover
A (fig.
8) and remove it by
rotating
on the lower side.
IMPORTANT : never use screwdrivers or other
utensils
to remove the cover
A. This could damage the enamel of the oven
or the lampholde
r. Ope
rate only by hands.
– Replace the halogen
lamp
B with a new
one suitable
for high
temperatures
having the following
specifications:
230V and same power (check watt
power as s
tamped in the lamp itself) of the
replaced lamp.
IMPORTANT W ARNING: Never replace the bulb with bare hands;
contamination f
rom your finge
rs can cause p
remature failu
re.
Always use a clean cl
oth or gl
oves.
– Refit the p
rotecti
ve cover
A operating in
reverse o
rder.
ATTENTION: the notch in the inner
edge of the cover must be orien
ted
toward the lamp.
– Assemble the left wi
re rack.
Note: O
ven bulb
replacement is n
ot covered by your gua
rantee.
A
B
B C
1
2
A
A
Fig. 8
W RONG
CORRECT
WRONG
CORRECT