Assemblf, Danger, Assembly – Troy-Bilt 13027 User Manual
Page 13: Remove battery from tractor, Reinstall battery
Attention! The text in this document has been recognized automatically. To view the original document, you can use the "Original mode".
Assemblf
DANGER
• Battery electrolyte solution
contains sulfuric acid which
can burn your skin, eyes and
clothes.
• Wear protective ciothing,
rubber gloves and shield eyes
with safety goggles when you
work near battery.
• Keep sparks, flame and all
smokers’ materials away.
• Ventilate area when charg
ing battery in an enclosed
space.
• The venting path of the bat
tery must always be open.
Step 7: Remove Tractor Battery
For Servicing, Then Reinstall
If your battery has not been
dealer serviced or charged, it will
be necessary to remove the battery
from the tractor, activate it with
electrolyte solution and charge it
correctly, then reinstall the battery.
We urge you, however, to have a
professional battery technician
do this job for you if you are not
experienced in doing this work.
Tools Required: one 7/16"
wrench; one 3/8" wrench; two
quarts of battery-grade electrolyte
solution; battery charger; flash
light; safety glasses and gloves;
baking soda.
Remove Battery from Tractor:
1. Unlatch the two black, rubber
hold-down straps securing the rear
of the tractor hood. One strap is
located on each side of the trac
tor’s control panel. Tip the hood
upward and forward.
2. The battery is located at the
back of the engine compartment.
Use a 7/16" wrench to remove the
two nuts securing the hold-down
bracket over the battery. Put the
hold-down bracket aside along
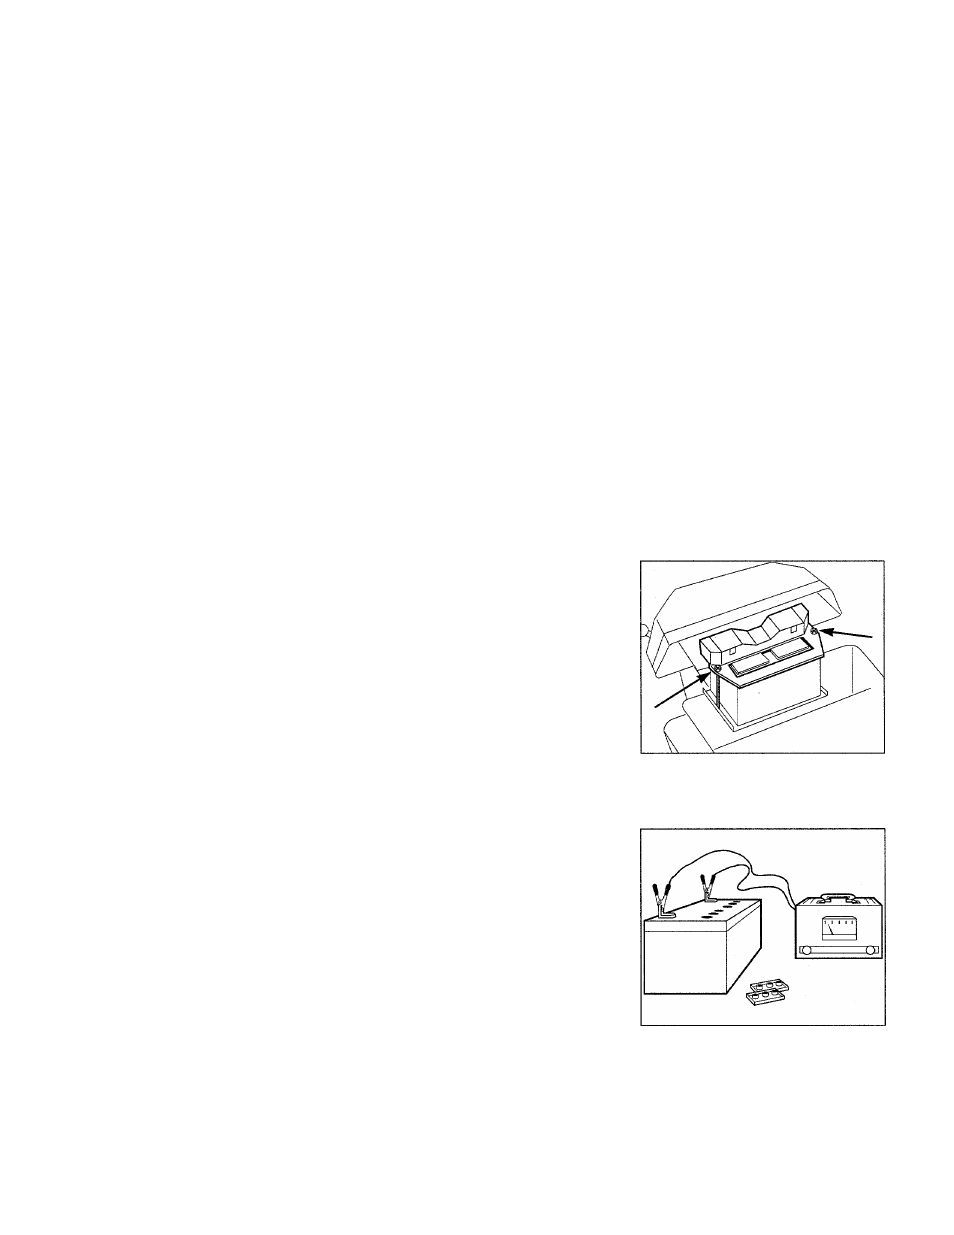
with its hardware. See Figure 2-8.
3. If connected, use a 3/8" wrench
to disconnect the black battery
cable from the negative (-) battery
terminal. Bend the cable away.
4. Discoimect the red battery cable
from the positive (-I-) battery termi
nal. Use a 3/8" wrench.
5. Remove battery from tractor.
Take the battery to a qualified ser
vice technician, or place it on a
wood or plastic surface to service
the battery.
To Activate the Battery;
6. Make sure all switches are in the
‘Off’ position (on battery charger).
Before opening the electrolyte,
read instructions on its container.
Also read operating instructions
for the battery Charger.
7. Put on safety goggles and rub
ber gloves. Remove filler caps
from top of battery. Fill battery
cells to proper level with elec
trolyte. LET BATTERY SIT FOR
20 MINUTES BEFORE CON
TINUING.
To Charge the Battery:
8. With filler caps removed, con
nect battery to charger and charge
at 2 Amperes until specific gravity
reading is 1.265-to-1.275. This
may take several hours. When
charged, the electrolyte in the cells
will be gassing freely—^the surface
will be bubbling. Wearing your
safety goggles, examine the cells
with your flashlight. Turn the
charger OFF. Disconnect it from
the battery.
9. If electrolyte level has fallen, re
fill cells to proper level with dis
tilled water only.
10. Reinstall the battery caps.
Wash any acid spillage off the bat
tery with water and baking soda.
Reinstall Battery
11. If the ignition key is in the
keyswitch, remove the key.
12. Place the battery back on the
tractor battery support—the posi
tive terminal must be on the left-
hand side as viewed from the oper
ator’s position.
13. Reconnect red positive cable to
the positive battery terminal.
Securely attach with the original
screw and nut.
14. Reconnect black negative
cable to negative battery terminal.
15. Re-attach the hold-down
bracket over the battery.
Figure 2-8: Remove battery hold
down bracket so battery can be re
moved for servicing.
Figure 2-9: Fill cells with elec
trolyte solution, then charge battery
at 2 amperes until specific gravity
reads between 1.265 -1.275.
13