SINGER 331K4 User Manual
Page 7
Attention! The text in this document has been recognized automatically. To view the original document, you can use the "Original mode".
TO WIND THE BOBBIN
(See “STOP MOTION DEVICE” for
treadle machines on page 11)
Bobbin winder should be fastened to table with its
driving pulley approximately 1 /4 inch in front of the
machine belt. Bobbin winder driving pulley will then
make firm contact with machine belt when thumb latch
is pressed down. Bobbin winder pulley will be released
from contact with belt when sufficient thread has been
wound upon the bobbin.
Place bobbin on spindle, pushing it on as far as it
will go and pass thread through threading points, as
shown in Fig. 11.
Wind end of thread around the bobbin a few times
in the direction shown in Fig. 11. Press down on thumb
latch, pushing driving pulley over against belt.
Start the machine.
Bobbins can be wound while the machine is stitching.
TO AVOID SPILLAGE: Regulate bobbin winder to
stop automatically when bobbin is wound approx
imately 1/16 inch short of bobbin rim.
OIL
TENSION
/
CONTROL ^
LOOSEN TO ADJUST^
FOR EVEN WINDING
^
NOTE—TIGHTEN FOR
MORE THREAD ON BOBBIN
1.
PLACE BOBBIN
ON SPINDLE
2. WIND THREAD
3. PRESS DOWN
Fig. 11. Winding the Bobbin
SLOT
n
r--
Fig. 12. Placing Bobbin in Bobbin Case
TO THREAD THE BOBBIN CASE
Hold the bobbin so that the thread will unwind in the
direction shown in Fig. 12.
Hold the bobbin case as shown in Fig. 12 and place
thé bobbin into it.
Pull the thread into the slot 1, Fig. 13 and under the
tension spring 2, Fig. 13.
Draw the thread into the delivery eye at the end of
the tension spring, as shown at 3, Fig. 14.
1. PULL THREAD
INTO SLOT
2. DRAW THREAD
DOWN AND
UNDER SPRING
Fig. 13. Pulling the Thread into the Slot
3. TURN BOBBIN
CASE OVER
AND DRAW
.THREAD UP INTO
DELIVERY EYE
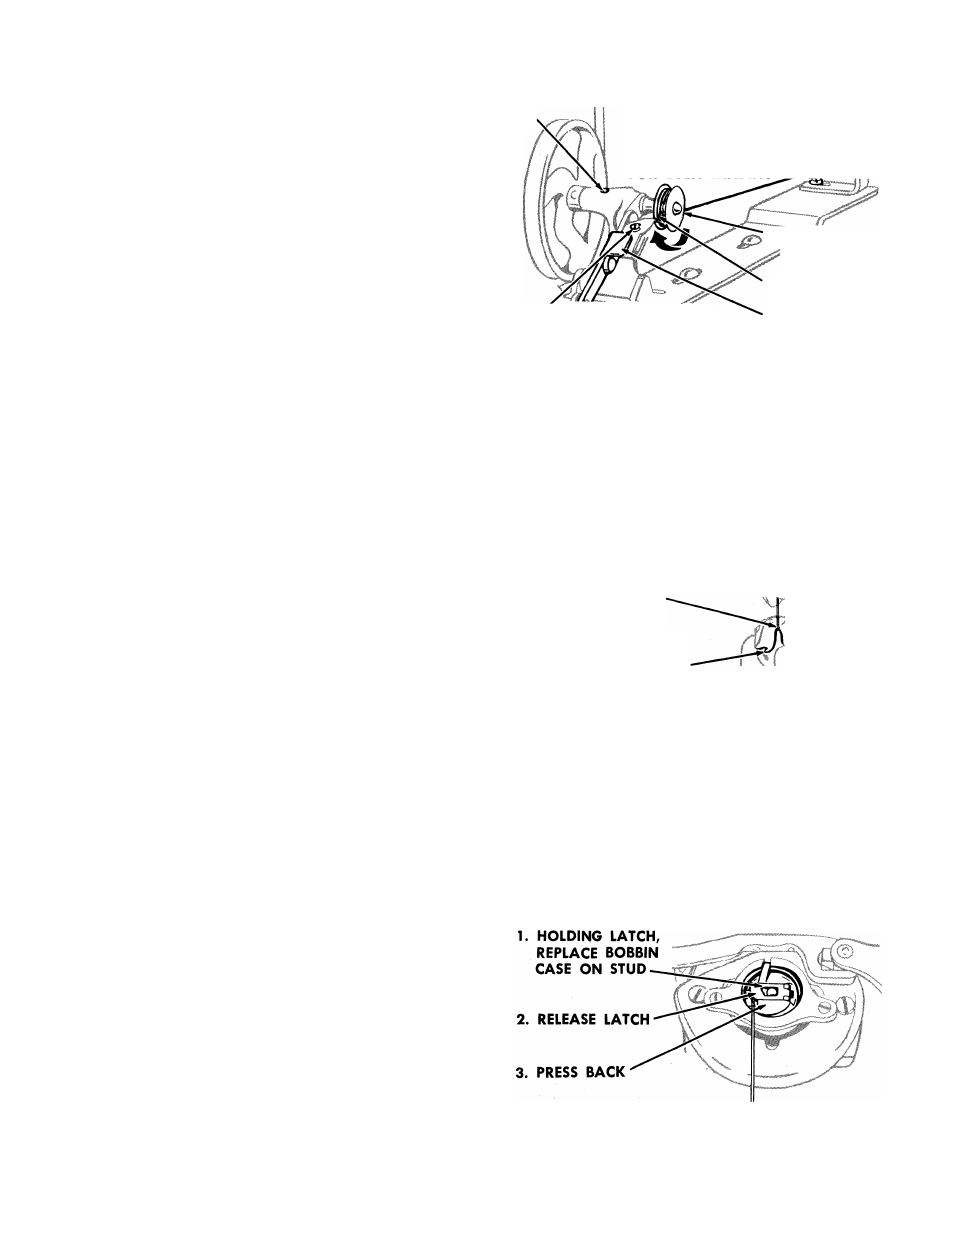
TO REPLACE THE BOBBIN CASE
Fig. 14. Drawing the Thread Under the Tension Spring
After threading, take bobbin case by latch in the
left hand.
Place bobbin case on centre stud of shuttle body
with position finger pointing upward, in front of notch
in upper plate over shuttle race, as shown in Fig. 15.
Release latch.
Press bobbin case back until latch catches groove
near end of stud.
Allow about two inches of thread to hang free.
Fig. 15. Bobbin Case Threaded and Replaced