To time the hook, To remove the hook, To remove the bobbin case – SINGER 142W25 User Manual
Page 9
Attention! The text in this document has been recognized automatically. To view the original document, you can use the "Original mode".
14
To Time the Hook
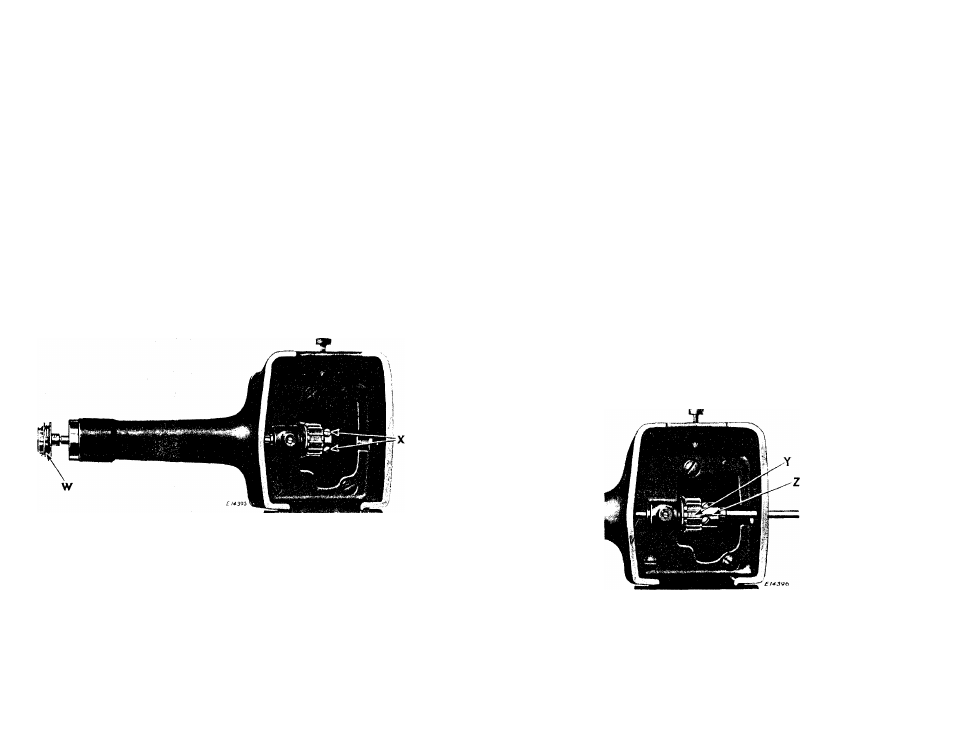
Loosen the screws (X,Fig.18) In the hook shaft connection
belt pulley and turn the balance wheel toward you until the
needle bar goes to Its lowest position and upward until the lower
mark (Q,Fig.17) across the needle bar Is Just visible at the end
of the bushing, then stop turning and hold the wheel firmly; with
the left hand, turn the hook until the point (R,Fig.17) is at the
center of the needle — 1/16 Inch above Its eye — see that the
end play to the shaft Is almost eliminated, then retlghten the
pulley screws (X).
To Remove the Hook
Loosen the screws (X,Fig.18), remove the screw (E,Flg.6) and
the cylinder end cover (F), and draw out the hook and shaft (W,
Fig.18).
Fig. 18. Removing the Hook
To Set the Hook To or From the Needle
Loosen the set screws (X,Fig.18) and the set screw (y,Fig.17)
that holds the bushing, and carefully drive the bushing to the
right to set the hook closer to the needle, or to the left to set
It farther from the needle. After carefully adjusting and timing
the hook to the needle, tighten the screws (V,Fig.17 and X,Flg.
18)'. Leave the least amount of end play possible to the shaft,
for lubricating purposes.
To Remove the Bobbin Case
To remove the bobbin case from the sewing hook to thoroughly
clean the bobbin case, remove the screw (U,Fig. 17) and open the
gib (T); turn the balance wheel until the point of the hook is
toward you and remove the bobbin case. See that there Is no lint
or dirt under the tension spring.
When replacing the bobbin case In the sewing hook, have the
position the same as when removing it. Be sure to have the notch
at the top of the bobbin case (at G,Flg.6) entered by the stop on
the cylinder end cover, then close the gib (T,Fig.17) and secure
ly tighten the screw (U), being careful not to damage the head of
the screw.
To Remove the Belt from Within the Arm
Slide the arm shaft connection belt (Y,Fig.19) off the lower
pulley, remove the balance wheel from the end of the arm shaft,
loosen the arm shaft bushing (back) screw (B,Flg.2) and remove
the bushing, lift the belt up through the arm cap hole as far as
possible and draw It out through the space formerly occupied by
the bushing.
When replacing the belt see that the sewing hook and needle
are In correct time before running the belt on the lower pulley,
and verify the correctness of the timing before commencing to
sew.
15
Fig. 19. Putting Belt on Lower Pulley
with Belt Replacer 244005
To facilitate the replacing of the belt on the lower pulley,
use belt replacer 244005 (V,Fig.19). Rest the replacer In the
loop of the belt and slide It over the hub of the pulley, as