Checking cutter blades, Fence – Sears 149.23632 User Manual
Page 6
Attention! The text in this document has been recognized automatically. To view the original document, you can use the "Original mode".
CHECKING CUTTER BLADES
A
CAUTION; MAKE SURE THE SWITCH IS IN THE OFF
POSITION AND CORD IS UNPLUGGED BEFORE PRO
CEEDING WITH CHECKING CUTTER BLADES.
The blades in your Jointer-Planer have been adjusted at the
factory to assure proper operation. Shipping and handling, how
ever, may cause rriisalignment. For accurate cutting, the blades
must be .003-in. higher than the outfeed table (thickness of a
piece of paper) when positioned at the highest point.
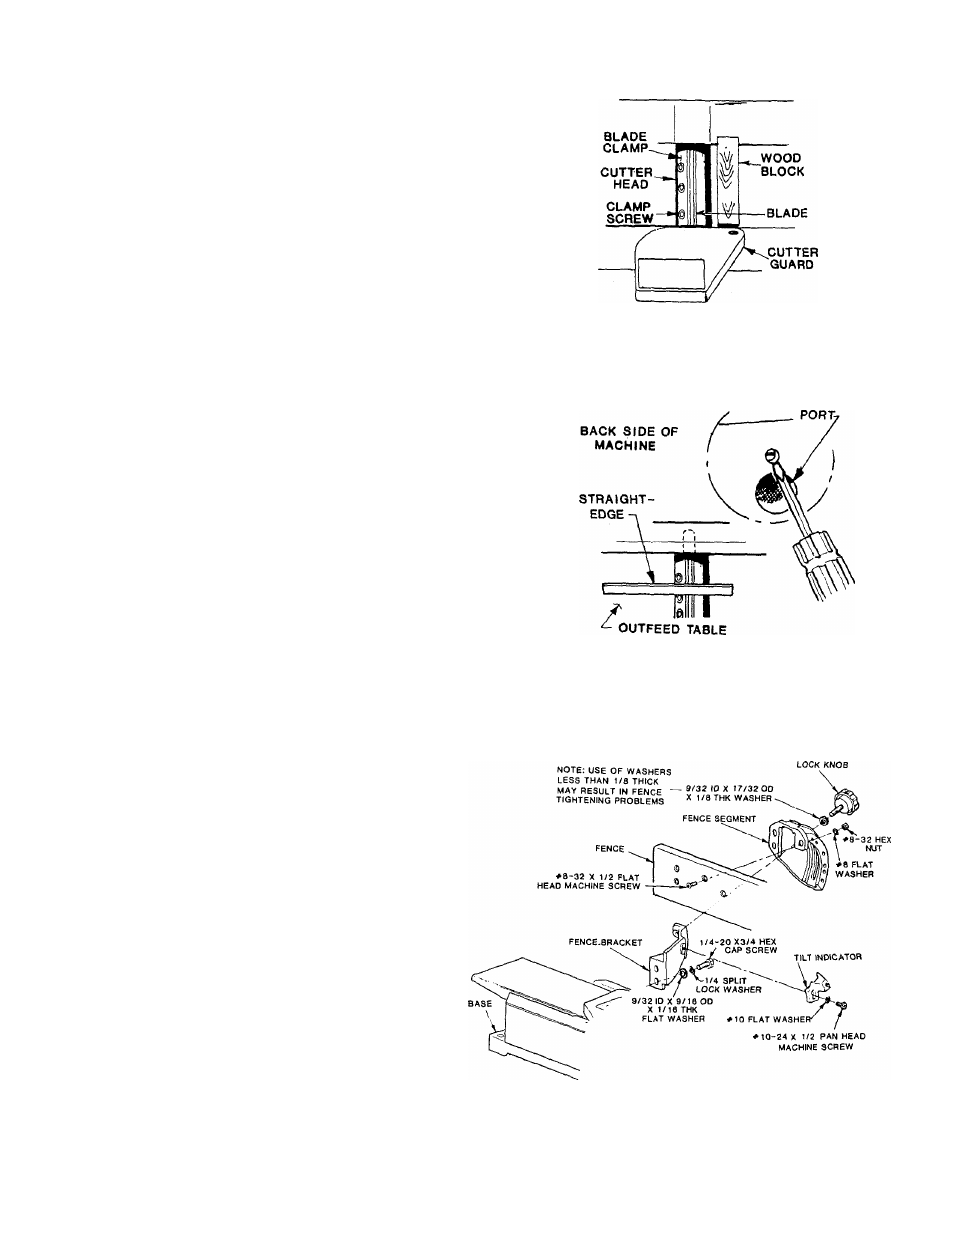
1. Block the cutter guard open with a scrap piece of wood about
5-1/2" long between the fence and cutter guard.
2. Locate the slot in the cutter head shaft through the small
hole in the backside of the machine directly above the vacuum
port. Rotate the cutter head with a screwdriver until one of
the blades is at its highest position.
3. Place a straight edge over the outfeed table and the blade.
The straight edge must touch evenly on the outfeed table at
both ends of the blade. Rotate the cutterhead slowly, and
making sure the blade lightly touches the straight edge. If the
straight edge rises or blades do not touch, follow the "RE
PLACING CUTTER BLADES" procedure in the "MAINTEN
ANCE” section.
CHIP DI3CHARGE/VACUUM
FENCE
1. From among the loose parts find the following:
(1)
Fence
(2)
Fence Brackets
(2) Fence Segments
(2) Tilt Indicators
(2) Lock Knobs
(4) 1/4-20 X 3/4" Hex Cap Screws
(4) 1/4 Lock Washers
(4) 9/32 ID x9/16 0Dx 1/16 Thick Washers
(2) 9/32 ID X 17/32 OD x 1/8 Thick Washers
(6) #8-32 X 1/2 Flat Head Machine Screws
(6) #8 Flat Washers
(6) #8-32 Hex Nuts
(2) #10-24 X 1/2 Pan Head Machine Screws
(2) #10 Flat Washers
1.
Attach fence brackets to base using
1/4-20
x
3/4
hex cap
screws,
9/32
ID
X 1/16
thick washers and
1/4
lock washers,
snug but do not tighten.
2. Attach fence segments to fence with #8-32 flat head screws,
#8 flat washers and #8-32 hex nuts.
3. Place assembled fence on
inside the fence segments.
machine with fence brackets
4. Position lock knobs with 9/32 ID x 17/32 OD x 1/8 thick washers
thru slots in fence segments and thread into fence brackets.