How to use your mower, To stop motor and blade, To start motor and engage blade – Sears 247.370291 User Manual
Page 8: Figure 5, Motor/blade control, Cutting height adjustment
Attention! The text in this document has been recognized automatically. To view the original document, you can use the "Original mode".
HOW TO USE YOUR MOWER
A
A
A
WARNING: DO NOT OPERATE THE
MOWER WITHOUT THE PROTECTIVE
SHIELD ON THE REAR OF THE C ECK IN
PLACE.
WARNING: BE SURE THAT L/.WN IS
CLEAR OF STONES, STICKS, WIF ES, OR
OTHER OBJECTS WHICH COUL ) DAM
AGE LAWN MOWER OR ENGINE. SUCH
OBJECTS COULD BE ACCIDE^ TALLY
THROWN BY THE MOWER IM ANY
DIRECTION AND CAUSE SERIOLS PER
SONAL INJURY TO THE OPERATI )R AND
OTHERS.
WARNING: TO PREVENT ELECTRIC
SHOCK, DO NOT OPERATE THE MOWER
IN DAMP OR WET LOCATIONS.
TO STOP MOTOR AND BLADE
• Release the motor/blade control handle to stop the
engine and blade. (You will hear a high pitched
noise, which is the result of deceleration of he elec
tric motor. Sparking at the top of motor, inside the
motor cover, is also normal during decelerati sn.)
WARNING: THE BLADE CONTINUES TO
ROTATE FOR A FEW SECONDS AFTER
THE MOTOR IS SHUT OFF. IF MOTOR
DOES NOT COME TO AN IMMEDIATE
STOP WHEN THE MOTOR/BLADE CON
TROL HANDLE IS RELEASED, CC NTACT
AN AUTHORIZED SERVICE LOCATION.
• Disconnect the power source to prevent a( cidental
starting while equipment is unattended.
A
A
WARNING: IF YOU STRIKE A FOREIGN
OBJECT, STOP THE MOTOR. D SCON-
NECT THE POWER SOURCE, THOR
OUGHLY INSPECT THE MOWER FOR
ANY DAMAGE, AND REPAIR TH E DAM
AGE BEFORE RESTARTING AND OPER
ATING THE MOWER. EXTENSIVE VIBRA
TION OF THE MOWER DURING OPERA
TION IS AN INDICATION OF DAMAGE.
THE UNIT SHOULD BE PRO IflPTLY
INSPECTED AND REPAIRED.
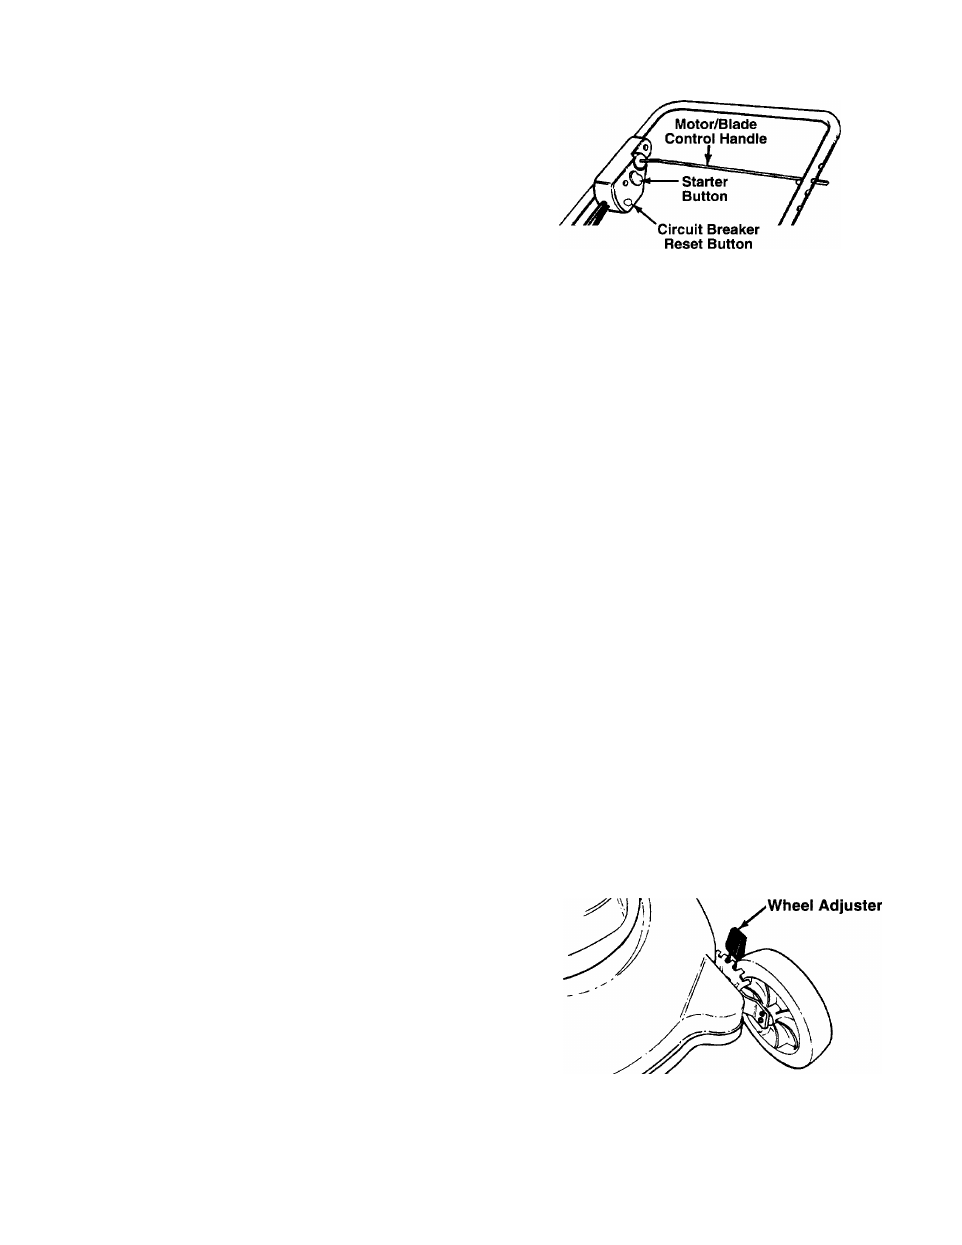
TO START MOTOR AND ENGAGE BLADE
Standing behind the unit, depress starter button on
the motor/blade control. Pull motor/blade control
handle up against handle. Release starter buticn.
IMPORTANT: YOUR MOWER IS EQUIPPE } WITH
A CIRCUIT BREAKER, LOCATED O vl THE
MOTOR/BLADE CONTROL HOUSING. SEE ^GURE
5. IF THE CIRCUIT BREAKER TRIPS, RESET AS
INSTRUCTED IN THE MAINTENANCE SECTION.
FIGURE 5.
MOTOR/BLADE CONTROL
A
WARNING: THE MOTOR/BLADE CON
TROL ON THIS MOWER IS INSTALLED
TO MINIMIZE THE RISK OF BLADE CON
TACT INJURY AND IS REQUIRED BY
FEDERAL
REGULATIONS.
DO
NOT
UNDER
ANY
CIRCUMSTANCES
ATTEMPT TO DEFEAT THE FUNCTION
OF THE MOTOR/BLADE CONTROL.
The motor/blade control requires the operator to be
behind the handle to start and run the mower. When
the operator releases the control handle, the motor
will stop and an internal brake helps the blade to stop
quickly.
When the operator leaves the operating position to
change the cutting height, or pick up sticks or other
objects in the way, the motor will stop automatically
when the motor/blade control lever is released.
CUTTING HEIGHT ADJUSTMENT
A
WARNING: TURN OFF MOTOR AND DIS
CONNECT
POWER
CORD
BEFORE
ADJUSTING THE CUTTING HEIGHT.
Each wheel has an adjuster lever to set the cutting
height on your mower. They should always be set to
the same position.
• Raise wheels for low cut and lower wheels for high
cut.
• To change cutting height, move adjuster levers
toward wheels. See figure 6. Move wheels up or
down to suit your requirements. Be sure all four
levers are in the same setting.
FIGURE 6.
• Adjust cutting height to suit your requirements. Refer
to the “Mowing and Mulching Tips” on page 9. (The
height adjusters may seem hard to move when new.
They will operate easier after some use.)