When using the c-ph200 outdoor pan/tilt head – Toa C-CH210FH User Manual
Page 13
13
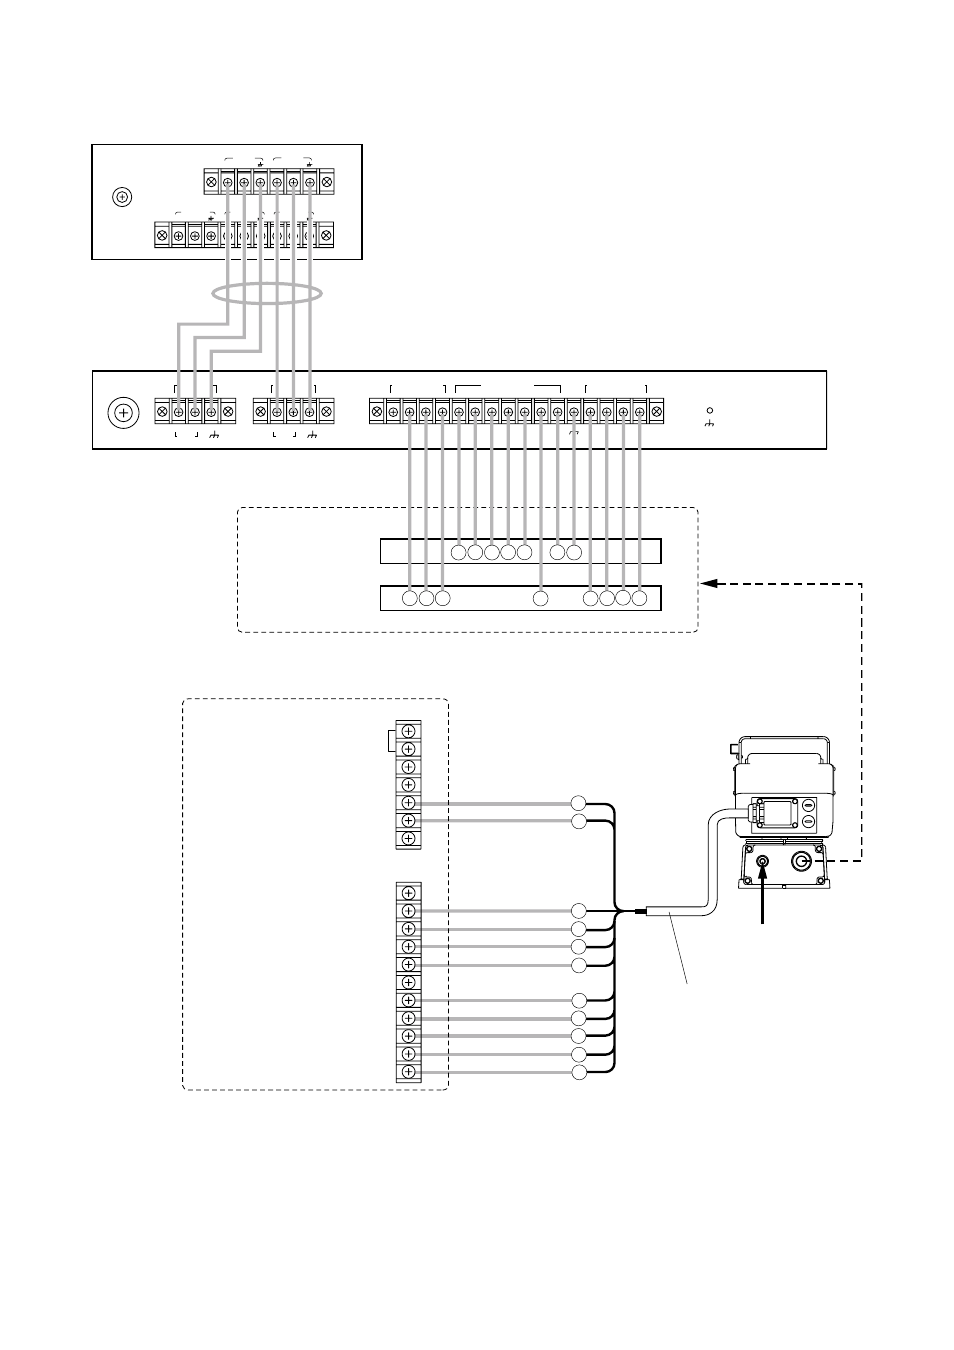
MAIN POWER
FUSE 1 A
24 V AC
1
2
24 V AC
1
2
HOUSING POWER
MAIN POWER
±
6 V DC
FOCUS ZOOM COM
UP
DOWN RIGHT LEFT AUTO CAMERA COM
COM WIPER DEF ON-AC
IRIS
MAIN POWER 24 V DC
HOUSING POWER 24 V AC
REMOTE CONTROL UNIT
model CC-5011B
HOUSING
POWER
MAIN
POWER
CAMERA 2
1
2
CAMERA 3
1
2
CAMERA 1
1
2
1
2
1
2
CC-5941B 24 VAC Adapter
CC-5011B Direct Control Remote Controller*
2
Note
Note correct polarity when connecting the dedicated AC adapter.
Reversed polarity connections will cause damage to equipment.
Terminal (lower)
Terminal (upper)
Inside of C-PH200
C-CH210FH
13
VIDEO OUT
VIDEO OUT
12
VIDEO GND
VIDEO GND
10
ZOOM
9
FOCUS
8
IRIS
7
LENS COM
6
NC
11
NC
5
WIPER
4
DEF
3
CAMERA POWER
CAMERA POWER
2
AC HOT
1
AC COM
6-core cable*
1
1
2
3
4
5
7
8
9
10
12
13
1 2 3 4
5
7
9 10
12
7
3
1 5 4 2
Junction circuit board terminal block (B)
Junction circuit board terminal block (A)
Coaxial shield
Coaxial core
Peach
White
Orange
Purple
Red
Gray
Blue
Yellow
Green
C-PH200 Outdoor-use
Pan/tilt Head**
To VIDEO terminal
Housing cable
Note
Take care not to connect the AC input to the video output.
If connected by mistake, the camera will fail.
8.1.2. When using the C-PH200 Outdoor Pan/tilt Head:
*
1
Use cables with diameter of over 1 mm when connecting the CC-5941B to the CC-5011B.
*
2
For how to mount the C-PH200 and the CC-5011B, refer to their respective instruction manuals.