Studiologic CMK-149 User Manual
Page 4
english
The CMK 149 is a MIDI keyboard which connects to the sound card of a PC (game port) or to a sound module
(expander). If the CMK149 is connected to a PC with the cable supplied, it is powered directly from the PC and
does not require the use of an external power adapter. As soon as you have installed the software supplied you
can begin to make music. If you connect the CMK 149 to a sound module you will need to use an external
power adapter (9VDC, 500ma, Tip Positive (+)).
Contents:
- CMK 149
- 1.8-metre (6-feet) Midi to game port cable (1xD-sub 15 male / 2xDIN 5 male)
- Two CD-ROMs
- Instruction manual
Technical Specifications
- 49 full size synth action keys (4 octaves C-C)
- Velocity Sensitive
- Compatible with all PC Sound Cards and/or or sound modules
- Pitch & Modulation Wheels
- MIDI Out jack
- 3 power systems:
1) Input for external power adapter (9VDC, 500mA,Tip Positive (+))
2) PC sound card through the MIDI cable provided
3) 9 v. battery
- Sustain Pedal Jack
- ON/OFF switch with LED
- 1 switch for Program change
- 1 switch for Bank Select
- 1 switch for Transpose
- 1 switch for Midi Channel
- 1 switch for DEMO SONG/ MEMORY functions
- Dimensions: cm 81 x 18 x 6 (in. 32 x 7 x 2.5)
- Weight: kg 2,5 (5.5 lb.)
Easy to connect:
Connection to PC
Using the cable supplied, insert the D-Sub 15 male plug into the serial port of the sound card already installed
in your PC, then insert the Din 5 male IN connector in the Midi Out port of your CMK 149 keyboard. Your CMK
149 keyboard will also be powered through this connection.
Connection to an Apple (Macintosh) Computer
Connect the power adapter to the power input socket located on the left hand side of the CMK 149.Then con-
nect the power adapter to the electrical wall socket. Please note that the CMK 149 works only with a 9VDC,
500ma, Tip Positive (+) power supply.
MIDI OUT
SWITCH ON-OFF
4
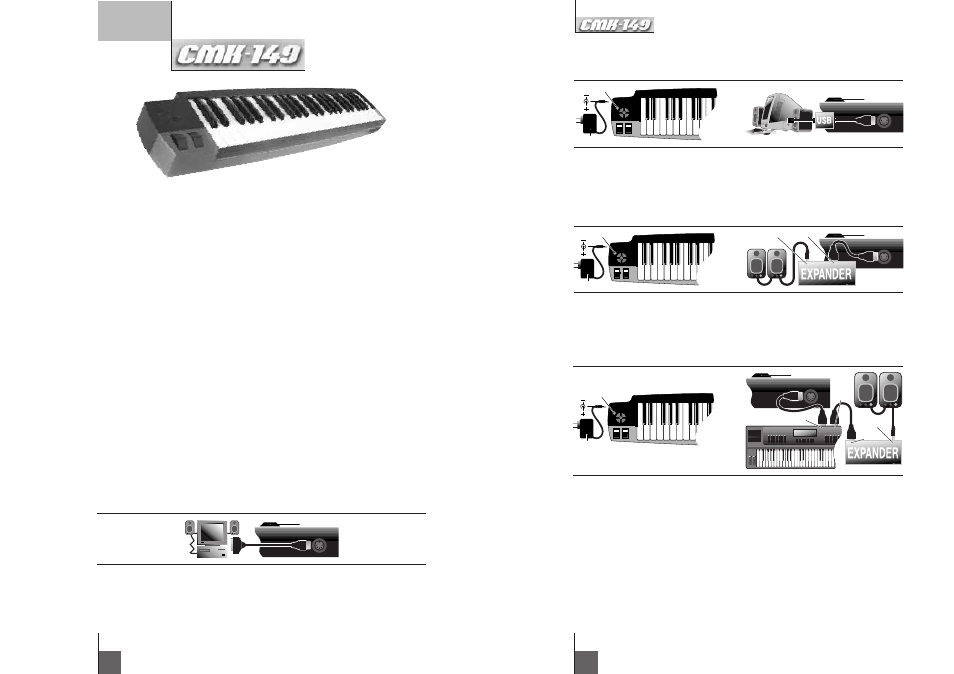
Conseguir en el proveedor habitual una interfaz MIDI con conexión USB. Conectar la salida MIDI situada en la
parte izquierda del teclado controlador MIDI a la entrada MIDI de la interfaz MIDI USB mediante un cable MIDI
estàndar. Después, conectar la salida USB al Mac mediante un cable USB.
Conexión con un módulo de sonido
Conectar el adaptador de voltaje a la toma de alimentación de electricidad y conectar el cable de salida en la
toma situada en la parte izquierda del teclado controlador MIDI (CMK 149 sólo funciona con una fuente de ali-
mentación 9V DC 500 mA positivo -+-).
Conectar la salida MIDI situada en la parte izquierda del teclado controlador MIDI a la entrada MIDI del módu-
lo de sonido mediante un cable MIDI estàndar. Después, conectar las salidas de audio del módulo de sonido al
sistema de amplificación.
Conexión a un sistema MIDI
Conectar el adaptador de voltaje a la toma de alimentación de electricidad y conectar el cable de salida en la
toma situada en la parte izquierda del teclado controlador MIDI (CMK 149 sólo funciona con una fuente de ali-
mentación 9V DC 500 mA positivo -+-).
Conectar la salida MIDI situada en la parte izquierda del teclado controlador MIDI a la entrada MIDI del teclado
maestro mediante un cable MIDI estàndar. Después, conectar la salida MIDI del teclado maestro a la entrada
MIDI de los módulos de sonido y las salidas de audio al mezclador o al sistema de amplificación.
USO:
Con PC y/o Mac
Tras efectuar la conexión del CMK 149 con vuestro PC y/o Mac y una vez instalados los programas incluidos en
el suministro, hay que reiniciar el ordenador; ahora también el CMK 149 debería tener el LED rojo encendido;
abrid el programa musical y empezad con vuestras composiciones o con las producciones multipista.
N.B.: Atención, si presionando las teclas del teclado no oís ningún sonido hay que comprobar que:
· el ordenador esté encendido,
· el LED rojo del teclado esté encendido,
· estén conectados los altavoces,
· los altavoces estén encendidos,
· haya sido lanzado el programa musical,
tras comprobar todos los puntos antedichos, si el teclado sigue sin emitir sonidos, entonces comprobar la con-
figuración Midi de la vuestra tarjeta sonora.
español
SWITCH ON-OFF
MIDI OUT
SWITCH ON-OFF
9V DC 500 mA
SWITCH ON-OFF
MIDI OUT
AUDIO OUT
MIDI IN
MIDI OUT
MIDI IN
SWITCH ON-OFF
9V DC 500 mA
SWITCH ON-OFF
MIDI OUT
MIDI IN
AUDIO OUT
SWITCH ON-OFF
9V DC 500 mA
17