Source Audio Hot Hand Phaser/Flanger User Manual
Page 5
06: How to select and control the effects
Preset Selection
Make sure effects are engaged by checking the
ON/OFF
light. Toggle the
ON/OFF
pedal to turn it on, if necessary.
Select any of the four presets by using the
SELECT
pedal to advance through
them. Note which of the
MOD SOURCE
lights are on at the top of the
EFFECT
knob. These select what will be sweeping the effect. If the
HOT HAND
light is not
on, moving the
HOT HAND
will not make any difference.
Editing
•
Use the
EFFECT
knob to select any of the
7
phasers or
7
flangers.
•
Hold down the
SELECT
pedal, and turn the
EFFECT
knob. It will now change
the
MOD SOURCE
selection instead of making an effect selection.
•
Use the
DEPTH
control to select the amount of modulation depth (sweep)
applied to the effect.
•
Use the
MOTION/SPEED
control to select how fast the modulation source var-
ies. It determines how much the Hot Hand responds to rapid motion; it sets
the
LFO
speed; and it controls how quickly the
ENVELOPE
tracks the levels of
the guitar signal.
•
Turn the
MOTION/SPEED
knob such that the
LED
indicator light moves across
the bottom-most part of the range. This will change the state of the
INVERT
switch. If
INVERT
is on, both the
HOT
HAND
and
ENVELOPE
direction of sweep
will be reversed.
•
When
LFO
is selected as the
MOD
SOURCE
, turning on
INVERT
will select
SEQ
as the modulation source instead of the
LFO
. Sequencer patterns will then be
used to sweep the effect.
•
Hold down the
SELECT
pedal, and adjust
FREQUENCY
range for the phasers,
and
DELAY
time for the flangers with the
DEPTH
knob.
Advanced editing
The Back Page parameters provide access to a number of miscellaneous
parameters, including control of the sequencer. Press
SAVE
while holding down
the
SELECT
pedal to edit these parameters. See page 26-30 for a detailed list.
Save Preset
If you wish to save the changes you have made to a preset location, hold down
the
SAVE
button. When the preset
LED
stops blinking, the data has been saved
to the current preset.
05 : Calibration (optional)
Calibration is recommended, but not required. See page
11
for additional
information.
Calibration is easy. Just turn the
EFFECT
knob to the
CALIBRATE
position and hold your strumming hand in its normal playing position over
the strings. Your hand should be held relatively still. Then, tap the
ON/OFF
pedal once. The
ON/OFF
LED
will blink for a few seconds. When the
LED
is off,
you are calibrated and ready to go. Turn the Effect Selector knob away from
the
CALIBRATE
position to select an effect.
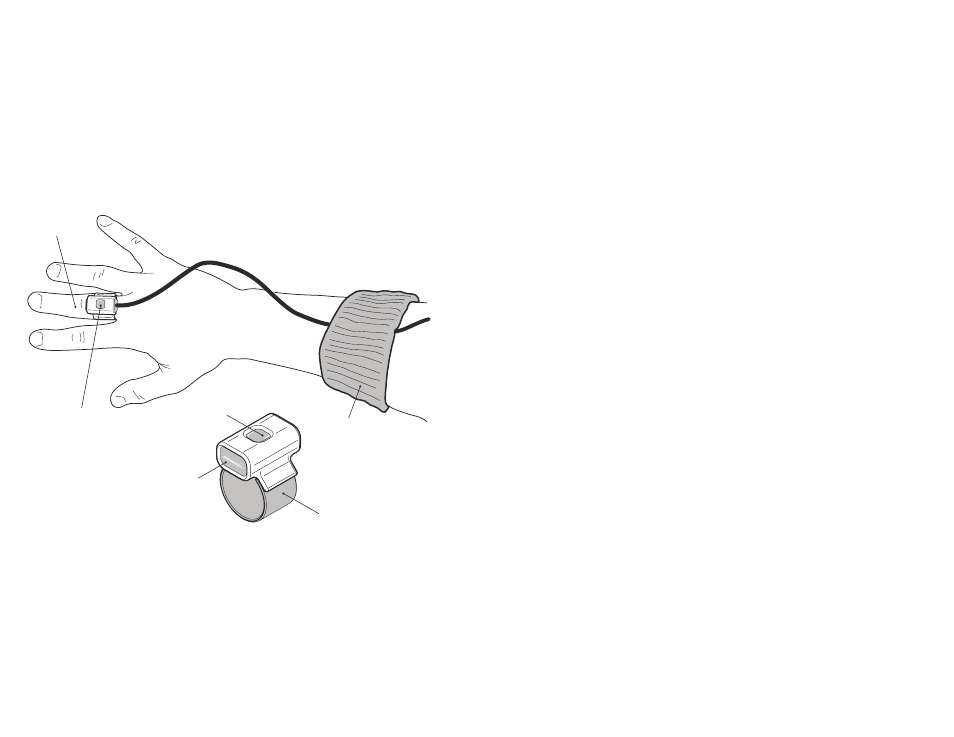
04 : Attaching the Hot Hand Motion Sensor
Choose the ring size which fits most comfortably. This is ideally placed on the
middle or ring finger of your strumming hand (A). Put your guitar on and take
out the Hot Hand sensor. Insert the Hot Hand into the ring as shown. To pre-
vent the sensor cord from interfering with your playing, use the provided arm
band (B) to hold it up near your elbow as shown. Once everything is comfort-
able, attach the wire that comes from the Hot Hand into the
EXTENSION CABLE
.
Note: the extension cable is not required for operation, but it is almost cer-
tainly required for using the product in the standing position. When the Hot
Hand is connected, and the control box is powered-on, a blue
LED
will glow in
the sensor to indicate is it ready to be used (C).
A
B
C
Quick Start | 9
8 | Quick Start
Hot Hand Ring
LED
Hot Hand Motion Sensor