Fitting the lamp, Installing the projector – OmniSistem PR Pilot 575 User Manual
Page 4
Pilot 575 Manual_ Last Revision_En.doc
4/22
256
106
(2PCS)
SAFETY CORD
SCREWS
(1PCS PER CLAMP)
CLAMPS
RETAINERS
(2PCS PER CLAMP)
(2PCS)
HANDLES
(2PCS)
4 HOLES FOR
SAFETY CORD
PASSING THROUGH
CORD
SAFETY
HOLE
CORD
SAFETY
HOLE
WARNING
through 4 HOLES for safety!
To pass 2 SAFETY CORDS
WARNING
through 4 HOLES for safety!
To pass 2 SAFETY CORDS
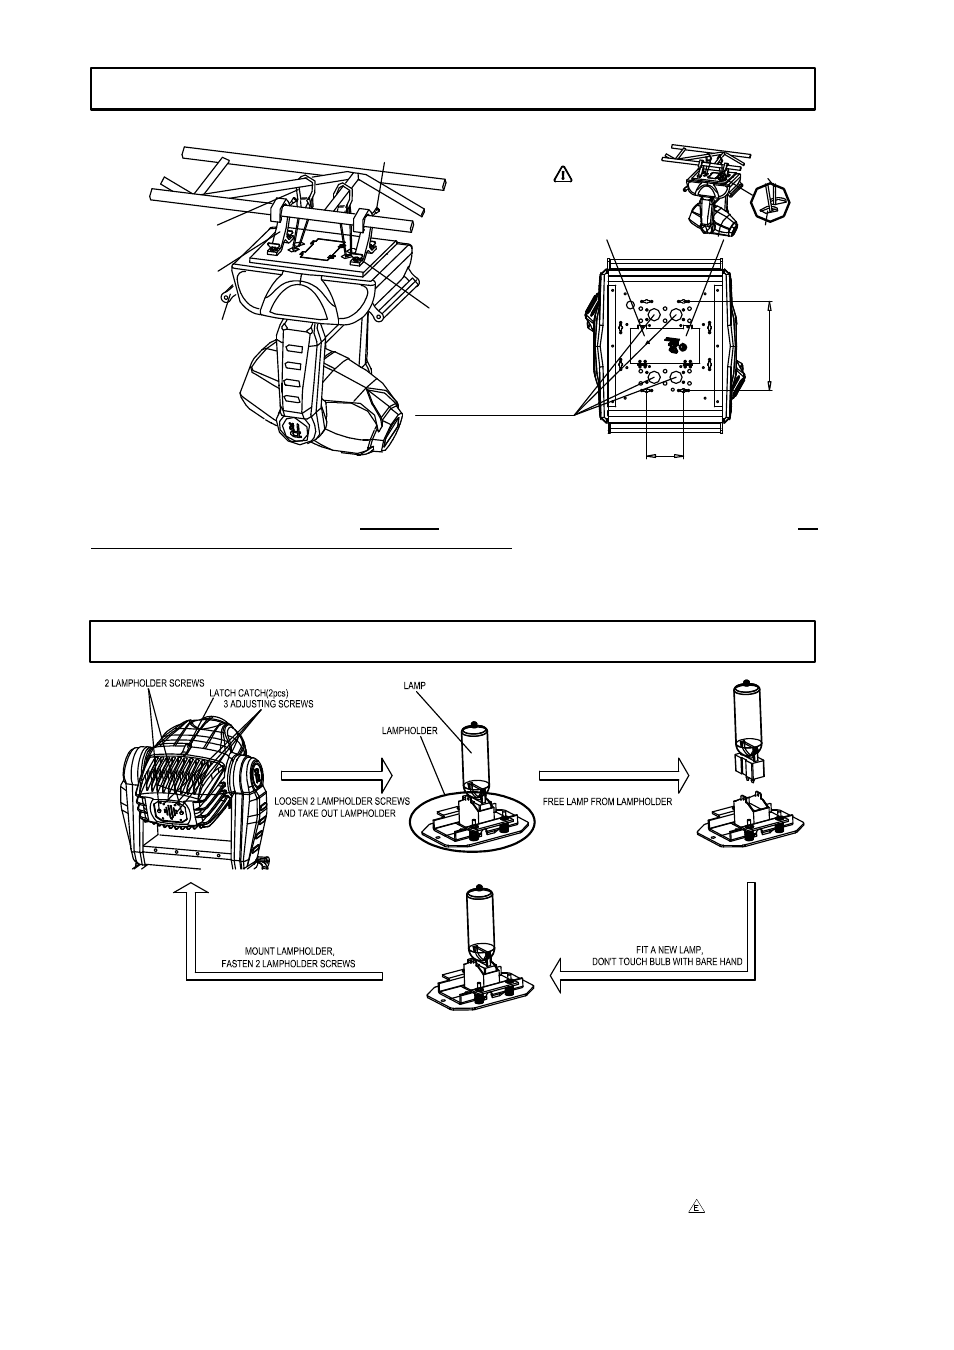
Take 2 clamps and 2 safety cords out from the package and mount 2 clamps on the underside of
fixture with 2 retainers attached to each clamp. Hang the fixture on the structure and fasten the screws
attached to each clamp. (Watch the WARNING on the underside of the base as shown above) To
pass 2 SAFETY CORDS through 4 HOLES for safety! Always ensure that the projector is firmly
anchored to avoid vibration and slipping whilst functioning. Always ensure that the structure that you
are going to mount the projector is secure and is strong enough to support a weight of PILOT 575.
WARNING: The projector MUST be lifted or carried by the HANDLES instead of clamps.
Lock tilt before fitting/replacing the lamp.
(Do the way as shown in the above figure)
Loosen 2 lampholder screws as shown in the above figure and take out the lampholder.
Free worn-out lamp from lampholder.
Fit a new lamp and insert it with lampholder into the fixture, then fasten 2 lampholder screws.
After the fitting is done, turn the projector on and 5 minutes later adjust 3 adjusting screws to focus for
the best light output.
Notes: don’
t touch the bulb of the new lamp with bare hand so as not to influence the beam
output.
WARNING: The MSR series are high-pressure lamps with external igniters (
). Care should
always be taken when handling these lamps. Always read the manufacturers "Instructions for
use" enclosed with the lamp.
FITTING THE LAMP
INSTALLING THE PROJECTOR