Casio 5214 User Manual
Page 8
Operation Guide 5114 5214
E-56
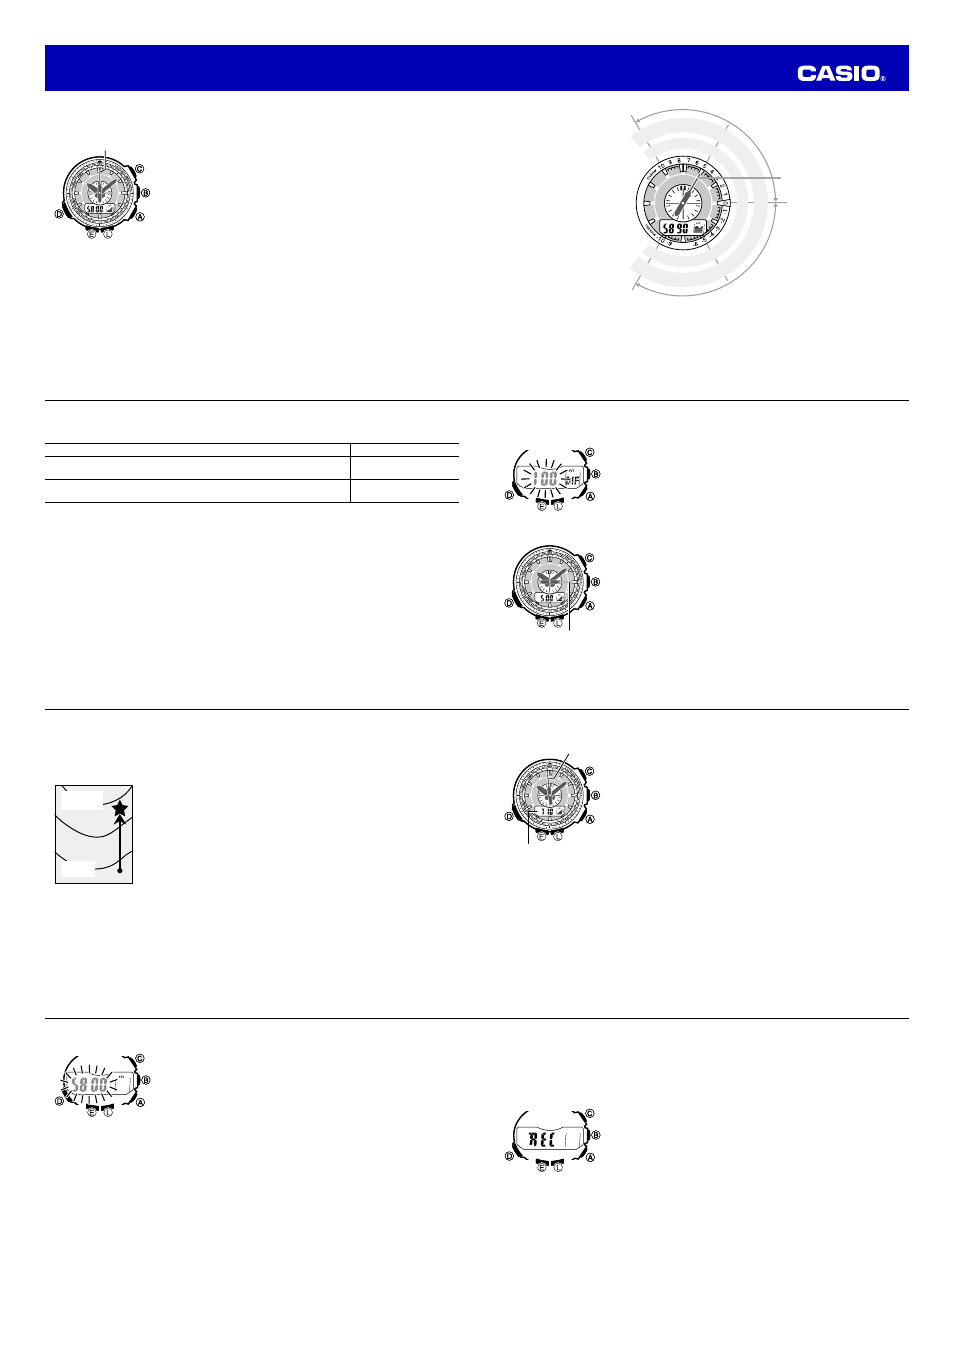
Using the Altitude Differential Value
In the Altimeter Mode, the part of the watch’s dial from 11 o’clock to 7
o’clock acts as an altitude differential scale. The second hand points to a
place on the scale that indicates the difference between the altitude at a
start point set by you and the altitude at your current location. The altitude
differential indication is updated each time the watch takes an altitude
reading.
You can confi gure the watch so each second mark in the altitude
differential scale stands for 5 meters (20 feet) or 50 meters (200 feet).
See “Confi guring the Altitude Differential Scale” (page E-58) for
information about how to confi gure this setting.
•
The second hand will point to OVER or UNDER if the altitude
differential is outside the allowable range of the scale.
•
The second hand will move to 9 o’clock if a sensor reading could not
be taken for some reason or if the reading is outside the allowable
range.
•
See “Using the Altitude Differential Value While Mountain Climbing or
Hiking” (page E-60) for some real-life examples of how to use this
feature.
Altitude differential
indicated by second hand
Altitude differential
indicated by second hand
E-57
Current altitude
reading greater than
previous reading
Current altitude
reading less than
previous reading
−500 m (−2000 ft)
100 m (400 ft)
1000 m (4000 ft)
500 m (2000 ft)
50 m (200 ft)
0
0
−50 m (−200 ft)
−100 m (−400 ft)
−1000 m (−4000 ft)
Unit: 50 m (200 ft)
Unit: 5 m (20 ft)
Second hand
E-58
Confi guring the Altitude Differential Scale
You can select either of the two altitude differential scale options described below.
To specify this:
Select this setting:
Scale step: 5 meters (20 feet) per second mark
Scale range: ±100 meters (± 400 feet)
100
Scale step: 50 meters (200 feet) per second mark
Scale range: ±1000 meters (± 4000 feet)
1000
•
Altitude differential is always calculated in meters, even when feet is selected as the altitude
measurement unit.
E-59
To change the altitude differential scale step unit
1. In the Altimeter Mode, hold down
E until each of the following steps
occurs.
•
Hold SET appears on the digital display.
➝ Hold SET disappears.
2. Press
D twice.
•
This will cause either 100 or 1000 to fl ash on the digital display.
3. Press
A to toggle the altitude differential scale step unit between 100
and 1000.
4. Press
E to exit the setting screen.
To set the altitude differential start point
In the Altimeter Mode, press
E.
•
The watch will take an altitude reading and record the result as the
current differential start point. At this time, the second hand will point
to 0 because that is the current altitude differential.
Altitude differential
indicated by second hand
Altitude differential
indicated by second hand
E-60
Using the Altitude Differential Value While Mountain Climbing or Hiking
After you specify the altitude differential start point while mountain climbing or hiking, you easily can
measure the change in the altitude between that point and other points along the way.
To use the altitude differential value
1. In the Altimeter Mode, check to make sure that an altitude reading is
on the digital display.
•
If an altitude reading is not displayed, press
A to take one. See “To
take an altimeter reading” (page E-53) for details.
2. Use the contour lines on your map to determine the difference in
altitude between your current location and your destination.
3. In the Altimeter Mode, press
E to specify your current location as the
altitude differential start point.
•
The watch will take an altitude reading and register the result as
the altitude differential value start point. The altitude differential
value will be reset to zero at this time.
Current
location
Destination
altitude
Current
location
Destination
altitude
E-61
4. While comparing the altitude difference you determined on the map
and the watch’s altitude differential value, advance towards your
destination.
•
If the map shows a difference of +80 meters between your current
location and your destination, you will know that you are
approaching your destination when the second hand is pointed
at +80 meters.
Specifying a Reference Altitude Value
The altitude readings produced by this watch are subject to error caused by changes in air pressure.
Because of this, we recommend that you update the reference altitude value whenever one is available
during your climb. After you specify a reference altitude value, the watch adjusts its air-pressure-to-altitude
conversion calculation accordingly.
Altitude
Altitude differential
indicated by second hand
Altitude
Altitude differential
indicated by second hand
E-62
To specify a reference altitude value
1. In the Altimeter Mode, hold down
E until each of the following steps
occurs.
•
Hold SET appears on the digital display.
➝ Hold SET disappears.
2. Press
A (+) or C (–) to change the current reference altitude value
by 5 meters (or 20 feet).
•
Specify a reference altitude value based on accurate altitude
information about your current location from a map, etc.
•
You can set the reference altitude value within the range of –10,000
to 10,000 meters (–32,800 to 32,800 feet).
•
Pressing
A and C at the same time returns to OFF (no reference
altitude value), so the watch performs air pressure to altitude
conversions based on preset data only.
3. Press
E to exit the setting screen.
Types of Altitude Data
The watch can maintain two types of altitude data in its memory: manual save records, and auto save
values (low altitude, high altitude, cumulative ascent, cumulative descent).
•
Use the Data Recall Mode to view data stored in memory. See “Viewing Altitude Records” (page E-72)
for details.
E-63
Manual Save Records
Any time you perform the procedure below in the Altimeter Mode, the watch will create and store a record
with the currently displayed altitude reading, along with the date and time the reading was taken. There is
enough memory to store up to 14 manual save records, which are numbered from REC01 through
REC14.
To create a manual save record
1. In the Altimeter Mode, check to make sure that an altitude reading is
on the digital display.
•
If an altitude reading is not displayed, press
A to take one. See “To
take an altimeter reading” (page E-53) for details.
2. Hold down
A until Hold REC appears on the digital display and then
changes to REC.
•
This will save the currently displayed altitude reading in a manual
save record, along with the measurement time and date.
•
The watch will return to the Altimeter Mode screen automatically after
the save operation is complete.
•
There is enough memory to store up to 14 manual save records. If
there are already 14 manual save records in memory, the above
operation will cause the oldest record to be deleted automatically
to make room for the new one.