Barometer/thermometer – Casio 3206 User Manual
Page 4
Operation Guide 3135 3206
4
Using the Digital Compass While Mountain Climbing or
Hiking
This section describes three real-life situations where you could use the
watch’s built-in digital compass.
• To set a map and find your current location
Having an idea of your current location is important when mountain
climbing or hiking. To do this, you need to “set the map”, which means to
align the map so the directions indicated on it are aligned with the actual
directions of your location. Basically what you are doing is aligning north on
the map with north as indicated by the watch.
• To find the bearing to an objective
• To determine the direction angle to an objective on a map and head in that
direction
To set a map and find your current location
1. With the watch on your wrist, position it so the
face is horizontal.
2. In the Timekeeping, Digital Compass,
Barometer/Thermometer, or Altimeter Mode,
press C to take a compass reading.
• The reading will appear on the display after
about two seconds.
3. Rotate the map without moving the watch so
the northerly direction indicated on the map
matches north as indicated by the watch.
• If the watch is configured to indicate
magnetic north, align the map’s magnetic
north with the watch indication. If the watch
has been configured with a declination to
correct to true north, align the map’s true
north with the watch indication.
• This will position the map in accordance
with your current location.
4. Determine your location as you check the
geographic contours around you.
North indicated
on the map
North indicated by
north pointer
Current
location
N
N
To find the bearing to an objective
1. Take a compass reading and then set the map
so its northerly indication is aligned with north
as indicated by the watch, and determine your
current location.
• See “To set a map and find your current
location” for information about how to
perform the above step.
2. Set the map so the direction you want to travel
on the map is pointed straight in front of you.
3. With the watch on your wrist, position it so the
face is horizontal.
4. In the Timekeeping, Digital Compass,
Barometer/Thermometer, or Altimeter Mode,
press C to take a compass reading.
• The reading will appear on the display after
about two seconds.
5. Still holding the map in front of you, turn your
body until north as indicated by the watch and
the northerly direction on the map are aligned.
12 o’clock
position
N
N
Current
location
Objective
• This will position the map relative to your current location, so the bearing to
your objective is straight ahead of you.
To determine the direction angle to an objective on a map and head
in that direction
Note
• The following procedure is possible only with a
watch that has a rotary bezel.
1. Take a compass reading and then set the map
so its northerly indication is aligned with north
as indicated by the watch, and determine your
current location.
• See “To set a map and find your current
location” for information about how to
perform the above step.
2. As shown in the illustration to the left, change
your position so you (and the 12 o’clock
position of the watch) are pointed in the
direction of objective, while keeping the map
aligned with the readings being produced by
the watch.
12 o’clock
position
N
N
Current
location
Objective
• If you find it difficult to perform the above step while keeping everything
aligned, first move into the correct position (12 o’clock position of the
watch pointed at the objective) without worrying about the orientation of
the map. Next, perform step 1 again to set the map.
3. In the Timekeeping, Digital Compass,
Barometer/Thermometer, or Altimeter Mode,
press C to take a compass reading.
• The compass reading information (angle
value, direction indicator, and four pointers
based on the 12 o’clock position of the
watch) will appear on the display after about
two seconds.
• The compass reading information will
remain on the display for only about 20
seconds after you press C. After that it will
disappear. If you want to re-display the
compass reading information, press C
again to take another reading.
12 o’clock
position
Direction angle of
current reading
North
pointer
4. Rotate the bezel so the “N” (North) indicator on the bezel is aligned with
the north indicator produced by the reading in step 3.
5. To advance to your objective proceed in the direction that 12 o’clock is
pointing.
Note
• When mountain climbing or hiking, conditions or geographic contours may
make it impossible for you to advance in a straight line. If this happens,
return to step 1 and save a new direction to the objective.
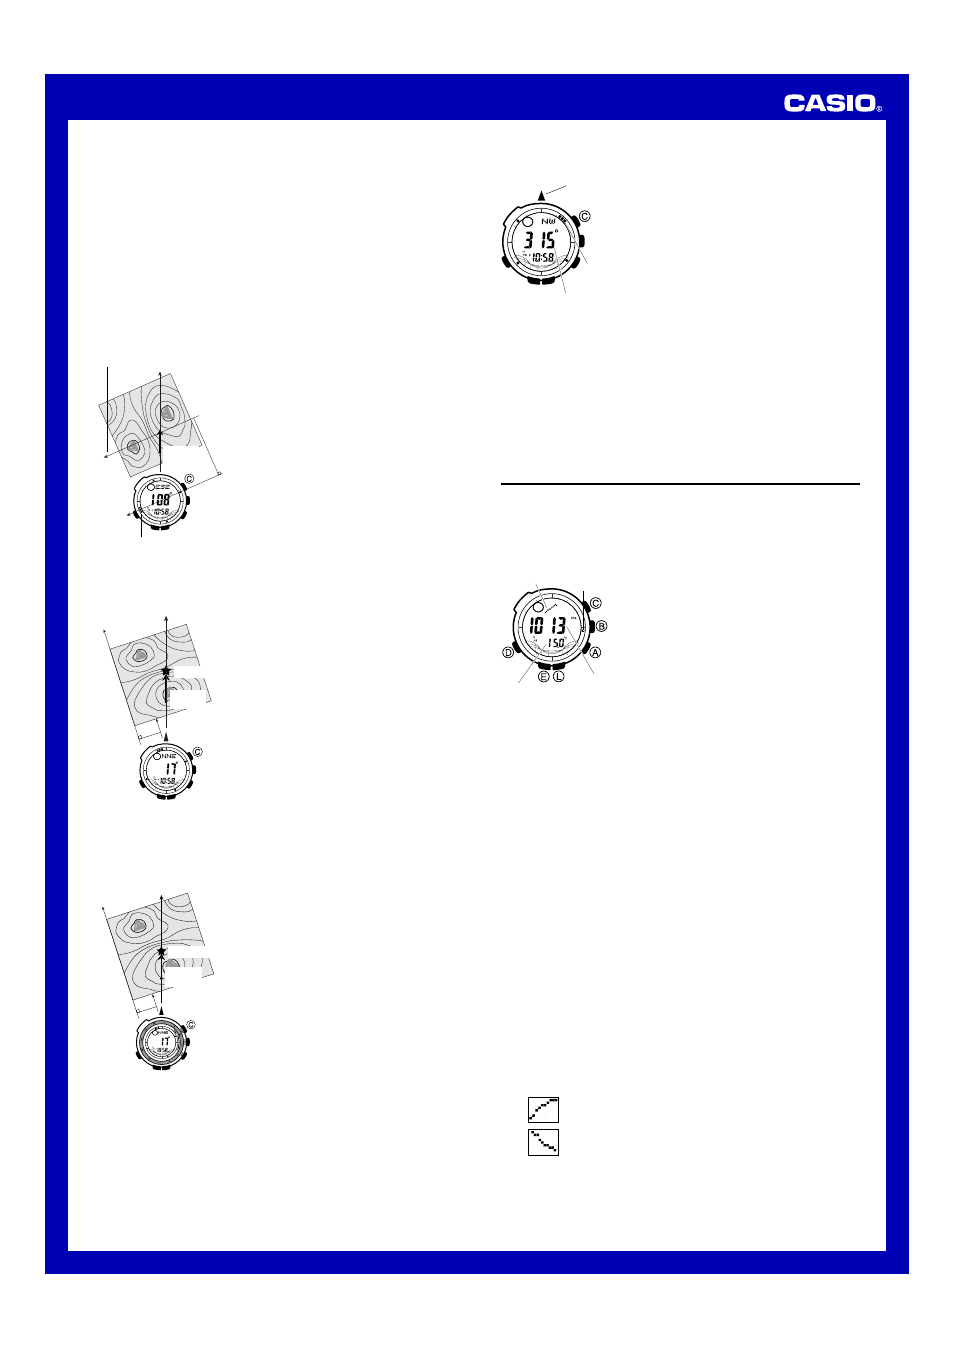
Barometer/Thermometer
This watch uses a pressure sensor to measure air pressure (barometric
pressure) and a temperature sensor to measure temperature.
• You can calibrate the pressure sensor and the temperature sensor if you
suspect that readings are incorrect.
To take barometric pressure and temperature readings
Pressing B in the Timekeeping Mode or in any
of other sensor modes enters the Barometer/
Thermometer Mode and starts barometric
pressure and temperature measurements
automatically .
• It can take up to four or five seconds for the
barometric pressure reading to appear after
you enter the Barometer/Thermometer Mode.
• Barometric pressure is displayed in units of
1hPa (or 0.05 inHg).
Temperature
Barometric
pressure
Barometric
pressure graph
Pressure
differential
pointer
• The displayed barometric pressure value changes to
xxxx
hPa (or inHg) if
a measured barometric pressure falls outside the range of 260 hPa to
1100 hPa (7.65 inHg to 32.45 inHg). The barometric pressure value will
reappear as soon as the measured barometric pressure is within the
allowable range.
• Temperature is displayed in units of 0.1°C (or 0.2°F).
• The displayed temperature value changes to
xxx
.
x
°C (or °F) if a
measured temperature falls outside the range of –10.0
°C to 60.0°C (14.0°F
to 140.0
°F). The temperature value will reappear as soon as the measured
temperature is within the allowable range.
• In some areas, barometric pressure is expressed in millibars (mb) instead
of hectopascals (hPa). It really makes no difference, because 1hPa = 1mb.
• You can select either hectopascals (hPa) or inchesHg (inHg) as the display
unit for the measured barometric pressure, and Celsius (
°C) or Fahrenheit
(
°F) as the display unit for the measured temperature value. See “To select
the temperature, barometric pressure, and altitude units”.
• See “Barometer and Thermometer Precautions” for important precautions.
Barometric Pressure Graph
Barometric pressure indicates changes in the atmosphere. By monitoring
these changes you can predict the weather with reasonable accuracy.
This watch takes barometric pressure measurements automatically every two
hours (at the top of each even-numbered hour), regardless of its current
mode. Measurement results are used to produce barometric pressure graph
and barometric pressure differential pointer readings.
The barometric pressure graph shows readings of previous measurements for
up to 20 hours. The horizontal axis of the graph represents time, with each dot
standing for two hours. The rightmost dot represents the most recent reading.
The vertical axis of the graph represents barometric pressure, with each dot
standing for the relative difference between its reading and that of the dots
next to it. Each dot represents 1hPa.
The following shows how to interpret the data that appears on the barometric
pressure graph.
A rising graph generally means improving weather.
A falling graph generally means deteriorating weather.