Landing gear installation – Great Planes Super Sportster 40 ARF - GPMA1040 User Manual
Page 12
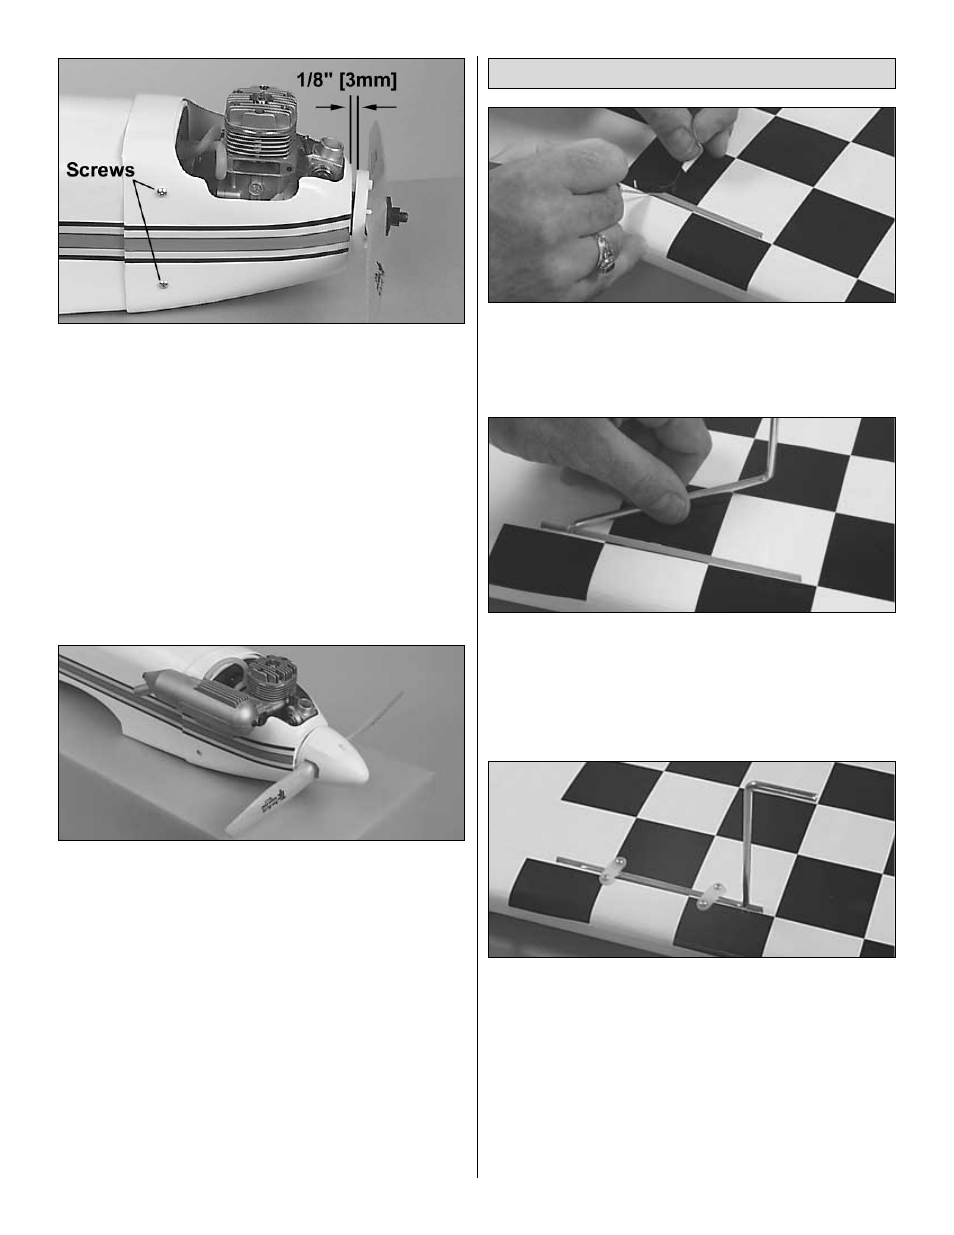
❏
6. Remove the propeller, spinner backplate and muffler
from the engine. Slide the cowling into position. Temporarily
attach the propeller and spinner to the engine. Position the
cowling to have 1/8" [3mm] clearance between the back of
the spinner backplate and the front of the cowling. Drill 1/16"
[1.5mm] pilot holes for the cowl screws through the cowl and
into the fuselage at the marks on the cowl. Remove the
cowling, and drill the locations for the cowl mounting screws
into the cowl using a 1/8" [3mm] drill bit. Wick thin CA into
the 1/16" [1.5mm] holes on the fuselage to harden the wood,
which will prevent the screws from stripping out. Attach the
cowling to the fuselage using four #4 x 3/8" sheet metal
screws and four #4 washers.
❏
7. Apply the decals onto the cowl as shown.
❏
8. Attach the muffler to the engine. Carefully trim the cowl,
removing small amounts of material as you progress to
allow for a 1/4" [6mm] clearance gap between the cowl and
the muffler. Attach the vent line to the muffler. Trim the cowl
so the vent line will not contact the cowl. If the vent line does
contact the cowl, it may break, which may cause the engine
to quit running during flight. Apply the supplied decals onto
the left and right sides of the cowl.
❏
9. Install the spinner backplate, propeller, propeller washer
and the propeller nut onto the engine. Trim the spinner cone
propeller slots if necessary so there is at least a 1/16"
[1.5mm] gap between the slots and the propeller. Once
satisfied with the fit, attach the cone with the screws
provided. Be careful not to overtighten these screws. They
are threaded into plastic, which can strip out easily if they
are overtightened.
❏ ❏
1. On the bottom of the wing, there are two channels for
the main landing gear. Locate these channels by running
your finger over the covering on the bottom of the wing. Use
a hobby knife to remove the covering from the channels.
❏ ❏
2. Test fit the main landing gear wires into the holes. If
they will not go in easily, drill out the two holes using a 5/32"
[4mm] drill bit. Next, use a drill bit or hobby knife to bevel the
inside corners of the holes so the bend in the wire will seat
fully into the holes and the wire will be flush with the bottom
of the wing.
❏ ❏
3. Position the main landing gear in the hole inside the
channel. Center the two nylon landing gear straps over the
struts so they are approximately 3/4" [19mm] from the ends
of the channel. Mark the holes using a felt-tip marker.
❏ ❏
4. Drill eight holes for the landing gear straps using a
1/16" [1.5mm] drill bit.
❏ ❏
5. Attach the nylon landing gear straps to the fuselage
using eight #2 x 1/2" sheet metal screws.
Landing Gear Installation
12