Okay – Great Planes RimFire 80mm Power System User Manual
Page 2
11
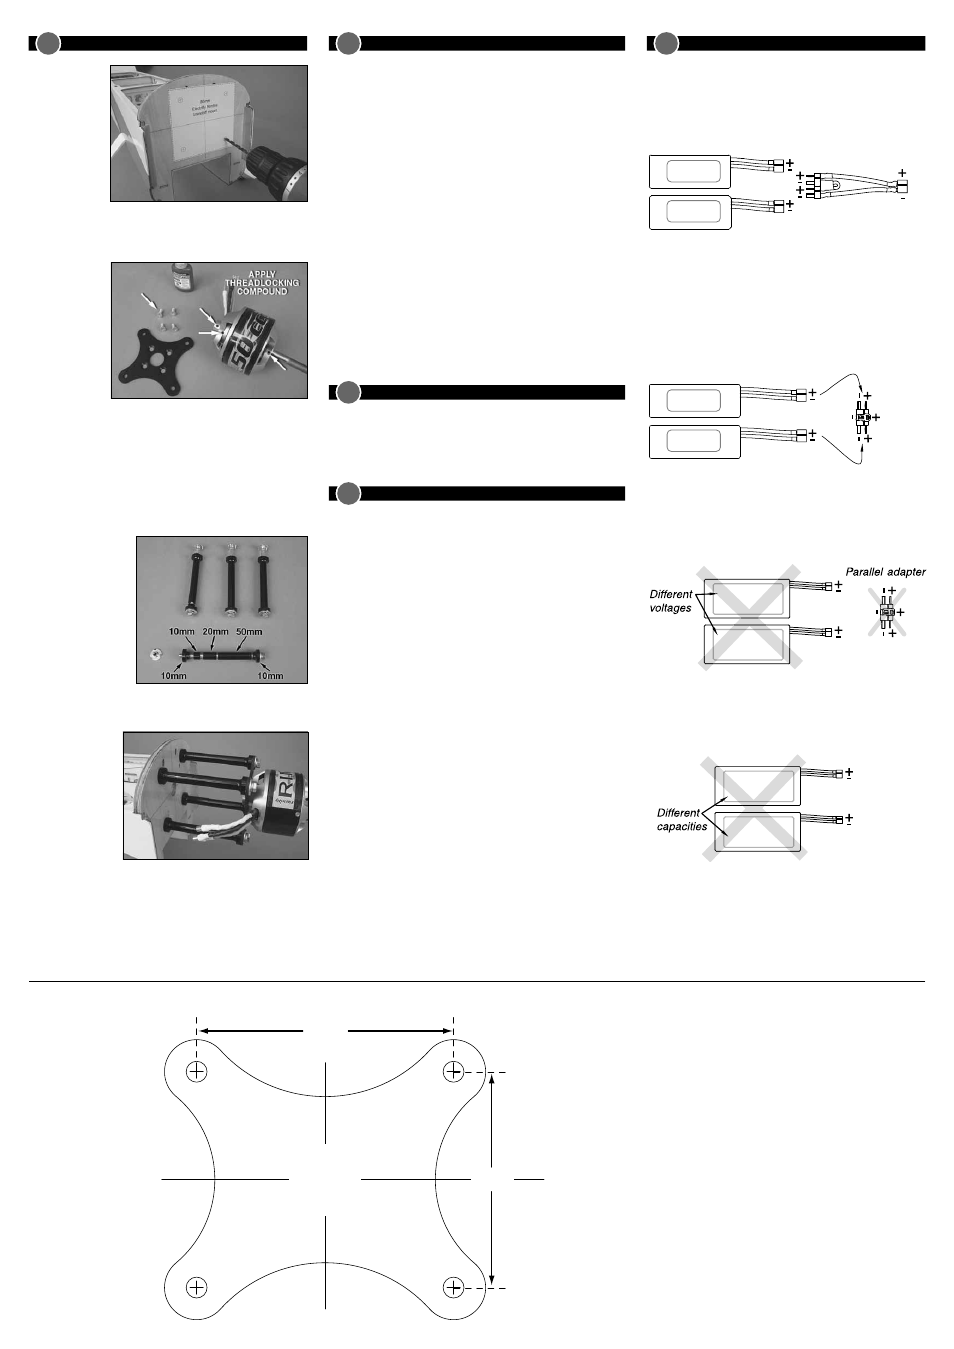
BATTERY PRECAUTIONS
There are two ways to connect multiple battery packs: In Series and
in Parallel.
These are two 33500mAh batteries (one 11.1V
and the other 7.4V). When joined in SERIES,
the result will be a 18.5V, 3350 mAh battery.
This is a SERIES battery
adapter (GPMM3143)
that connects two
batteries in series.
11.1V (3-Cell)
3350mAh
OKAY
7.4V (2-Cell)
3350mAh
1) Connecting batteries in “Series” means to connect the +’s to the –’s
and the –’s to the +’s. This combines the batteries’ voltages, but the
capacity remains the same.
These two 3350mAh batteries (both 11.1V) are
being joined in PARALLEL. The result will be
one 11.1V, 6700mAh battery.
This is a PARALLEL battery
adapter (GPMM3142) that
connects two batteries in parallel.
11.1V (3-Cell)
3350mAh
OKAY
11.1V (3-Cell)
3350mAh
2) Connecting batteries in “Parallel” means to connect the +’s to the
+’s and the -’s to the -’s. This combines the batteries’ capacities, but
the voltage remains the same.
NO!!!
11.1V (3-Cell)
3350mAh
7.4 V (3-Cell)
3350mAh
NEVER connect battery packs with different Voltages in Parallel–only
combine in Series. Otherwise, the batteries will try to “equalize” with
the larger one trying to “charge” the smaller one, thus causing heat
and likely a fire.
NO!!!
11.1V (3-Cell)
3350mAh
11.1V (3-Cell)
5300mAh
Also NEVER connect battery packs with different capacities in Series
or in Parallel.
Entire Contents Copyright © 2009
GPMG4800/05Mnl
8
INSTALL THE BRUSHLESS ESC
1) Make sure that the ESC you have selected has the proper 6mm female
bullet connectors attached to the three motor leads. If it does not, this
motor is supplied with 6mm female bullet connectors. These are fitted to
the male bullet connectors on the motor leads. Slide them off and solder
them to your ESC motor leads. Insulate the bare connector body with
some heat-shrink tubing. The heat shrink on the motor wires and the
ESC wires must completely cover the gold connectors. If the bare
connectors touch each other while power is supplied to the motor,
permanent damage to the ESC/motor may result. Note: DO NOT try to
remotely mount your ESC by extending the motor lead wires. This will
adversely affect motor timing.
2) Attach the ESC you have selected to your model in the location suggested
by the manufacturer. If your model does not come with mounting
equipment for an ESC, fit your ESC to a place where it will receive adequate
airflow. Make sure that airflow is directed over the cooling fins of the ESC
and that air has a path to exit from the model.
3) Attach a suitable battery lead connector from your ESC to your battery.
For safety reasons, you may want to build an arming switch which will
allow you to quickly and safely arm and disarm your motor without
opening or removing any hatch. Keep all leads as short as possible to
reduce resistance, and well insulated to eliminate short-circuits.
4) Connect the three motor leads from the ESC to the motor. Check to see
that the motor rotates in the correct direction. Swap the position of any
two motor leads to reverse the rotation of the motor.
9
RIMFIRE MOTOR MAINTENANCE
RimFire brushless motors require virtually no maintenance. There are no
brushes to wear out and replace. The precision bearings have a very long
service life and should last a very long time. The internal parts of the motor
should not require any cleaning. The only thing that needs to be checked
is to make sure all the screws and set screws remain tight.
10
IMPORTANT PRECAUTIONS
• Once the battery is connected to the ESC, stay clear of the motor and
prop.
• DO NOT apply an input voltage that exceeds the maximum specification
of each motor.
• DO NOT apply currents to the motor that exceed the maximum
specifications of each motor.
• DO NOT allow the input connectors to accidentally touch each other while
power is applied to the motor. Make sure all input connections are
insulated electrically.
• DO NOT allow water or moisture to enter the motor, as it can cause
permanent damage to the motor and possibly short out the
attached ESC.
• DO NOT cut the wires from the motor. The wires are part of the windings
and are coated with an insulating material and cannot be soldered
without removing the coating, which is very difficult. If you must remove
the bullet connectors, unsolder them.
• Allow the motor to cool after each flight.
• The motor shaft of the motor will rotate at very high rpm. DO NOT
attempt to touch the shaft while it is rotating. If setting up the motor/ESC
on the workbench, make sure the motor is securely attached and that
nothing is attached to the motor shaft BEFORE applying power.
• NEVER attempt to use a damaged motor (having mechanical or
electrical defects).
• Great Planes carries a complete line of Ammo
™
(inrunner style) and
RimFire (outrunner style) brushless motors, gear drives, motor mounts,
prop adapters and speed controls. For a complete list of these products,
check out our web sites at:
www.greatplanes.com www.electrifly.com
or visit your nearest hobby shop that carries the full line of Great Planes
and ElectriFly products.
7
INSTALL YOUR MOTOR
1) If you will
mount your motor
directly to the
firewall or if you
will use the Great
Planes
80mm
Motor Standoff
Motor Mount set,
cut out the
mounting tem-
plate in this man-
ual and mount it
to your firewall using tape or a spray adhesive. Align the template
crosshairs with the centering marks provided on the firewall. Drill four
9/32” [7.1mm] mounting holes.
2) Remove the
four countersunk
screws holding the
X-mount to the
motor and reinstall
them using thread
locking com-
pound. Remove
the set screws
from the wheel
collar, the rear
case, and the front
case and reinstall them using thread locking compound.
3) Determine the mounting space required by your model – this is
usually found during the engine/motor installation steps in your
model’s instruction manual. Subtract the mounting space of the
motor from the total required mounting space. For example, if the
mounting space is 184mm [7-1/4”] and we want to mount the 50cc
RimFire which itself has a mounting space of 87.3mm [3.44”]:
184mm - 87.3mm = 96.7mm
4) Using a Great Planes
XX-Large Standoff
Brushless Motor Mount
set (sold separately,
GPMG1275), combine
standoffs to achieve the
dimension you came up
with. You may not get
the exact dimension
with the standoffs, so
check to see if your cowl
or balance condition will
allow you to increase or
decrease this dimension. The standoffs shown in the photo above
combine to make a 100mm standoff dimension.
5) Select good
quality 1/4-20 bolts
that are long enough
to fully engage all of
the threads of your
blind nuts, or use
the bolts included
with the standoff kit.
We used 5” [127mm]
long bolts for this
example. Attach your
motor to the firewall using flat washers, lock washers, and thread
locking compound.
80mm
67mm
RIMFIRE 50cc & 65cc MOUNTING PATTERN
Note: This mounting
pattern matches the
DLE-55 engine. An
optional mount that
matches the DA-50
engine is GPMG1214.
RimFire 50cc Accessory and Spare Parts
GPMM3116 6mm Gold Plated Bullet Cnnectors - Male (3)
GPMM3117 6mm Gold Plated Bullet Connectors - Female (3)
GPMQ4914 RimFire 50cc and 65cc Replacement Prop Drive
GPMG1212 RimFire Backplate Motor Mount for 50cc and 65cc Motors
GPMG1214 Optional DA50 RimFire Backplate Motor Mount for 50cc & 65cc Motors
GPMG1438 C-clip (10) for 10mm RimFire Motor Shafts
GPMG1462 Bearings (3) for RimFire 50cc and 65cc Motors
GPMG1424 Replacement Shaft Kit for RimFire 50cc
GPMG1275 Stand Off Brushless Motor Mount XX Large
RimFire 65cc Accessory and Spare Parts
GPMM3116 6mm Gold Plated Bullet Cnnectors - Male (3)
GPMM3117 6mm Gold Plated Bullet Connectors - Female (3)
GPMQ4914 RimFire 50cc and 65cc Replacement Prop Drive
GPMG1212 RimFire Backplate Motor Mount for 50cc and 65cc Motors
GPMG1214 Optional DA50 RimFire Backplate Motor Mount for 50cc & 65cc Motors
GPMG1438 C-clip (10) for 10mm RimFire Motor Shafts
GPMG1462 Bearings (3) for RimFire 50cc and 65cc Motors
GPMG1426 Replacement Shaft Kit for RimFire 65cc
GPMG1275 Stand Off Brushless Motor Mount XX Large