GME TX3540S User Manual
Page 31
PA G E 3 0
I N S T R U C T I O N M A N UA L
T X 3 5 1 0 S / T X 3 5 2 0 S / T X 3 5 4 0 S
T X 3 5 1 0 S / T X 3 5 2 0 S / T X 3 5 4 0 S
I N S T R U C T I O N M A N UA L
PA G E 3 1
Mounting the Cradle
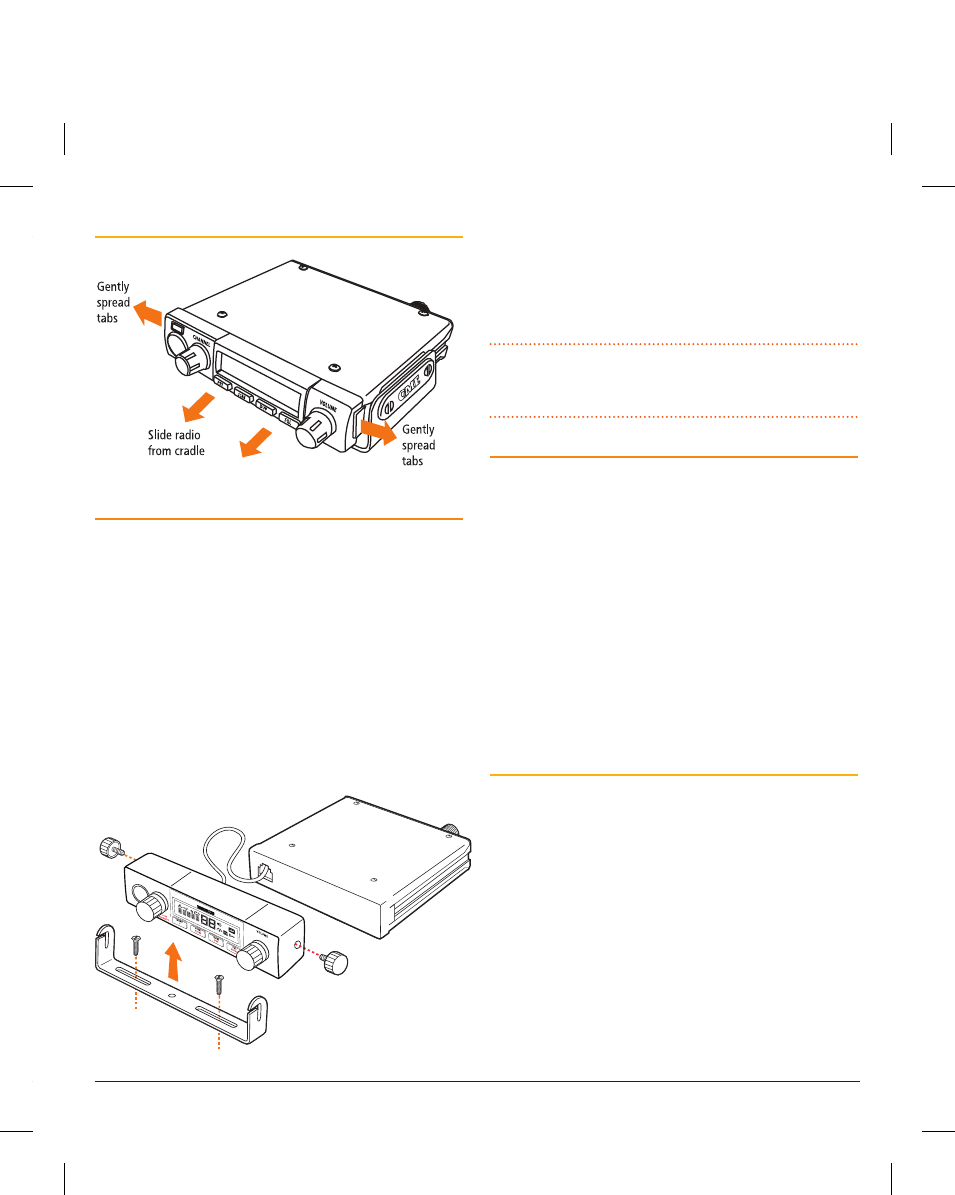
Fitting the Radio
Slide radio fully into cradle until it clicks into place.
Removing the Radio
TX3520S INSTALLATION
The TX3520S remote head can be installed inside the cabin
with the main unit hidden away in the glove box, under the
seat or in the boot. Install the remote head bracket into a
convenient location near your driving position using screws
or double sided tape. Loosen the gimbal controls and slide
the remote head into the slots in the bracket. Adjust the
remote head for the desired angle then tighten the controls.
The mounting of the main unit is identical to that of the
TX3510S and TX3540S models. If the main unit is installed in
a remote location, you will also need to install an extension
speaker inside the cabin. The extension speaker plugs into the
extension speaker socket on the rear panel of the main unit.
CHANNEL
Remote Head
Main Unit
The remote head cable uses an 8 pin telephone style
connector. Plug the cable from the remote head into
the socket in the FRONT of the MAIN unit. Plug the
MICROPHONE (6 pin plug) into the front of the REMOTE
HEAD unit. (Alternatively the microphone can be plugged into
the rear microphone socket on the main unit.
NOTE:
The remote head socket (8 pin) is different to the
microphone socket (6 pin). Do not attempt to plug the
microphone into the front of the main unit as it will not fit
MICROPHONE
The TX3510S and TX3520S uses a standard microphone
fitted with a 6 pin telephone style plug. The standard
microphone will fit the 6 pin socket in the front of the
TX3510S and TX3520S radio panels. Alternately the standard
microphone can be plugged into the microphone socket
on radio’s rear panel.. If connecting the microphone to the
rear socket, an optional extension cable LEM6P is available
if required to bring the microphone connection to a more
accessible location.
The TX3540S uses a controller microphone which has an
8 pin telephone style plug. This microphone can only be
plugged into the 8 pin socket on the front of the TX3540S
main unit. The controller microphone cannot be plugged into
the rear microphone socket.
Fitting the Standard Microphone
Front
1. The front microphone cover is a press fit. To remove,
simply insert the end of a paper clip or similar into the
small slot in the edge of the cover and lift the cover away
from the panel. Retain the cover in case you require it
later on.
2. Position the microphone plug so the plastic tab faces
downwards, and press the plug into the socket until
it ‘clicks’.