GME TX3540S User Manual
Page 27
PA G E 2 6
I N S T R U C T I O N M A N UA L
T X 3 5 1 0 S / T X 3 5 2 0 S / T X 3 5 4 0 S
T X 3 5 1 0 S / T X 3 5 2 0 S / T X 3 5 4 0 S
I N S T R U C T I O N M A N UA L
PA G E 2 7
2. Press and hold the Channel control while switching the
radio on again.
3. ‘RXALL’ will be displayed briefly, indicating the RX
Channel Editor has been activated.
You can now use the Channel control (or press the or
keys) to select channels 81 – 99 for programming.
Selecting Frequency Steps
NOTE:
This menu option is only available when an RX-only
channel is selected.
The frequency step is the space between frequencies when
the Channel control is rotated (or the or keys are
pressed). The frequency step can be set to either 12.5 kHz or
25.0 kHz. You should select a frequency step that matches
the channel allocations in the frequency band you are
programming. If in doubt, selecting 12.5 kHz will ensure you
do not miss any useful channels. When selecting 12.5 kHz
or 25.0 kHz steps the appropriate wideband or narrowband
filter will be selected automatically to ensure optimum
performance.
1. Select a Receive-only channel.
2. Press and hold MENU to select the menu.
3. Press MENU repeatedly until the frequency step is
displayed.
25kHz Steps 12.5 kHz Steps
4. Rotate the Channel control (or press the or keys)
to change the frequency step
5. Press the PTT to exit the menu.
Displaying Frequencies
When selecting frequencies, your radio may change the
frequency in 12.5 kHz or 25 kHz steps, however the display
will only show the frequency to the nearest 10 kHz. See the
table on page 27.
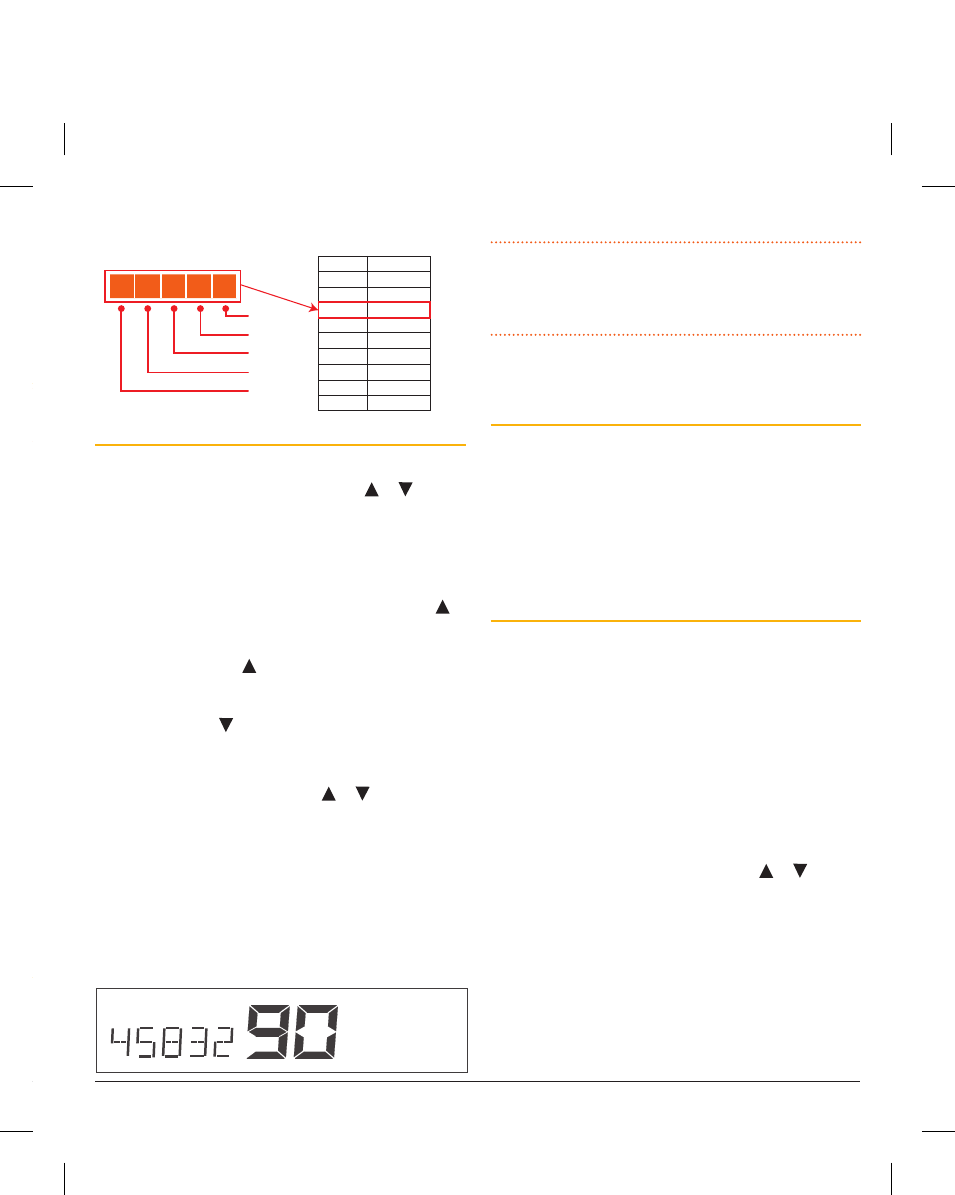
e.g. 468.4250 MHz will display as:
Display
46840
46841
46842
46843
46845
46846
46847
46848
46850
Frequency
468.4000
468.4125
468.4250
468.4375
468.4500
468.4625
468.4750
468.4875
468.5000
4
6
8
4
2
10 kHz
100 kHz
1 MHz
10 MHz
100 MHz
Programming Receive-only Frequencies
While in the channel editor:
1. Rotate the Channel control (or press the or keys)
to select a suitable channel (81-99).
2. Press and hold MENU until the radio beeps. ‘–OFF-’ will
flash under the channel number. You now have 6 seconds
to begin programming otherwise the menu will time-out.
3. Rotate the Channel control to the right (or press the
key) to begin selecting the desired frequency starting at
403 MHz. Continue rotating the
Channel control to the
right (or pressing the key) to increase the frequency in
12.5/25 kHz steps (the display will show the frequency to
the nearest 10 kHz). Rotate the Channel control to the
left (or press the key) to decrease the frequency.
4. To change the frequency in 1 MHz steps, briefly press the
Channel control. The 1 MHz digit will flash. Now rotate
the Channel control (or press the or keys) to adjust
the frequency in 1 MHz steps. As you approach the desired
frequency, briefly press the Channel control again to
return the original 12.5/25 kHz steps for finer adjustment.
5. When the desired frequency is displayed, press and hold
the Channel control to store it. The frequency will flash
then the radio will beep. The radio will then exit the menu
and return to normal operation.
e.g. 458.325 MHz stored under CH 90
6. Repeat steps 1 – 5 to program other channels.
NOTE:
The frequency tuning is live which means the radio
is actually listening to the frequencies you are selecting. You
can use this feature to locate and store active frequencies
while you are tuning.
If you need to program more than 19 channels, you will need
to select another Channel Bank.
To Close the Channel Editor
Once you have finished programming your frequencies,
switch the radio Off then On again. Normal operation will be
restored and the Receive-only channels you have programmed
will be visible above channel 80. Remember, if you have
programmed some of your channels into different Channel
Banks, you will need to select the appropriate Channel Bank
(from within the menu) to access them.
Displaying Alpha Names on your Receive-only
Channels
By default your radio displays the received signal strength to
the left of the channel number on all channels. However on
Receive-only channels you can also configure the display to
show an Alpha name or the channel frequency. This option is
only available when a receive-only channel is selected.
1. Select a receive-only channel.
2. Press and hold MENU until the radio beeps.
3. Briefly press MENU repeatedly to advance to the S-Meter
option. (‘S-MET’, ‘S-LIN’ or ‘BATT’ will be displayed.
‘S-MET’ is the default).
4. Rotate the Channel control (or press the or keys)
until ‘ALPHA’ is displayed.
5. Press the PTT to exit the menu.
The channel will now display the channel frequency or an
Alpha name (depending on whether your radio is in Alpha
mode).