GME TX3540S User Manual
Page 29
PA G E 2 8
I N S T R U C T I O N M A N UA L
T X 3 5 1 0 S / T X 3 5 2 0 S / T X 3 5 4 0 S
T X 3 5 1 0 S / T X 3 5 2 0 S / T X 3 5 4 0 S
I N S T R U C T I O N M A N UA L
PA G E 2 9
To Edit the Frequency of a Receive-only Channel
NOTE:
You do not need to enable the channel editor to edit
a current Receive-only channel.
1. Rotate the Channel control (or press the or keys) to
select the desired Receive-only channel.
2. If the channel’s ALPHA label is displayed briefly press the
F key followed by the ALPHA key to switch to Frequency
(numeric) mode.
3. Press and hold MENU until the radio beeps. The right
hand digit will be flashing.
4. Rotate the Channel control (or press the or keys)
to select a new frequency. To switch between 12.5/25
kHz and 1 MHz frequency steps briefly press the Channel
control (or the LVL key).
5. When the desired frequency is selected, press and hold
the Channel control (or the LVL key) to store the new
setting.
To Delete a Receive-only Channel
NOTE:
You do not need to enable the channel editor to
delete Receive-only channels.
1. Rotate the Channel control (or press the or keys) to
select the desired Receive-only channel.
2. If the channel’s ALPHA label is displayed briefly press the
F key followed by the ALPHA key to switch to Frequency
(numeric) mode.
3. Press and hold MENU until the radio beeps. The right
hand digit will be flashing.
4. Briefly press the Channel control (or the LVL key) to
select the 1 MHz digit (this will allow faster frequency
stepping) then rotate the Channel control to the left (or
press and hold the key) until ‘–OFF–‘ is displayed.
5. To store the setting, press and hold the Channel control
(or the LVL key).
The deleted channel will no longer be visible in normal
operating mode.
Scanning Receive-only Channels
Receive-only channels can be programmed into your Open
or Group scan groups in the same way as your normal CB
channels. Receive-only channels cannot be programmed into
your Network scan group.
To add receive-only channel to your scan group, simply select
the required scan group (Open or Group), select the desired
receive-only channel then press and hold the SCAN key until
the radio beeps.
will be displayed on that channel. For
more details on scanning, see the section on ‘Scanning’ in
this manual.
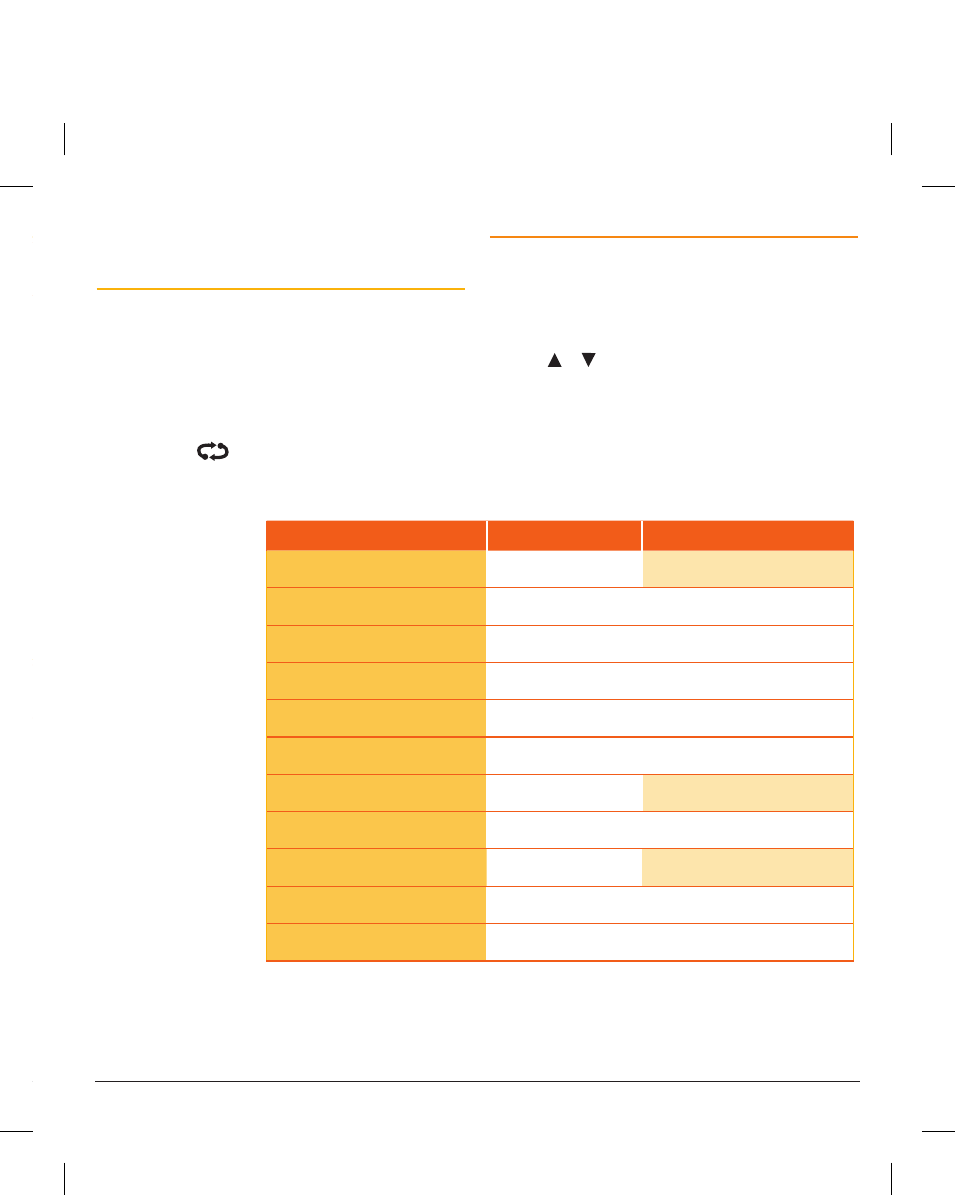
CONFIGURATION MENU
The configuration menu controls preset functions in the radio.
To access the menu, press and hold MENU until a beep is
heard. Selected menu options are displayed to the left of
the channel display. Briefly press MENU to step through
the available menu options. Rotate the Channel control (or
press the or keys) to change the selected menu option.
After viewing or making changes, briefly press the PTT to
exit the menu (or simply wait a few seconds for the menu
function to time-out).
The following settings are available.
Menu Option
UHF CB Channel
RX-Only Channel
RX-Only Frequency /Alpha Label:
NA
Frequency, Alpha Label
CTCSS/DCS:
CTCOF, CTC01-CTC50, DT001-DT104
Network Scan
NS-OF, NS-01 to NS-50, NS001 to NS104
Voice Scrambler:
ENCOF, ENCON
Silent Squelch Tail
SSTOF, SSTON
Beep Tone Level:
BEEP 0 to BEEP 9
Filter Bandwidth:
WBFLT , NBFLT
12.5/25 kHz
Dynamic Volume Control:
DVCOF, DVCON
Display Mode Options:
S-MET, S-LIN, BATT
S-MET, S-LIN, BATT, ALPHA
Busy Lockout:
BLKOF, BLKON
RX Only Channel Banks:
RX-A, RX-B, RX-C, RX-D, RX-E, RXA-E