Mac 10, Ledc, 4x4 fan filter unit – Envirco MAC 10 LE-DC User Manual
Page 16: Service: rsr/e motor removal and installation
MAC 10
®
LEDC
4x4 Fan Filter Unit
16
Innovators in Clean Air Technology | www.envirco.com | Operation & Maintenance
I n s t a l l a t i o n & S e r v i c e M a n u a l
■
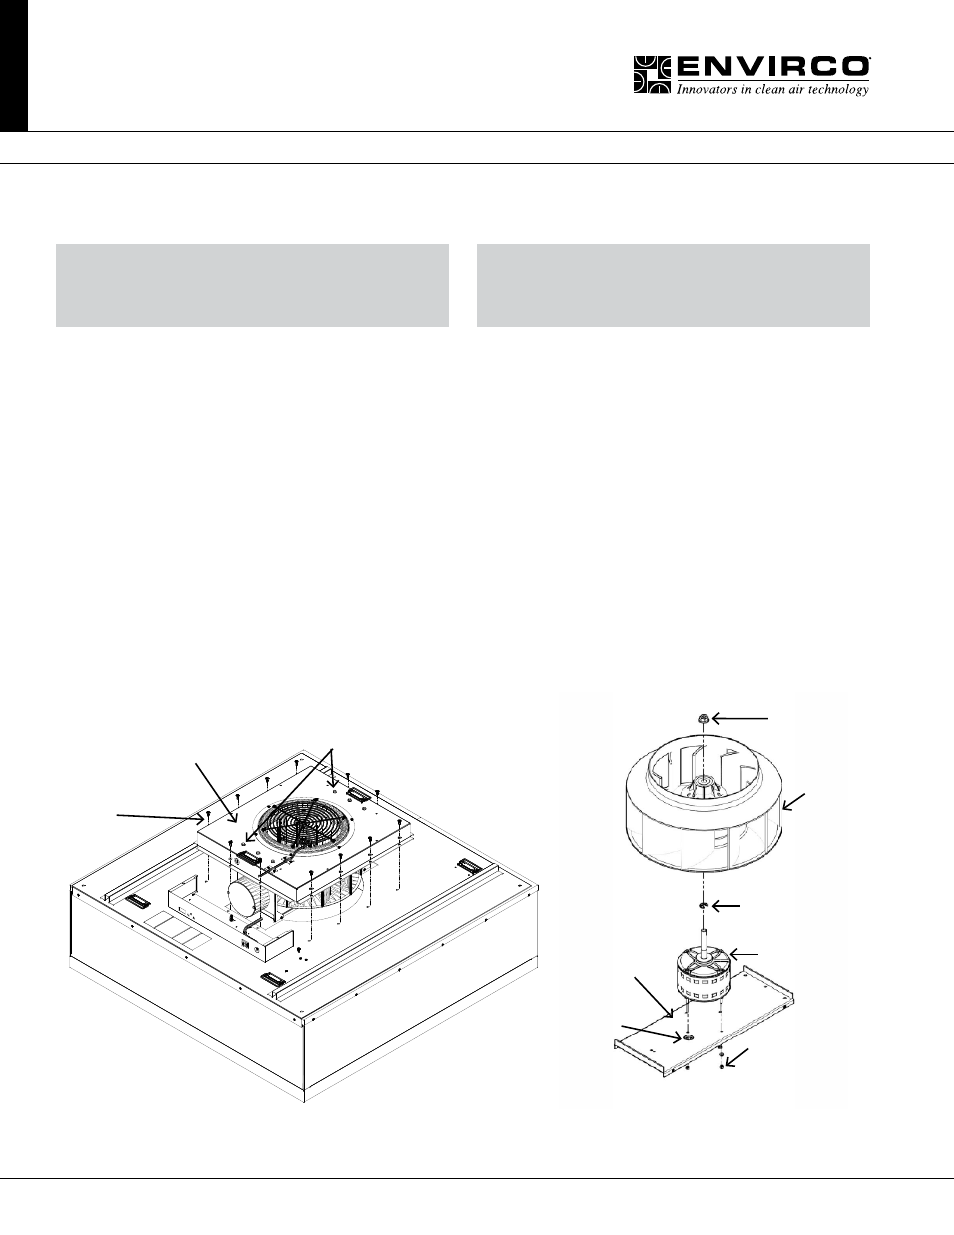
Service: RSR/E Motor Removal and Installation
Note: Minimum 2 person project.
Tools Required: 3/16 Ball Driver, Phillips screw bit, Head Driver, Battery Operated Drill, (2) 8” adjustable wrenches, 10 mm
hex head wrench, #2 standard screwdriver, and slip joint pliers
Step 1. Diffuser Screen Removal.
Step 2. HEPA Filter Removal.
Step 3. Remove (10) baffle mounting screws, carefully remove baffle.
Step 4. Disconnect the 4-pin and 5-pin control cables at the cap.
Step 5. Remove cover of cap to access motor cable for disconnection and routing back to motor - two screws for cap cover/
mounting of cap have nuts needing to be re-used.
Step 6. At the motor mounting plate, remove the (4) gussett screws at the corners, then the (6) bolts of the lower blower
assembly.
Step 7. Remove blower wheel using (2) adjustable wrenches, one to hold motor shaft and the other to losen the 3/4” hex
nut. Once wheel is removed, then using screwdriver, pull c-clip from motor shaft.
Step 8. Carefully route motor wire through grommet hole after removing rubber grommet to allow for cable connection and
clearance.
Step 9. Remove hex nuts and washers from (4) mounting studs of motor to separate motor from plate.
Step 10. Install new motor and components in reverse order.
WARNING
DISCONNECT THE UNIT FROM THE ELECTRICAL
POWER SOURCE BEFORE ATTEMPTING
ANY SERVICE
WARNING
ELECTRICAL SERVICE SHOULD ONLY
BE PERFORMED BY A LICENSED
OR QUALIFIED ELECTRICIAN.
Motor/Electrical Removal
Motor Housing
Assm.
Motor Mounting Plate
10 mm bolts
Mounting
Screws
Motor Mounting
Hardware
Motor Mounting
Plate
Motor Shaft
Hex Nut
Motor
Blower
Wheel
C-Clip
Wiring
Grommet
Motor Assembly