Location, Installation, Important – Kenmore 241858201 User Manual
Page 5: Installation clearances, Instaiiation
Attention! The text in this document has been recognized automatically. To view the original document, you can use the "Original mode".
0 1
Instaiiation
This Use & Care Manual provides specific operating
instructions for your model. Use the refrigerator only as
instructed in this Use & Care Manual.
Before starting the
refrigerator,
follow these important first steps.
LOCATION
•
Choose a place that is near a grounded electrical outlet.
Do Not
use an extension cord or an adapter plug.
•
If possible, place the refrigerator out of direct sunlight
and away from the range, dishwasher or other heat
sources.
•
The refrigerator must be installed on a floor that is level
and strong enough to support a fully loaded refrigerator.
•
Consider water supply availability for models equipped
with an automatic ice maker.
INSTALLATION
DO' NOT.
l:nste1l-ih.e.rfefrig'efator^;wh:ere:ttie terihperaturewl-jl
::
dfpp beiow'S5':F; pr.r|s0;3bpveTd№F (43"G).The:^
Poitipresser mil .ridt .ableto maihtaih: pto.per^.^; : V
te:niper
0turas;1nsld© the refrigerator.': :i: / T '
/. ' ///
. '
0
CAUTION
D.Ò NOT:bìóckihéTòe'grl'Ìie/òtt thsrfpWer:front ofyour'T:' .'
refrigerator. Buffioietrt air. cireuiation is essential itor the.
proper.opératiort of; your; refrigerator, ■; ■; ■;
IMPORTANT
if-yeu; .irisfall 'ypur ;ref.rige.ràt
0
.r ■iri :a.gargge
or
Piher.;uriti:eated
àrea,-y.diJ rbay .expe.riehòè freSief tempèratùréyp.robléms
(Juri.f;ig\thS:wi:ntGr;fflcnthd: wfisriTemperafurés. dip.beibw.:
.55‘'.'F; ■; T. a/; ■■/■.
t
;;;-
upgrading yciijr rsfrigeraior; with.>f; Garage iKit: will fower.fhe
;mirii mum :opér,àti.h g f srnipe ratu re : of yoyr
pan :be.:or:dered;thro;ug.f!; fiears stores .or
:àt ah .addifioria! òosf.; ; ; ; ; ; ; ; ; ; ; ; ; ;
.urHt:lp;.34rTrThis kit
Sears ■Pa.ris :&-.F{epair
Installation Clearances
• Allow the following clearances for ease of installation,
proper air circulation, and plumbing and electrical
connections:
Sides & Top 3/8”
Back
1 ”
MÒTE
if:ypu: .itee-.blaek coils,'tubing;on the back
of
;yGur.ref;rigerator
(air-cooled: cfji'KJe'rus'erTi.eave.'3:”: cfearlance-.at
itop.
oft ip'
retrigeratQf.i i i i i i i i i i i i i i i i i i i i i i i i i i i i i i i i i i i i i i i i i i i i i
■MOTE"
;if your; refrigerator ;is;:p.laced .with: the do.or. fiinge; side again.st
:a.w:iilb youi rnày have to (allow additipnaiispace.:?© the .door ( ■
■.cari- be :o.pened; wider;. ■; ■; ■; ■; ■; ■; ■; ■; ■; ■; ■; ■; ■; ■; ■; ■; ■; ■; ■; ■; ■; ■; ■; ■; ■; ■; ■; ■; ■; ■; ■; ■; ■; ■; ■; ■;
All four comers of your refrigerator must rest firmly on a solid
floor. Your refrigerator is equipped with adjustable front rollers
or front leveling screws to help level your unit.
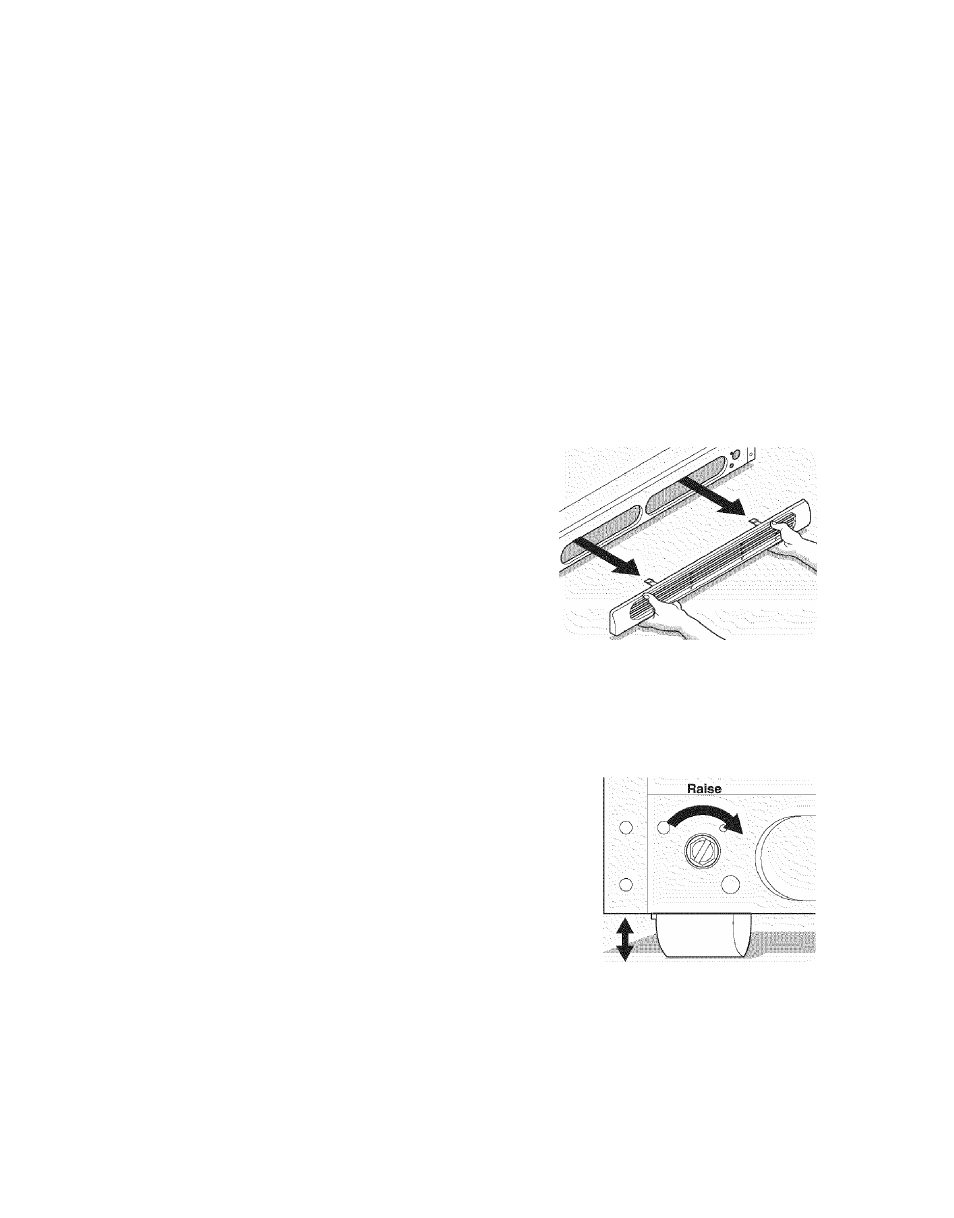
To Level Your Refrigerator:
1. Remove toe grille.
2.
Use flat-blade screwdriver or 3/8” socket wrench to adjust
front rollers.
Raise the front of the refrigerator enough .so the doors close
freely when opened halfway. The refrigerator should slope
W’
to down from front to back. Then level the refrigerator from
side to side by adjusting the front rollers.
m
■Z:
W:
r-
CO