Now start, Page 5 – Whirlpool 3406449 User Manual
Page 5
Attention! The text in this document has been recognized automatically. To view the original document, you can use the "Original mode".
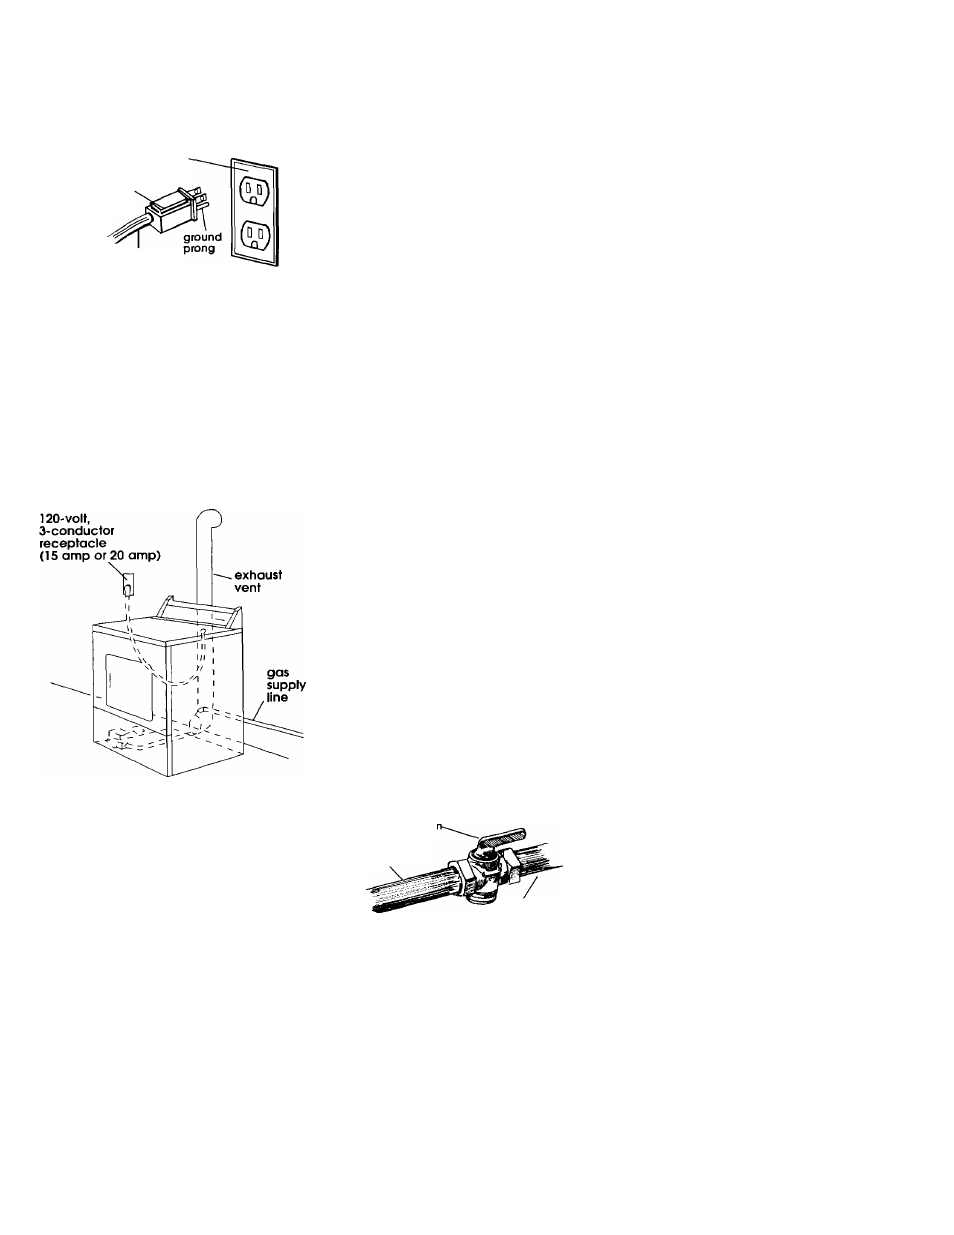
customer to have a properly
grounded, 3-prong wall receptacle
Installed by a qualified electrician. See
Figure 1.
3-prong,
ground-type
wall receptacle
3-prong,
ground
plug
power supply
cord
Figure 1
Copies of the standards listed above may
be obtained from:
‘American Gas Association
1515 Wilson Boulevard
Arlington, Virginia 22209
" National Fire Protection Association
Batterymarch Park
Quincy, Massachusetts 02269
Now start...
With dryer in laundry area.
I
■ Put on safety glasses and
gloves. Take tape off front corners of
dryer. Open dryer and remove the
literature and parts packages.
Remove the tape that holds the
drum to the cabinet. (Some dryer
drums are not taped for shipping.)
Move the drum by hand to make
certain all tape has been removed.
Wipe the interior of the drum
thoroughly with a damp cloth.
fcB Take two of the cardboard
corners from the carton and place
them on the floor in back of the
dryer. Firmly grasp the body of the
dryer and gently lay it on its back on
the cardboard corners.
3 ■ With one of the legs in hand,
check the ridges for a diamond
marking. That's how far the leg is
supposed to go into the hole.
4
b
Start to screw the leveling legs
into the holes by hand. (Use a small
amount of liquid detergent to
lubricate the screw threads so it is
easier to turn the legs.) Use a 1-inch
wrench or socket wrench to finish
turning the legs until you reach the
diamond mark.
Stand the dryer up.
Slide dryer onto cardboard or hard-
board before moving across floor to
avoid damaging floor covering.
3 B Move dryer close to final
position. Remove cardboard or
hardboard from under dryer.
6
b
Remove red cap from gas pipe.
Carefully move dryer into final
position. Place level on top of the
dryer, first side to side: then front to
back. If the dryer is not level, adjust
the legs of the dryer up or down until
the dryer is level.
7
B Connect gas supply to dryer. Use
pipe-joint compound resistant to the
action of L.Pgas for gas connections.
If flexible metal tubing is used, check
that there are no kinks.
shutoff valve
"open" positioi
to dryer
gas supply line
6
b
Open the shutoff valve in the
gas supply line.
9
b
Use a brush and liquid detergent
to test all external gas connections
for leaks. Bubbles around connections
will indicate a leak. If a leak appears,
shut off gas valve controls and adjust
connections. Then check connections
again. NEVER TEST FOR GAS LEAKS
WITH A FLAME. Close the access
panel.
All connections must be wrench-
tightened.
10
.
I To exhaust dryer, see "Exhaust
requirements," Pages 2-3. Connect
exhaust vent to exhaust hood. Use
duct tape to seal all joints in the
exhaust vent. Use caulking to seal
exterior wall opening around exhaust
hood.
11
b
Plug power supply cord into
grounded outlet.
12
.
Insert user card and push
START button to start dryer to remove
air from the gas supply line. Using a
full heat cycle (not the air cycle), let
the dryer run for at least five minutes.
If the burner does not ignite and you
can feel no heat inside the dryer, shut
off the dryer for five minutes. Check
that all gas supply valve controls are
in "ON" position and that the power
supply cord is plugged in. Repeat the
five-minute test.
Note: Dryer door must be closed for
dryer to operate. When door is open,
dryer stops, but timer continues to
run. To restart dryer, close door and
push START button.
Page 5