Carl Goldberg GBGA1043 User Manual
Page 9
9
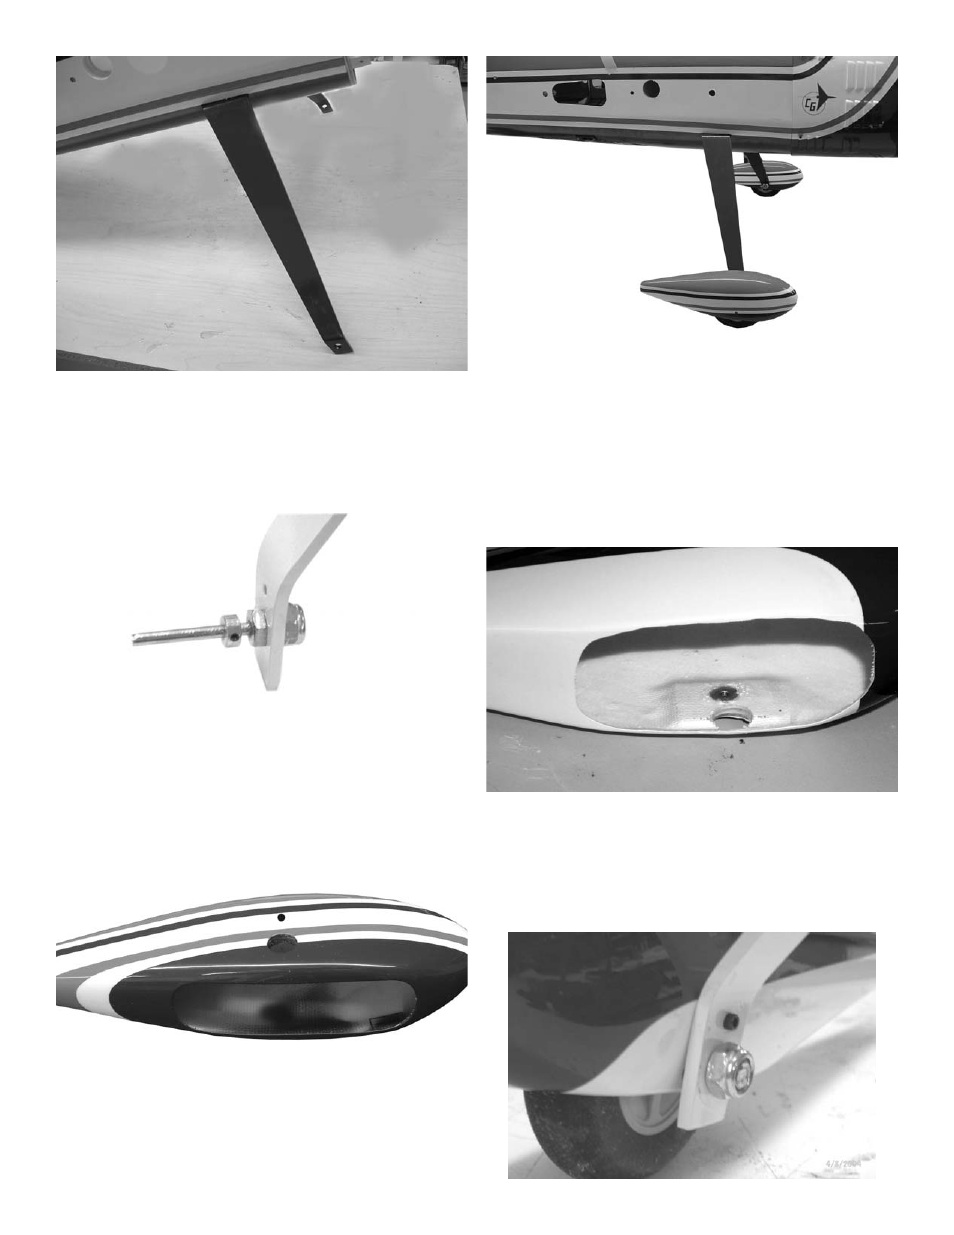
3.
Install each axel using the locking nut. Be
careful not to over tighten the nut, it looks like
a large bolt but it has been drilled out for the
axel and can be broken if too much torque is
applied.
4.
Install one wheel collar on each axel with 3/16”
between the collar and the axel nut. This will
space the wheel in the center of the wheel
pant.
5.
The wheel pants have the 1/2” hole predrilled
in each pant. The 1/8” hole for the mounting
bolt must be drilled.
7.
Remove the wheel pant and drill a 5/32” hole
at the location you marked. Insert the blind nut
on the inside and pull it tight using the 4-40
mounting bolt. Lock in place with CA glue
being careful not to get it in the threads.
6.
Block the tail of the plane up so that the fuse-
lage is sitting level. Put the wheel inside the
pant and slide both on the axel together.
While holding the wheel pant level, mark the
location of the mounting bolt by using a 1/8”
drill and inserting it through the predrilled hole
on the landing gear leg
- GBGQ1296 (12 pages)
- GBGA1079 (25 pages)
- GPMA0963 Cub (33 pages)
- GBGA1023 (12 pages)
- GBGA1069 (29 pages)
- GPMA1956 Eagle 2 ARF (40 pages)
- GPMA0955 EAGLE 2 (59 pages)
- GBGA1080 (9 pages)
- GBGA1046 (21 pages)
- GBGA1045 (21 pages)
- GBGA1040 (16 pages)
- GBGA0040 (40 pages)
- GBGA1082 (10 pages)
- GBGA0055 (44 pages)
- GBGA1041 (20 pages)
- GBGA1070 (17 pages)
- GBGA1078 (23 pages)
- GBGA0050 (26 pages)
- GPMA1940 EP Falcon ARF (16 pages)
- GBGA0057 (60 pages)
- GPMA1960 Gentle Lady Glider ARF (16 pages)
- GPMA0960 Gentle Lady (21 pages)
- GBGA1091 (15 pages)
- GBGA1042 (9 pages)
- GBGA1019 (13 pages)
- GBGA1072 (14 pages)
- GBGA1075 (18 pages)
- GPMP1020 Mini Hold'em Electric Cradle (2 pages)
- GBGP0105 (10 pages)
- GBGA1090 (16 pages)
- GBGA1064 (24 pages)
- GBGA1088 (30 pages)
- GPMA1926 Monster Pitts Electric ARF (17 pages)
- GBGA1058 (9 pages)
- GBGA1087 (16 pages)
- GBGA1092 (24 pages)
- GBGA1085 (19 pages)
- GPMA1993 Skylark 70 Sport ARF (18 pages)
- GPMA1959 Sophisticated Lady Glider ARF (20 pages)
- GBGA0059 (32 pages)
- GPMA1967 Sr. Falcon ARF (21 pages)
- GBGA1089 (19 pages)
- GBGA1067 (19 pages)
- GBGA0067 (39 pages)
- GBGP0108 (4 pages)