Char-Broil 466231203 User Manual
Page 7
466231203 • 7
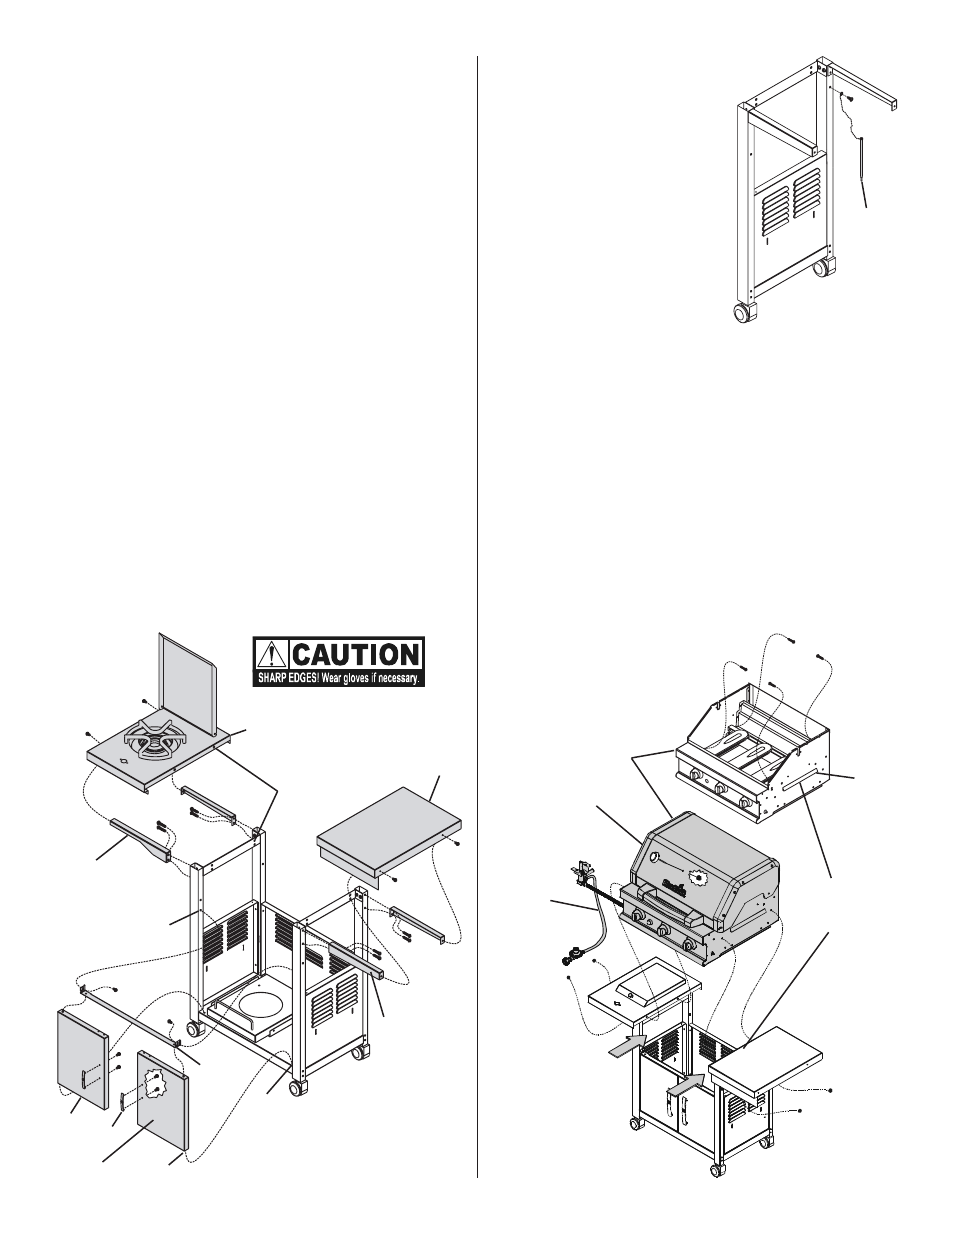
8. Attach the door bracket to the lower holes in the front legs
with the end tabs pointing upward and the flange to the rear,
pointing downward. Use 2 of the 1/4x1/2" Phillips-head
screws. Do not fully tighten. See Fig. 4.
9. Place doors into the hinge holes of the bottom shelf and
door bracket. Push door bracket down until doors are
secure and can open and close freely. Do not fully tighten
door bracket screws. See Fig. 4.
10. Remove protective film from doors. Install door handles to
doors using 4 of the 3/16x3/8" Phillips-head screws. See
Fig. 4.
11. Attach the 4 side shelf brackets to the tops of the cart legs
using 8 of the 1/4x1/2" Phillips-head screws.
IMPORTANT: Bracket with cut-out installs on front left
leg. Be sure the flat side of each bracket faces outward.
Fully tighten. See Fig. 4.
12. Place the sideburner shelf over the left brackets and cross
brace. Be sure ignitor wire is hanging loose. Be sure the
inside shelf holes align with cross brace holes. Secure
shelf firmly to the ends of the brackets using 2 of the
1/4x1/2" Phillips-head screws. Repeat this procedure for
the side shelf on the right side of the cart. See Fig. 4.
FIGURE 4
FIGURE 6
Sideburner
shelf
Side
shelf
Shelf bracket,
flat side facing
outward
Lower
hole
Door
bracket
Door
Handle
Hinge
Hinge
hole
Align
holes
To reduce the weight of the grill head, open the grill lid and
remove the packed components. This step requires 2 people
to lift and position the grill head onto the cart.
14. HINT: Slide grill head into cart from the front. Use care to
avoid scratching tops of side shelves. Align the 2 holes
beneath the hang ledge on each side of the grill head with
the 2 holes in the side shelf and cross brace on the cart.
Raise the grill lid and insert 4 of the 1/4x3/4" Phillips-head
screws. Beneath the side shelves, add 1/4" nuts. Do not
fully tighten. See Fig. 6.
15. Attach heat indicator to grill lid using nut provided. Make
sure graphics on heat indicator are properly oriented before
tightening nut. See Fig. 6.
Grill
head
Hang
ledge
Gas hose
Hang
ledges
rest on
shelves
Bracket with
cut-out
Heat indicator
Remove
film
Match
lighting
stick
FIGURE 5
13. Attach match lighting stick
and chain to the right rear
leg, below shelf bracket,
using one M4x10mm,
self-tapping, Phillips-head
screw. See Fig. 5.