Char-Broil 466231203 User Manual
Page 6
6 • 466231203
LF
LR
RR
RF
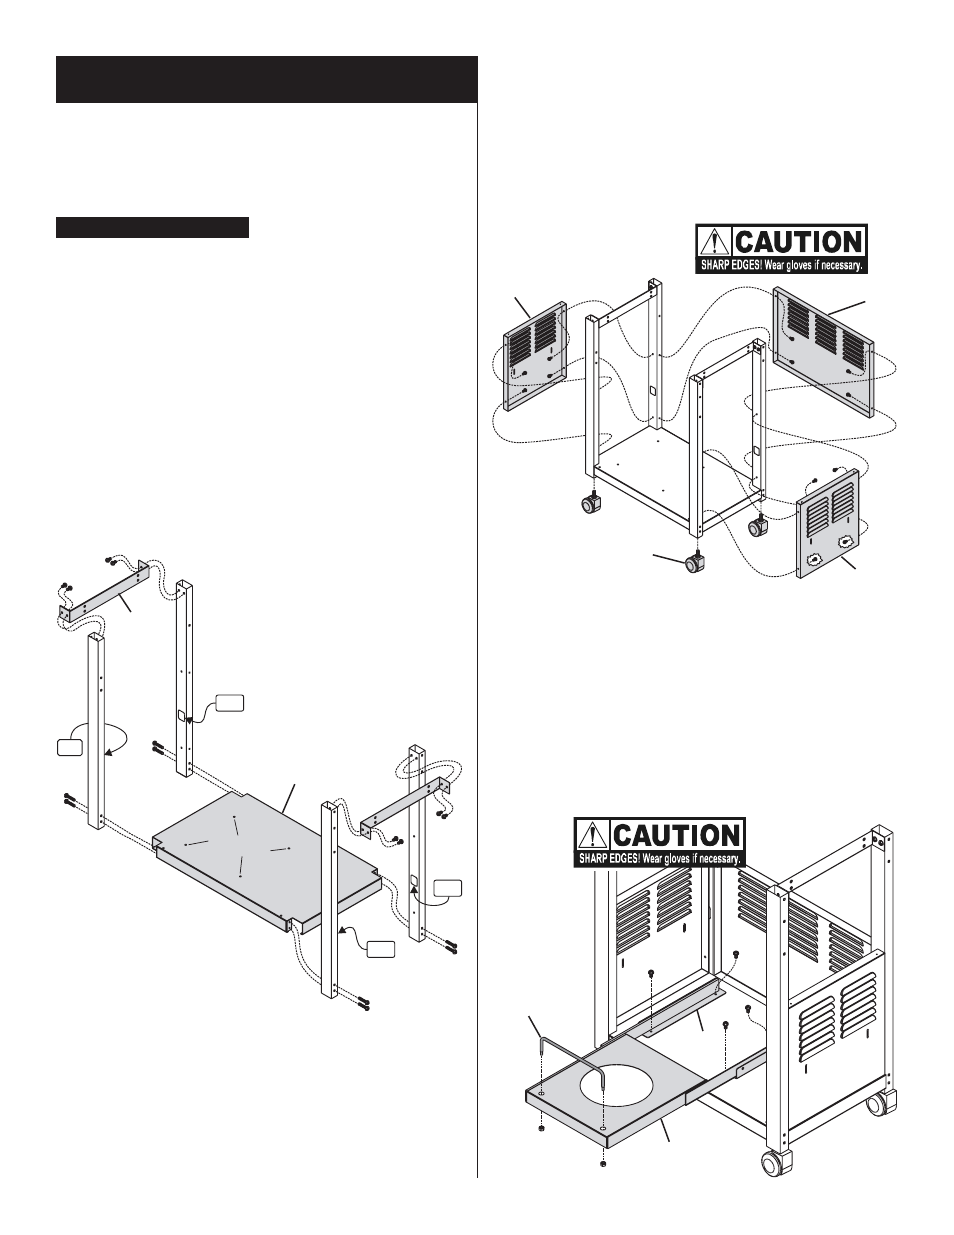
Assembly - 466231203
• Unpack and remove all protective packaging.
1. Position bottom shelf with the 4-hole pattern to the left side.
See Fig. 1.
VERY IMPORTANT:
The labels on the cart legs
indicate their assembly position to the bottom shelf.
LF
LF
LF
LF
LF=Left
Front,
LR
LR
LR
LR
LR=Left Rear, RF
RF
RF
RF
RF=Right Front, and RR
RR
RR
RR
RR=Right
Rear. Labels should face inward toward each other when
correctly assembled. Remaining components cannot be
assembled if leg positions are incorrect.
2. Install the four cart legs to the indicated corners of the
bottom shelf using 8 of the 1/4x2-1/2" Phillips-head screws
provided. Do not fully tighten screws.
3. Install cross braces, facing inward, to cart legs on both
sides using 8 of the 1/4x1/2" Phillips-head screws. Fully
tighten. See Fig. 1.
FIGURE 1
Cross
Brace
Bottom
Shelf
4. Screw the 4 casters into the caster seats in the bottom of
each cart leg. Turn the threaded caster stem by hand,
clockwise until it stops. Fully tighten with the wrench
provided. See Fig. 2.
5. Install the two side panels and one rear panel to the cart by
using 4 of the 3/16x3/8" Phillips-head screws on each
panel. Leave rear panel screws loose. See Fig. 2.
FIGURE 2
Caster
Rear
panel
4-hole pattern
toward left side
Side
panel
Side
panel
6. USE CAUTION when handling the pull-out tank tray.
Slide rails have sharp edges. Install the handle on the
pull-out tank using 2 of the 1/4" nuts. Fully tighten. See
Fig. 3.
7. Fully extend the pull-out tank tray and attach the slide rails
to the 4-hole pattern in the bottom shelf using 4 of the
1/4x1/2" Phillips-head screws. Fully tighten. See Fig. 3.
FIGURE 3
Handle
Pull-out
tank tray
Slide
Rail