Servicing your utility vehicle, Warning – Cub Cadet Series C470 User Manual
Page 16
16
Clean Battery and Terminals
1. Remove battery from vehicle. Always remove negative
cable first when disconnecting.
2. Wash battery with solution of four tablespoons of
baking soda to one gallon of water.
3. Rinse the battery with plain water and dry.
4. Clean terminals and battery cable ends with wire
brush until bright.
5. Apply petroleum jelly or silicone spray to terminals to
prevent corrosion.
6. Install battery. Always install negative cable last when
connecting.
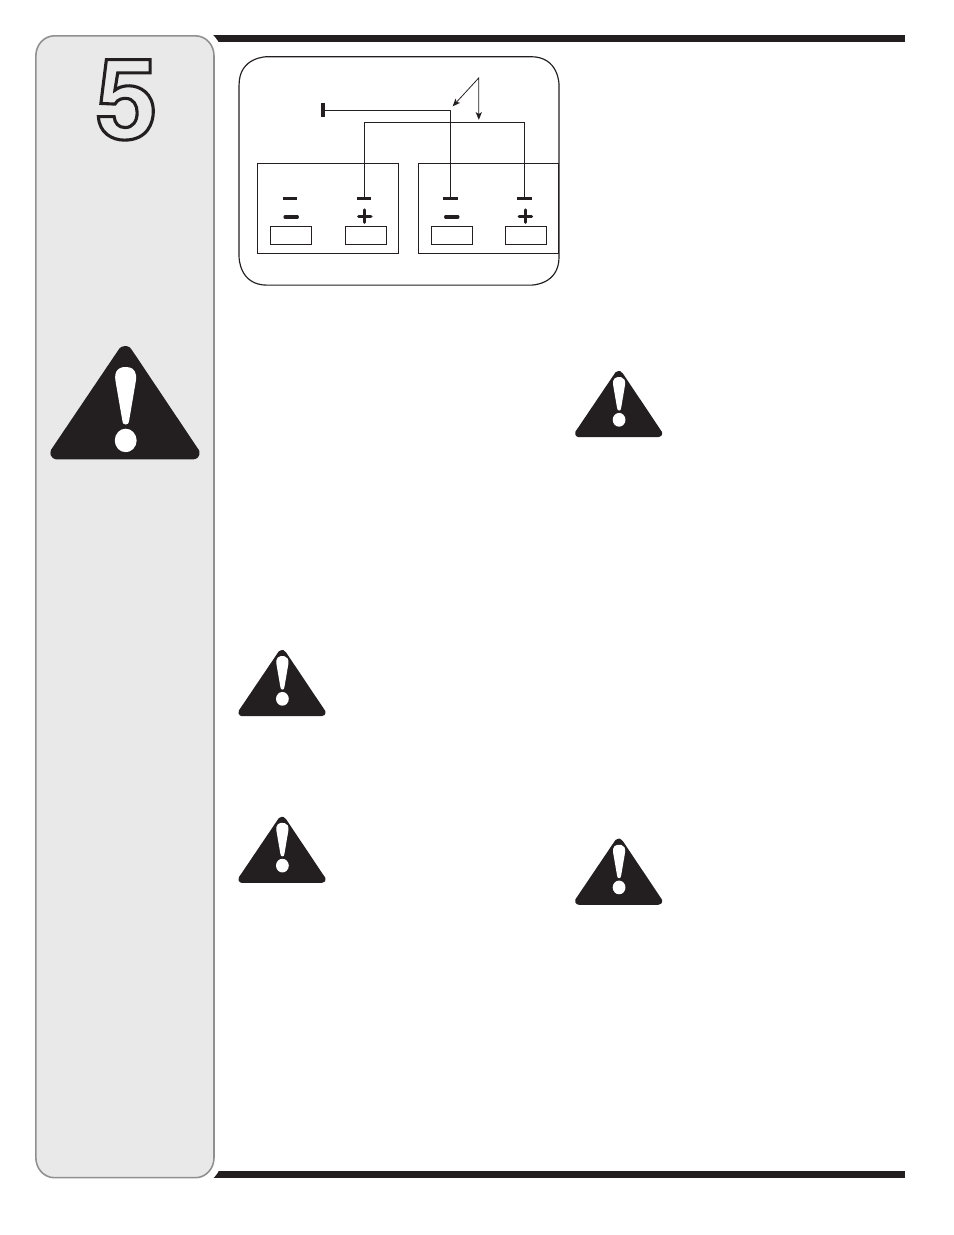
Jumping a Battery
WARNING: Do not attempt to jump
start a frozen battery. Warm to 60 de-
grees F (16 degrees C). Do not smoke
near battery and wear eye protection
and gloves when handling battery.
1. Connect positive (+) jumper cable to booster battery
positive (+) post (A). See Figure 6.
2. Connect the other end of positive (+) jumper cable to
the disabled vehicle battery positive (+) post (B).
3. Connect negative (-) jumper cable to booster battery
negative (-) post (C).
4. Connect the other end (D) of negative (-) jumper cable
to a metal part of the disabled machine frame away
from battery.
5. Start the engine of the disabled machine and run
machine for several minutes.
6. Carefully disconnect the jumper cables in the exact
reverse order: negative cable first and then the
positive cable.
Charging
WARNING: Charge battery in a well
ventilated area and keep away from an
open flame or pilot light as on a water
heater, space heater, furnace, clothes
dryer or other gas appliances.
If the vehicle has not been put into use for an extended
period of time, charge the battery with an automotive type
12-volt charger for a minimum of one hour at six amps.
Engine
Read the engine operator’s manual for any service or
maintenance information pertaining to the engine.
Filling Fuel Tank
1. Stop vehicle on a level surface and apply parking brake.
2. Turn the ignition key to the STOP position and
remove the key.
3. Allow engine to cool several minutes before you add fuel.
4. Clean area around fuel cap and remove cap.
5. Fill tank with fresh, unleaded, regular grade fuel only
to bottom of filler neck. Use a minimum of 87 octane.
6. After refueling, make sure tank cap is closed securely.
Battery
WARNING: The battery produces
a flammable and explosive gas. Do
not smoke near battery. Wear eye
protection and gloves when handling
the battery. Do not allow direct metal
contact across battery posts.
The battery is sealed and is maintenance-free.
Acid levels cannot be checked and fluid can not be
added.
California Proposition 65 Warning:
Battery posts, terminals, and related
accessories contain lead and lead
compounds, chemicals known to the
State of California to cause cancer
and reproductive harm. Wash hands after handling.
IMPORTANT: If removing the battery for any reason,
disconnect the NEGATIVE (Black) wire from it’s
terminal first, followed by the POSITIVE (Red) wire.
When re-installing the battery, always connect the
POSITIVE (Red) wire to its terminal first, followed by the
NEGATIVE (Black) wire. Be certain that the wires are
connected to the correct terminals; reversing them could
change the polarity and cause damage to your engine’s
alternating system.
WARNING
Figure
Disabled Battery
Booster Battery
Jumper Cables
B
D
A
C
Servicing
Your
Utility
Vehicle
The battery produces a
flammable and explo-
sive gas. Do not smoke
near battery. Wear eye
protection and gloves
when handling the
battery. Do not allow
direct metal contact
across battery posts.
The battery is sealed
and is maintenance-
free. Acid levels cannot
be checked and fluid
cannot be added.
Do not attempt to jump
start a frozen battery.
Warm to 60 degrees F
(16 degrees C). Do not
smoke near battery
and wear eye protec-
tion and gloves when
handling battery.
Charge battery in a
well ventilated area
and keep away from
an open flame or
pilot light as on a
water heater, space
heater, furnace, clothes
dryer or other gas
appliances.