Steffes HPB22 Troubleshooting Guide User Manual
Page 5
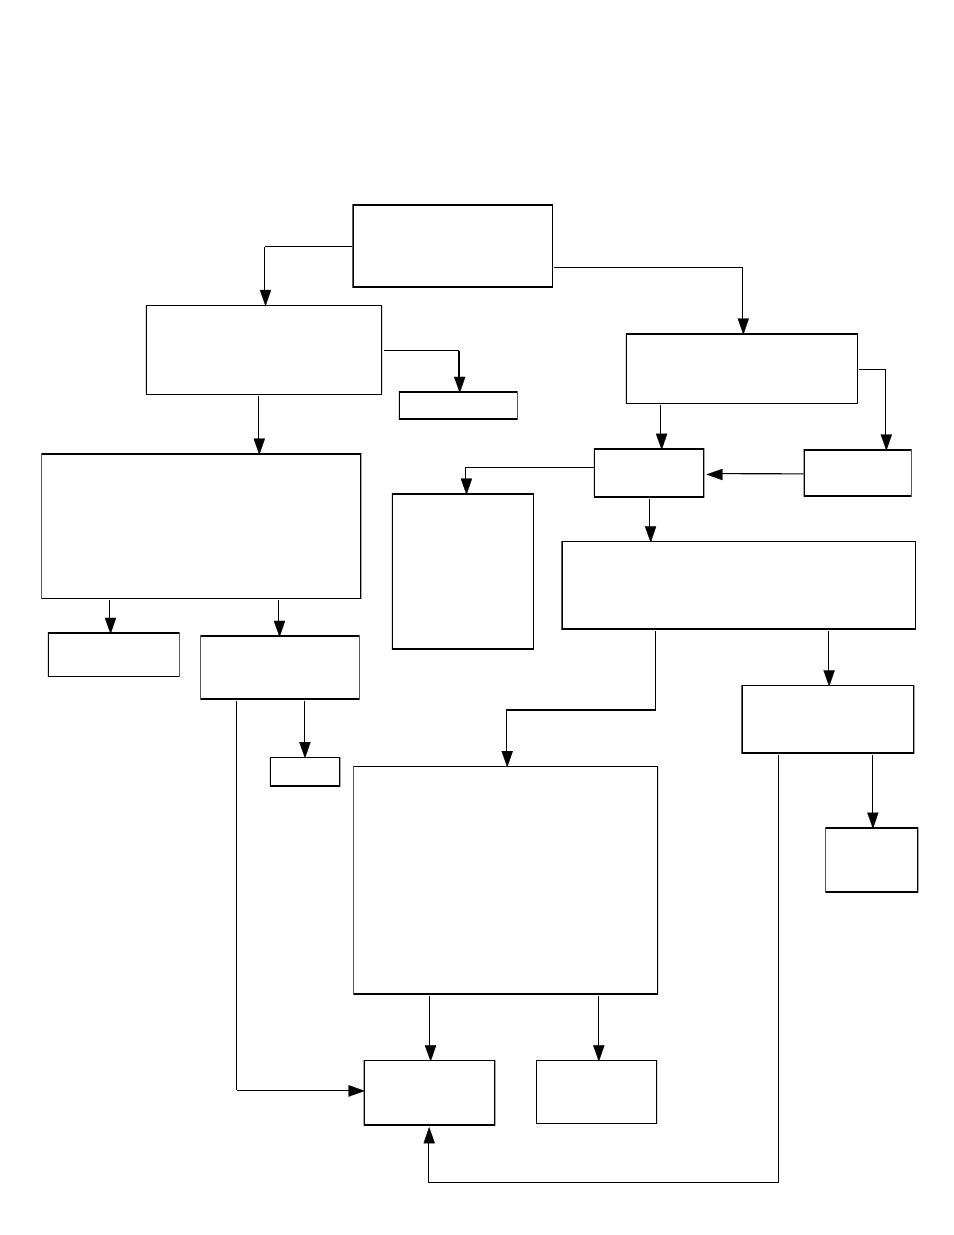
Page 3
Heat Pump Booster
Function: Core Charging
Problem: Unit overcharges on warm days
Before starting any of the procedure below, check voltage on load side of all HPB circuit
breaker and check low voltage fuses on charge control circuit board.
Check operation of the three
"Outdoor Temperature
Sensor" lights on charge
control circuit board (51).
With wires disconnected, check
ohm values of the charge control
resistor (49). Must be 175 ohm
center to top and center to bottom.
Check the charge level selector
switch. Unit should not be in
"HIGH" mode on warm days.
All lights "ON" regardless of
outdoor temperature
Lights work properly
Replace resistor (49).
Check unit wiring and
charge control circuit
board fuses.
Replace charge control
circuit board (51).
Defective
Ok
Defective
Check for 32 VDC between the "C" position
(thermostat connection) on the charge control circuit
board's terminal block and the top low voltage fuse on
the charge control circuit board (51). Check fuse.
Check control
transformer(s) (55) and the
two lower 3AMP fuses.
Replace charge control
circuit board (51).
No voltage present
Ok
Replace charge
control circuit
board (51).
Ok
1. With outdoor air temperature sensor wiring disconnected and the selector
switches on the charge control circuit board set to "WINTER" and "AUTO"
positions, jumper outdoor air sensor terminals "W" and "R". The bottom
Outdoor Temperature Sensor light on charge control circuit board should be
off.
2. Jumper "W", "R", and "B" terminals. The middle and bottom Outdoor
Temperature Sensor lights on charge control circuit board should go off.
Voltage present
Replace charge control
circuit board (51).
Replace outdoor air
temperature sensor(61).
Ok
Defective
Repair
Ok
Check top
(1 AMP) fuse.
Set to auto
position.
Ok
Not
Ok
Defective
Replace fuse
and/or
transformer
(55).
Fuse Ok
Check outdoor
sensor wiring and
replace the fuse.
Fuse bad
Page 4
Check operation of the three
"Outdoor Temperature
Sensor" lights on charge
control circuit board.
With wires disconnected, check
ohm values of the charge control
resistor. Must be 175 ohm center
to top and center to bottom.
Check the charge level selector
switch. Unit should not be in
"HIGH" mode on warm days.
All lights "ON" regardless of
outdoor temperature
Lights work
properly
Replace resistor.
Check unit wiring and
charge control circuit
board fuses.
Ok
Defective
Check for 32 VDC between the "C" position
(thermostat connection) on the charge control circuit
board's terminal block and the top low voltage fuse on
the charge control circuit board.
Check control
transformer(s) and the
two lower 3AMP fuses.
No voltage present
Ok
Ok
1. With outdoor air temperature sensor
wiring disconnected and the selector switches
on the charge control circuit board set to
"WINTER" and "AUTO" positions, jumper
outdoor air sensor terminals "W" and "R". The
bottom Outdoor Temperature Sensor light on
charge control circuit board should be off.
2. Jumper "W", "R", and "B" terminals. The
middle and bottom Outdoor Temperature
Sensor lights on charge control circuit board
should go off.
Replace charge
control circuit
board.
Replace outdoor
air temperature
sensor.
Ok
Defective
Repair
Ok
Check top
(1 AMP) fuse.
Set to auto
position.
Not
Ok
Defective
Replace fuse
and/or
transformer.
Fuse Ok
Check outdoor
sensor wiring for
short to ground and
replace the fuse. If
fuse continues to
open, replace charge
control circuit
board.
Fuse bad
Check VAC on resistor (66) from middle to top
and middle to bottom. Reults vary depending on
number of charging lights on:
1 light on = 24 VAC middle to top and bottom
2 lights on = 0 VAC middle to top; 24 VAC
middle to bottom
3 lights on = 0 VAC middle to top and bottom
Replace charge
control thermostat.
Defective
Voltage present
Ok
Incorrect