Changing the tone – Panasonic RQ-V164 User Manual
Page 2
Attention! The text in this document has been recognized automatically. To view the original document, you can use the "Original mode".
Before Operation
Tape Playback
Listening to the Radio
IS
ET
Power source Q
Insert 2 AA size (R6/LR6 or equivalent, not in
cluded) batteries.
Batteries installed with incorrect polarities may leak
and damage this unit.
Replace with fresh batteries of the same kind, ob
serving polarity.
Battery life
When the batteries are weak, the tape speed will
slow down, the sound will become distorted, and
the voiume will decrease.
Connecting the headphones □
Plug the included stereo headphones into the Q
jack.
FAST
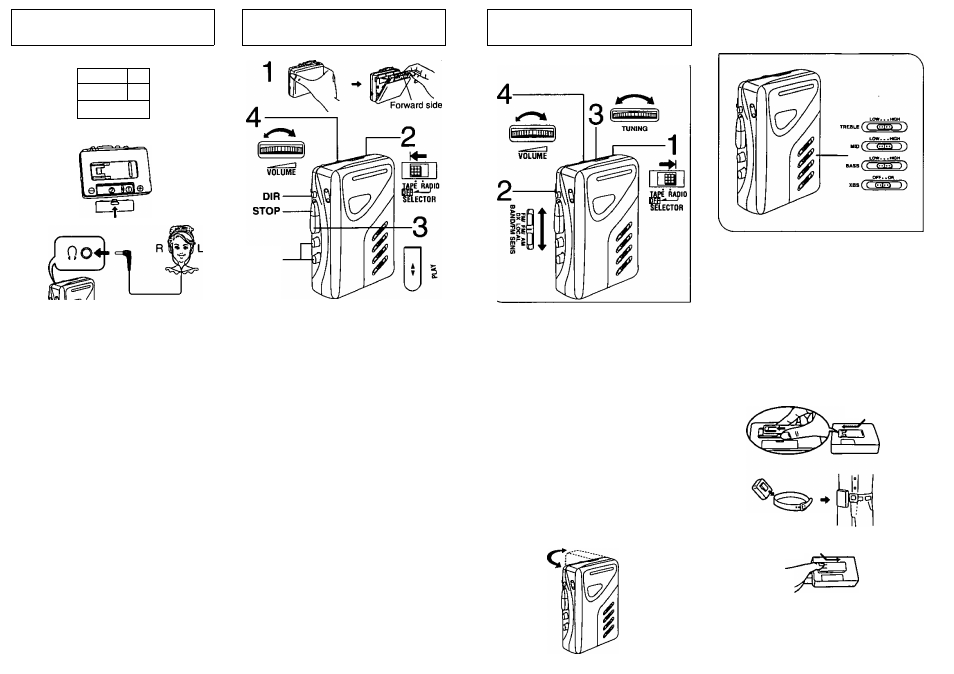
Follow steps 1 -4.
• Play will be continued, looping forward and re
verse side, until
STOP
is pressed. (Auto reverse)
• You can use normal type of tapes only.
■ To
Stop playback
Press
STOP.
■ To fast forward and rewind
Press one of the
FAST
buttons (◄◄ or ►►).
The tape will rapidly move in the direction of the
arrow.
■ To change the tape direction
Press
DIR
to select the playback side,
“FWD”
(for
ward) or
“REV”
(reverse).
Notes:
• Do not open the cassette compartment cover dur
ing tape operation.
• If the
SELECTOR
is set to
“RADIO”
during tape
operation, the button will not be released even
though the motor has stopped. In this case, press
STOP
to release the button.
• Between functions (during play, fast fonward or
rewind), always press
STOP
first to avoid jam
ming the tape.
•When the tape reaches the end after fast forward
or rewind, press
STOP
to release the
FAST
button.
Follow steps 1-4.
■ To stop the radio
Set the
SELECTOR
to
“TAPE
CSEB”
■ FM sensitivity selector
Normally set the
FM SENS
selector to
“DX”.
When the FM reception is impaired, or there is
interference from a powerful station, set the selec
tor to
“LOCAL”.
•This selector does not function for AM reception.
■ Antennas
FM:
Since the headphones cord serves as the FM an
tenna, be sure to use it extended, not coiled.
AM:
The built-in ferrite core AM antenna is directional.
Turn the unit to obtain optimum reception.
• Be sure to have the set in a horizontal position.
Changing the Tone
■ 3 BAND EQUALIZER
(TREBLE/MID/BASS)
Positioning the control to the “HIGH” side will am
plify the corresponding controls: the
“LOW"
side
will attenuate it.
■ XBS (Extra Bass System) Control
Set this control to
“ON”
to boost the dynamic bass
range. You can enjoy the dynamic bass sound.
Attaching the belt clip
Belt clip
(included)
Attaching clip to
your belt
To remove