Rane RPM 44 User Manual
Page 9
Drag Net Quick Start-1
Drag Net Quick Start
Rane’s tradition of writing a one page Quick Start section in our
manuals has been revamped. Since this section is four pages, it’s
called the Mostly Quick Start section.
Drag Net software installation is straight forward — just
run the setup.exe file included on the CD-ROM or downloaded
from Rane's website (www.rane.com/dragnet) and follow the on-
screen instructions.
You are prompted to create a new project and device con-
figuration the first time Drag Net is launched. Enter the project
name and file storage location on your hard drive. A second
dialog allows you to create a new device configuration. Select a
device type, RPM 26z for example, and specify a hard drive stor-
age location to create a new configuration.
Once a new project and configuration have been created, a
collection of windows is displayed within the Drag Net interface.
These windows can be independently resized, opened, closed,
docked and floated as you prefer.
• The Shortcuts folder displays a list of links to non-Drag
Net files or applications (e.g. project spreadsheets, proposal
documents), URLs, and even email recipients. Double-
click on a Shortcut to open it using the associated applica-
tion. Add additional links to the Shortcuts folder by right-
clicking within the Project window and selecting New.
• The Live folder displays a list of “online” Drag Net devices.
Click on the Poll icon or right-click in the Project window
and select Poll for devices, then choose one of the polling
options. The Live folder is populated as the polling opera-
tion progresses.
Transfer configurations between Storage and Live by dragging and
dropping configurations from one folder to another, or by using the
Transfer
menu.
All outputs are intentionally muted each time a new configura-
tion is transferred to a Live device. Unmute each output individual-
ly or use the Mute Outputs button in the toolbar to toggle the mute
status of all outputs (after carefully pondering the consequences, of
course).
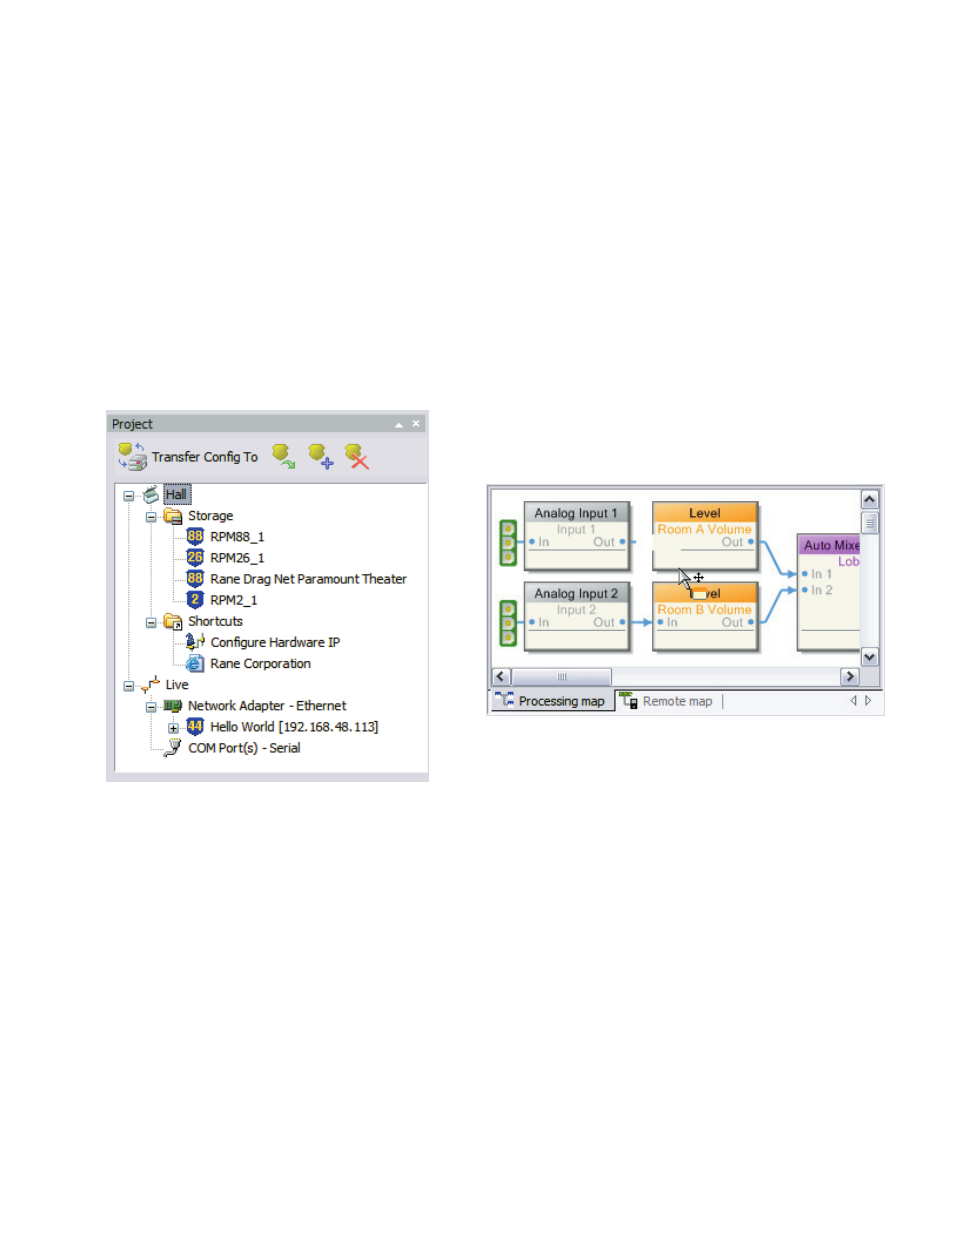
The Project Window is comprised of three folders and provides
links to Storage configurations, Shortcut links to other files or
applications, and a list of Live devices. Think of a Project as an
editable database of links — only the links to files are contained
in the Project file (*.prj file extension). The Project file neither
stores nor contains any of the settings for a particular device
configuration, it just consolidates and manages links to the rel-
evant files (for examples, the RPM 26z configurations are stored
with a .r26 file extension, and the RPM 88 configurations have a
.r88 extension). Changes to a Project's contents are automatically
saved. Only one Project at a time can be viewed in the Project
window.
• The Storage folder displays a list of “offline” or Storage
configurations residing on the local hard drive. Add links
to new or existing configurations to the Storage folder by
right-clicking within the Project window and selecting
either New or Add file(s).
The Device Configuration Window displays the current device
configuration, activated by double-clicking a Storage or Live
configuration (or alternately by right-clicking and selecting Open
Item). It is comprised of two distinct views: the Processing Map
and the Remote Map. Toggle between views using the tabs at the
bottom of the window. The Processing Map serves two basic
functions:
• It allows drag and drop techniques to assemble and connect
any combination of signal processing blocks between the in-
puts and outputs of a Storage configuration. It is not possible
to add or delete signal processing blocks or connections on a
Live configuration.
• It allows you to view and edit, in real-time, all signal process-
ing parameters for Storage or Live configurations. Double-
click the processing block or right-click and select Properties
to display a Properties (parameters) dialog. Changes made to a
Live configuration are automatically transferred to and saved
in the Live device. Changes made to a Storage configuration
must be saved using the Save command.