Front panel description – Rane RE 27 User Manual
Page 2
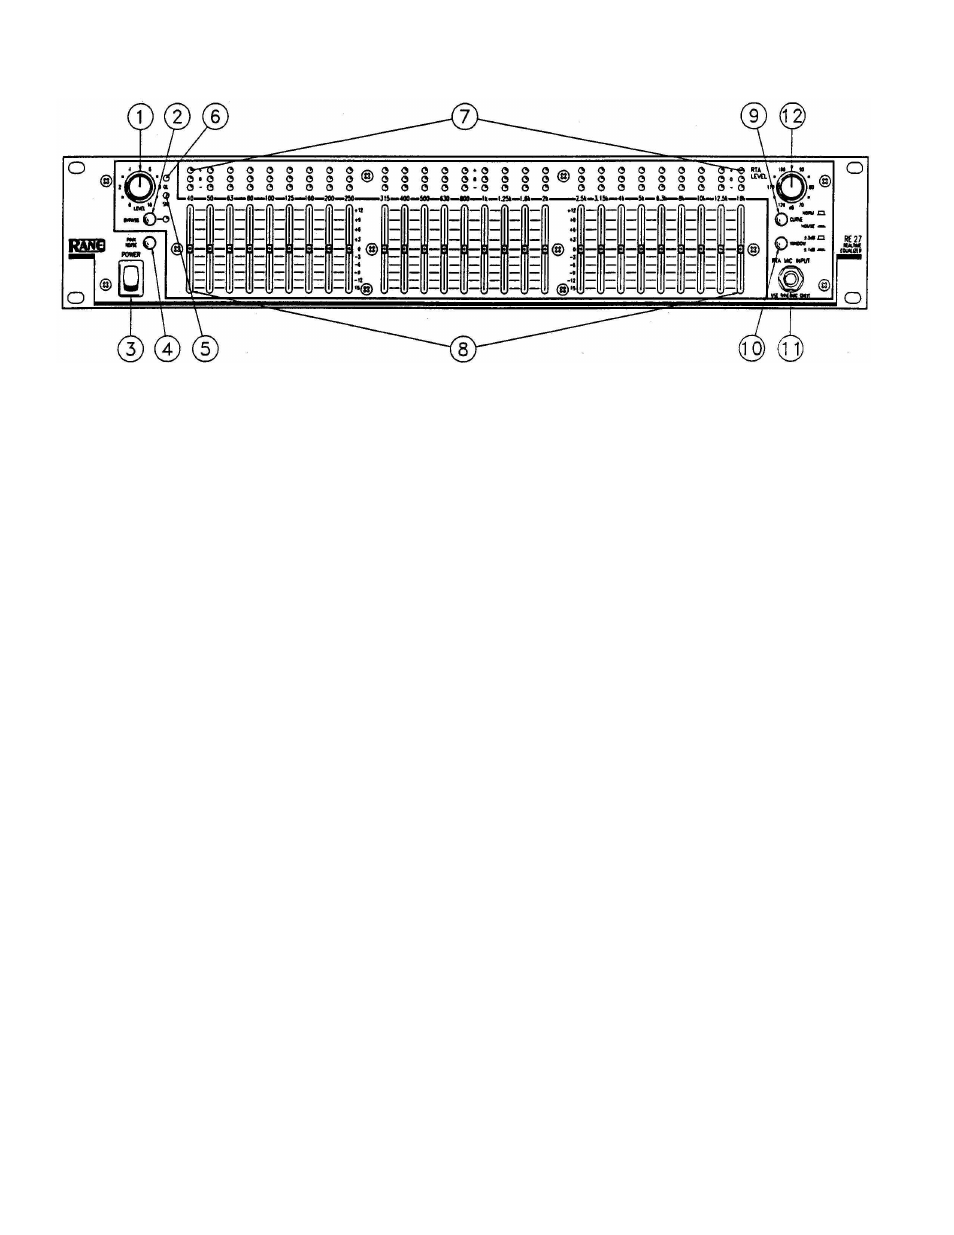
FRONT PANEL DESCRIPTION
1. EQ LEVEL CONTROL: This controls level through the equalizer section and provides up to 6 dB overall gain. Turn
this control down if the overload LED lights up.
2. BYPASS SWITCH: Engage to BYPASS all equalizer sections. The Bypass LED lights whenever the BYPASS switch
is engaged.
3. POWER SWITCH: You’ve probably figured this one out by now...
4. PINK NOISE SWITCH: Engage to activate the built-in pink noise generator. NOTE: Switch the pink noise generator
OFF when not in use. This prevents possible noise bleed-through into the program material.
5. SIGNAL PRESENT INDICATOR: This green LED lights with any input above -20 dBu (.078 volts), even in the
Bypass mode.
6. OVERLOAD INDICATOR: This red LED lights whenever the equalizer signal level reaches 4 dB below clipping.
7. ANALYZER DISPLAY LEDs: Bach red LED lights up when response is too high in that band; green LEDs light
when response is within +3 dB or +l dB of the selected curve; yellow LEDs come on when response is too low.
8. EQUALIZER SLIDERS: Calibrated in 3 dB increments, these sliders provide +12 dB of boost and -15 dB of cut at each
of the IS0 frequency centers.
9. CURVE SELECT SWITCH: The NORMAL position yields a flat response when all LEDs are green. The HOUSE
CURVE changes the response of the display such that the EQ sliders between 400 Hz and 1.6 kHz must be attenuated 3 dB to
obtain green LED response. This reduction in midrange results in a warmer more desirable sound at lower sound pressure
levels.
10. WINDOW SELECT SWITCH: In the ±3 dB position, the green LED in each band lights when signals of that
frequency are within 3 dB above or below the Normal or House curve, whichever is selected. In the ±l dB mode, system
response must be within 1 dB above or below the selected curve to light the green LEDs.
11. MICROPHONE INPUT JACK: Plug only the Rane Microphone into this jack — the DC volt-
age supplied by this jack could be damaging to any other microphone. When the mic is plugged
in, the display responds to whatever the mic picks up; when the mic is unplugged, the jack automatically switches the
display to monitor the output of the equalizer section.
12. RTA LEVEL CONTROL: Use this knob to adjust the microphone level (or line level when the microphone is
unplugged) to properly drive the display. This control is accurately calibrated in dB-SPL; any display band whose LED is
green has the sound pressure level indicated by this knob (only with the mic plugged in).
2