Operation, Routing with the template, Helpful hints – Ryobi A25RE02 User Manual
Page 6: Warning
6
7
13
32
7
1532
16
11
32
5
16
3
8
OPERATION
ROUTING WITH THE TEMPLATE
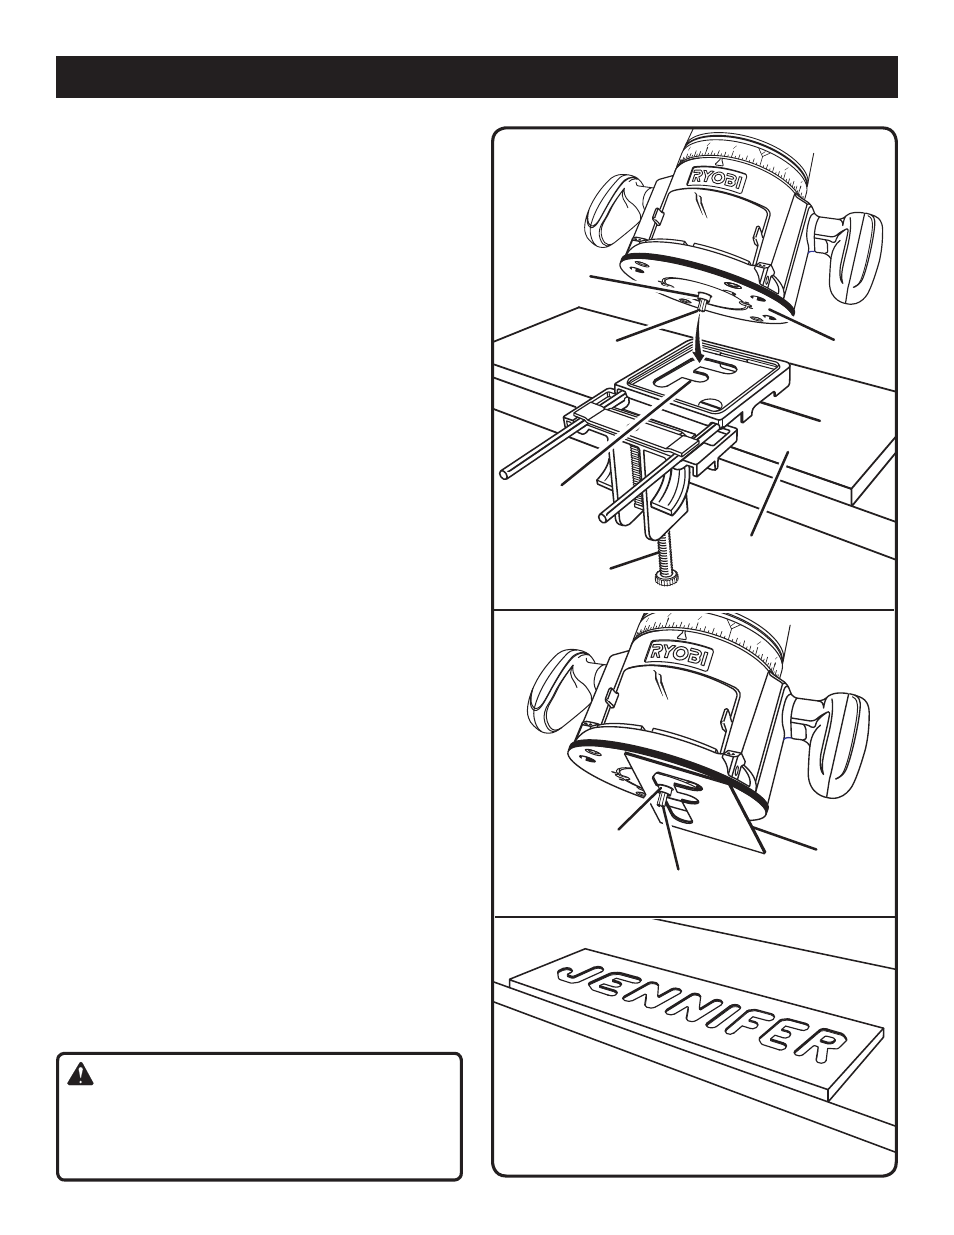
See figures 8 - 10.
NOTE: Refer to the Operator’s Manual that accompanied
your router for instructions on how to correctly install and
remove router bits.
Before making a cut in the workpiece, rout the first letter
in scrap material to get a feel for guiding the router around
the template.
n
With bit installed in router, set bit to desired depth of
cut.
n
Place router guide bushing into letter opening.
NOTE: Template guide bushing must be in contact with
letter template with bit slightly above workpiece when
router is started.
n
Turn router on and lower into wood until router base rests
on letter frame.
n
Follow opening with slight pressure to outside of letter
until you have routed completely around the letter and
returned to where you started.
n
Turn router off and wait until bit comes to a complete
stop before lifting router off letter frame.
n
Loosen clamp screw.
n
Slide mounting bracket to the right until left side of letter
frame lines up with edge of routed letter just completed.
(This gives you uniform spacing between each letter.)
n
Remove template of letter just routed and replace with
next template to be used.
n
Continue process until project is complete.
HELPFUL HINTS
n
When using the small set of letter templates, always posi-
tion the letter to be routed in the lower left hand corner
of the letter frame.
n
Redwood is a good sign material. It is easy to rout and
has a long outdoor life.
n
Finish your sign quickly and easily by painting the entire
top surface of the finished sign with fast drying paint. (Us-
ing paint in aerosol cans is helpful.) Sand the top surface
of the sign leaving the paint in routed letters. The non-skid
mat is useful for holding the sign in place.
n
Vertical signs can be routed by turning the letter template
90˚ in the letter frame.
n
Letters can be routed close to the edge of a sign by turn-
ing workpiece around. Turn letter templates around and
locate letters close to the far edge of the workpiece.
WARNING:
Some workpieces may not be securely held with the
non-skid mat. Always assure your workpiece is securely
held in place by the mat or clamps before beginning any
cutting operation.
Fig. 9
Fig. 10
GUIDE
BUSHING
LETTER
FRAME
ROUTER BASE
WORKPIECE
LETTER
TEMPLATE
BIT
13 32
7
1532
16
11
32
5
16
3
8
LETTER
TEMPLATE
BIT
TEMPLATE GUIDE
BUSHING COLLAR
CLAMP SCREW
Fig. 8