Conair inFiniti NE158CS User Manual
Page 2
LIM
ITE
D T
HRE
E Y
EAR
W
ARR
ANT
Y
Conair will
repair or
replace (a
t our
option)
your unit
free of
charge for
36 months
from
the
d
ate
o
f
pur
cha
se
if
the
a
ppl
ian
ce
is
defective in
workmanship or
materials.
To
obtain ser
vice under
this warranty
, return
the defective
product to
the ser
vice center
listed belo
w tha
t is
nearest you,
together
with
your purchase
receipt and
$3.00 for
postage
and handling.
California
residents need
only
provide proof
of purchase
and should
call
1-8
00-
366
-09
37
for
s
hip
pin
g
ins
tru
ctio
ns.
In the
absence of
a purchase
receipt, the
warranty period
shall be
36 months
from the
date
of manufacture.
ANY IMPLIED
WARRANTIES,
OBLIGA
TIONS,
OR
LIA
BIL
ITI
ES,
I
NCL
UD
IN
G
BUT
N
OT
LIMITED TO
THE IMPLIED
WARRANTY
OF
MERCHANTABILITY
AND FITNESS
FOR A
PAR
TICULAR PURPOSE,
SHALL
BE LIMITED
IN DURA
TION TO
THE 36
MONTH DURA
TION
OF
THI
S
WRI
TTE
N,
LIM
ITE
D
WAR
RAN
TY.
Some sta
tes do
not allo
w limita
tions on
how
long an
implied warranty
lasts, so
the above
limitations
may not
apply
to you.
IN NO
EVENT SHALL
CONAIR BE
LIABLE
FO
R
AN
Y
SPE
CIA
L,
IN
CID
EN
TAL
,
OR
CONSEQUENTIAL DAMAGES
FOR BREACH
OF
THIS OR
ANY O
THER W
ARRANTY, EXPRESS
OR IMPLIED
, WHA
TSOEVER. Some
states
do
not allo
w the
exclusion
or limita
tion of
special,
incidental, or
consequential dama
ges, so
the
above limita
tion may
not apply
to you.
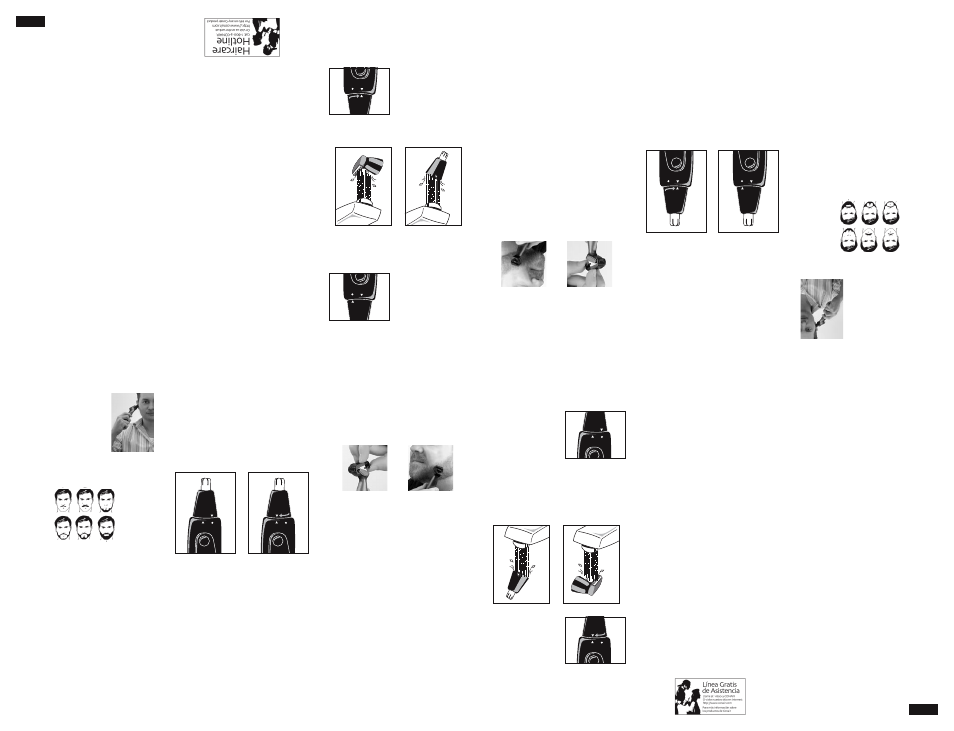
TO
TRI
M Y
OUR
EA
R H
AIR
Tur
n
uni
t
on.
G
ent
ly
ins
ert
trim
mer
h
ead
n
o
mor
e
tha
n
1" into
outer ear
canal. Gently
move trimmer
in and
out of
the
outer ear
and rota
te trimmer
in
a
circ
ula
r
mot
ion
a
rou
nd
the ear
canal opening.
Guide
the trimmer
around the
outer
surface of
ear to
trim protruding
hairs. Never
insert trimmer
more than
1" into
ear canal.
TYP
ES
OF
BEA
RDS
/M
UST
ACH
ES
GRO
WIN
G A
BE
ARD
OR
M
UST
ACH
E
There are
three key
factors tha
t determine
which
beard or
mustache style
is most
suitable for
your face:
1. The
shape
and dimensions
of your
face.
2. The
natural
growth
of your
beard/mustache.
3. The
thickness of
your beard/mustache.
If
you
a
re
uns
ure
o
f
the
t
ype
o
f
bea
rd
or
mustache tha
t most
suits your
face, speak
with
a professional
hair stylist
and ask
for an
opinion
on wha
t style
would be
best. Once
your beard
or mustache
has been
styled, it
is essential
that
you maintain
its appearance.
To
do this,
use
your
shaper
to trim
your beard/mustache
weekly.
For
the best
trimming results,
your
beard should
be slightly
damp (not
wet) before
using the
trim
mer
. T
his
w
ill
pre
ven
t
the
t
rim
mer
f
rom
removing more
hair than
desired.
07N
G90
04
IB-7247
GET
TIN
G S
TAR
TED
TO
SW
ITC
H T
RIM
MER
HE
ADS
Begin with
trimmer in
normal pivot
position.
Hold the
handle of
the trimmer
while turning
the
trimmer head
counterclockwise
until the
arrow
mark is
aligned properly
with the
circle
mark
(Fig.
2).
At
this point
you should
be able
to easily
lift the
nose/ear trimmer
head from
the handle.
To
use a
new trimmer
head on
the unit,
properly
install the
head into
position making
sure the
arrow
mark is
aligned with
the circ
le mark,
turn clockwise
until the
two arro
ws are
aligned
(Fig.
3)
and lock
into position.
OUT
LIN
ING
YO
UR
BEA
RD
1. It
is al
ways best
to begin
with a
clean,
slightly
damp beard.
2. After
you ha
ve combed
through your
beard in
the direction
it gro
ws na
turally, you
will want
to
outline the
desired sha
pe, beginning
under your
jawline.
3. Attach
the 3/4"
trimmer head.
Begin
defining
your beard’
s sha
pe under
your chin
and work
upward on
each side
of your
face to
ward your
ears. Then
define the
upper outline
of your
beard
across your
cheeks, past
your sideburns
and
toward
your hairline.
NOW
YO
U’R
E R
EAD
Y T
O T
RIM
YO
UR
BEA
RD
1. T
o u
se
the
ad
jus
tab
le
atta
chm
ent
co
mb,
sl
ide
it
ove
r t
he
trim
mer
b
lad
e a
nd
snap
d
own
int
o
pos
itio
n (F
ig
4).
At f
irs
t, u
ntil
yo
u b
eco
me
fam
ilia
r
with
th
e a
dju
stm
ent
s, u
se
the
lo
nge
st t
rim
se
ttin
g
(3/
8”)
. (Y
ou
can
alw
ays
go
ba
ck
and
m
ake
yo
ur
bea
rd
a li
ttle
sh
orte
r.)
(Fig
. 5
)
2. Begin
trimming your
beard using
smooth,
even strokes.
Start
with your
sideburns and
work
downward
toward
your chin.
(Never
attempt
to
trim a
gainst the
natural
growth
of your
beard,
because the
hair will
be cut
too short.)
3. If
you decide
you want
a closer
trim, you
can
now
adjust the
5-position comb
to a
shorter
setting and
go over
your beard
again
until you
achieve the
desired length.
TO TRIM
YOUR
MUSTACHE
1. F
or best
results, start
with a
clean,
slightly
damp mustache.
2. Comb
through your
mustache in
the direction
it gro
ws.
3. Place
the 5-position
comb over
the trimmer
blades and
snap
it into
position. It
is a
good idea
to start
with the
longest trim
setting adjustment.
(You
can al
ways go
back and
cut your
mustache
more closely
with a
shorter setting.)
ALW
AYS
TRIM YOUR
MUSTACHE
FROM THE
TOP DOWN
After your
mustache has
been trimmed
to the
desired length,
remove
the 5-position
trimming
attachment
and, using
the blades
only, define
the
outline of
the bottom
of your
mustache.
Fig.
2
Fig.
3
Fig.
4
Fig.
5
©20
07
CO
NA
IR
C
OR
PO
RAT
IO
N
Ser
vic
e C
ent
er:
Con
air
Cor
por
atio
n
Ser
vic
e D
epa
rtm
ent
747
5 G
len
H
arb
or
Blv
d.,
Gle
nda
le,
A
riz
ona
85
307
TO
CLE
AN
YOU
R T
RIM
MER
Mak
e s
ure
tri
mm
er i
s o
ff.
1. T
o r
em
ove
th
e tr
im
mer
hea
d fo
r c
lea
nin
g, t
urn
th
e
hea
d
cou
nte
r-c
loc
kw
ise
unt
il
the
arr
ow
mar
k
alig
ned
w
ith
t
he
circ
le
mar
k,
the
n l
ift
the
h
ead
gen
tly
(F
ig
6).
2.
Onl
y r
ins
e t
he
hea
d u
nde
r w
ater
(F
ig
7).
For
pr
ope
r fu
nct
ion
ing
of
th
e u
nit,
th
e h
and
le
can
no
t to
uch
or
be
im
mer
sed
in
w
ate
r.
3. A
fte
r c
lea
nin
g, m
ake
su
re
to
sha
ke
dry
th
e
hea
d b
efo
re
rep
lac
ing
it
to
the
bo
dy.
4. T
o re
ass
em
ble
th
e h
ead
ont
o t
he
body
, a
lig
n t
he
arrow
o
n t
he
hea
d w
ith
the
ci
rcl
e o
n th
e b
ody
an
d
the
n, t
urn
cl
ock
wis
e u
ntil
the
ar
row
on
th
e b
ody
is
alig
ned
(F
ig
8)
Not
e: T
he
trim
mer
he
ad
atta
chm
ent
ca
n a
lso
be
cle
ane
d b
y ri
nsi
ng
und
er w
ater
.
Fig.
6
Fig.
7
Fig.
7
Fig.
8
GARANTÍA LIMITADA POR
TRES AÑOS
Conair reparará o remplazará (a su opción) su
aparato sin cargo por un período de 36 meses a
partir de la fecha de compra si presenta defectos de
mano de obra o en los materiales.
Para obtener servicio técnico bajo esta garantía,
lleve o mande su aparato al Centro de Servicio
indicado a continuación, junto con su recibo de
compra y un cheque de $3,00US por gastos de
envío y manejo. Los residentes de California sólo
necesitan dar una prueba de compra y deben llamar
al 1-800-366-0937 para recibir instrucciones de
envío. En ausencia del recibo de compra, el período
de garantía será de 36 meses a partir de la fecha
de fabricación.
CUALQUIER
GARANTÍA,
OBLIGACIÓN
O
RESPONSABILIDAD IMPLÍCITAS, INCLUYENDO
PERO NO LIMITADAS A LA GARANTÍA IMPLÍCITA DE
COMERCIABILIDAD Y APTITUD PARA UN PROPÓSITO
ESPECÍFICO, ESTARÁN LIMITADAS POR LOS 36
MESES DE LA PRESENTE GARANTÍA ESCRITA.
Algunos Estados no permiten limitaciones sobre la
duración de una garantía implícita, de modo que
las limitaciones mencionadas pueden no regir para
usted.
CONAIR NO SERÁ RESPONSABLE EN NINGÚN
CASO POR ALGÚN DAÑO ESPECIAL, INCIDENTAL O
CONSECUENTE DEBIDO AL INCUMPLIMIENTO DE
ESTA O DE CUALQUIER OTRA GARANTÍA, EXPRESA O
IMPLÍCITA. Algunos Estados no permiten la exclusión
o limitación de daños especiales, incidentales
o consecuentes, de modo que las limitaciones
mencionadas pueden no regir para usted.
Esta garantía le otorga derechos legales específicos
y usted puede tener otros derechos que varían de
un Estado a otro.
CÓMO RECORTAR LOS PELOS EN LOS OÍDOS
Encienda la unidad. Inserte
lentamente el cabezal en el
oído, no más de 25 mm (1
pulgada). Deslícelo despacio
hacia adentro y afuera
mientras gira la unidad con
un movimiento circular. Guíe
el cabezal alrededor de la
superficie externa de la oreja para cortar pelos
exteriores. Nunca inserte el cabezal más de 25
mm (1 pulgada) en el canal del oído.
TIPOS DE BARBAS Y DE BIGOTES
BARBAS Y BIGOTES
El tipo de barba o de bigote que más conviene a
su rostro depende de:
1. La forma y el tamaño de su rostro.
2. La forma del crecimiento natural de su barba
o de su bigote.
3. El espesor de su barba o de su bigote.
Si no está seguro del tipo de barba o bigote que
le conviene, busque el consejo de un estilista
profesional. Después de darle forma a su barba
o a su bigote, tendrá que mantener su aspecto,
usando la cortadora una vez por semana.
Para lograr resultados óptimos, humedezca
ligeramente (no moje) su barba o su bigote antes
del recorte. Esto logrará un cortado más preciso.
07NG9004
IB-7247
CÓMO CAMBIAR EL CABEZAL
Ponga el cabezal en la posición central. Coja
la cortadora firmemente con una mano y gire
el cabezal en el sentido antihorario con la
otra mano, hasta que el triángulo y el círculo
coincidan (Fig.2). Jale el cabezal hacia arriba.
Instale la cuchilla para la barba y el bigote sobre
el cabezal y gírela en el sentido horario hasta que
los dos triángulos coincidan (Fig.3).
DELINEAR SU BARBA
1. Se le hará más fácil el contorneo y el recorte si
su barba está limpia y ligeramente humedecida.
2. Peine su barba en la dirección del crecimiento
natural del pelo antes de empezar a darle
forma.
3. Déle forma a su barba empezando por debajo
de la quijada y subiendo hacia la oreja por cada
lado del rostro. Siga dando forma al área de la
mejilla, a las patillas y al nacimiento del pelo.
CORTAR SU BARBA
1. Ensarte el peine accesorio con 5 posiciones
encima de la cuchilla para la barba (Fig.4). Le
recomendamos que utilice la posición más larga
(10 mm) hasta acostumbrarse a lo largo del
recorte (siempre podrá volver a acortar la barba).
(Fig.5)
2. Empiece a cortar su barba con movimientos
parejos y suaves, desde las patillas hasta la
quijada. Nunca corte en la dirección opuesta a
la del crecimiento natural del pelo. El recorte
resultaría demasiado corto.
3. Si desea un recorte aún más corto, escoja un
largo de recorte más corto, y siga acortando su
barba hasta conseguir el tamaño deseado.
CORTAR SU BIGOTE
1. Se le hará más fácil cortar su bigote si está
limpio y ligeramente humedecido.
2. Peine su bigote en la dirección del crecimiento
natural del pelo.
3. Ensarte el peine accesorio con 5 posiciones
sobre las cuchillas. Empiece con la posición más
larga (siempre podrá volver a acortar el bigote).
SIEMPRE CORTE SU BIGOTE DESDE
ARRIBA HASTA ABAJO
Cuando haya terminado, saque el peine accesorio
y déle forma a la parte inferior de su bigote.
Fig. 2
Fig. 3
Fig. 4
Fig. 5
©2007 CONAIR CORPORATION
Centro de Servicio:
Conair Corporation
Service Department
7475 Glen Harbor Blvd.,
Glendale, Arizona 85307
INSTRUCCIONES DE LIMPIEZA
Asegúrese que la unidad esté apagada.
1. Para extraer el cabezal,
gire el mismo en el
sentido antihorario hasta
que el triángulo y el
círculo coincidan y jale el
cabezal lentamente hacia
arriba (Fig.6).
2. Enjuague el cabezal solamente bajo el
chorro de agua (Fig.7).
Para que su unidad
siga funcionando correctamente, asegúrese
que la manija nunca entre en contacto con
el agua.
3. Después de limpiar
el cabezal, séquelo bien
antes de regresarlo en la
unidad.
4. Para instalar el cabezal
sobre la manija: ensarte
el cabezal sobre la
manija y gírelo en el sentido horario hasta que
los dos triángulos coincidan (Fig.8).
NOTA: La cuchilla para barba y bigote se
puede limpiar en agua de la misma manera.
Fig. 6
Fig. 7
Fig. 7
Fig. 8