Epson 1400 setup – Xpres Crystal Print User Manual
Page 3
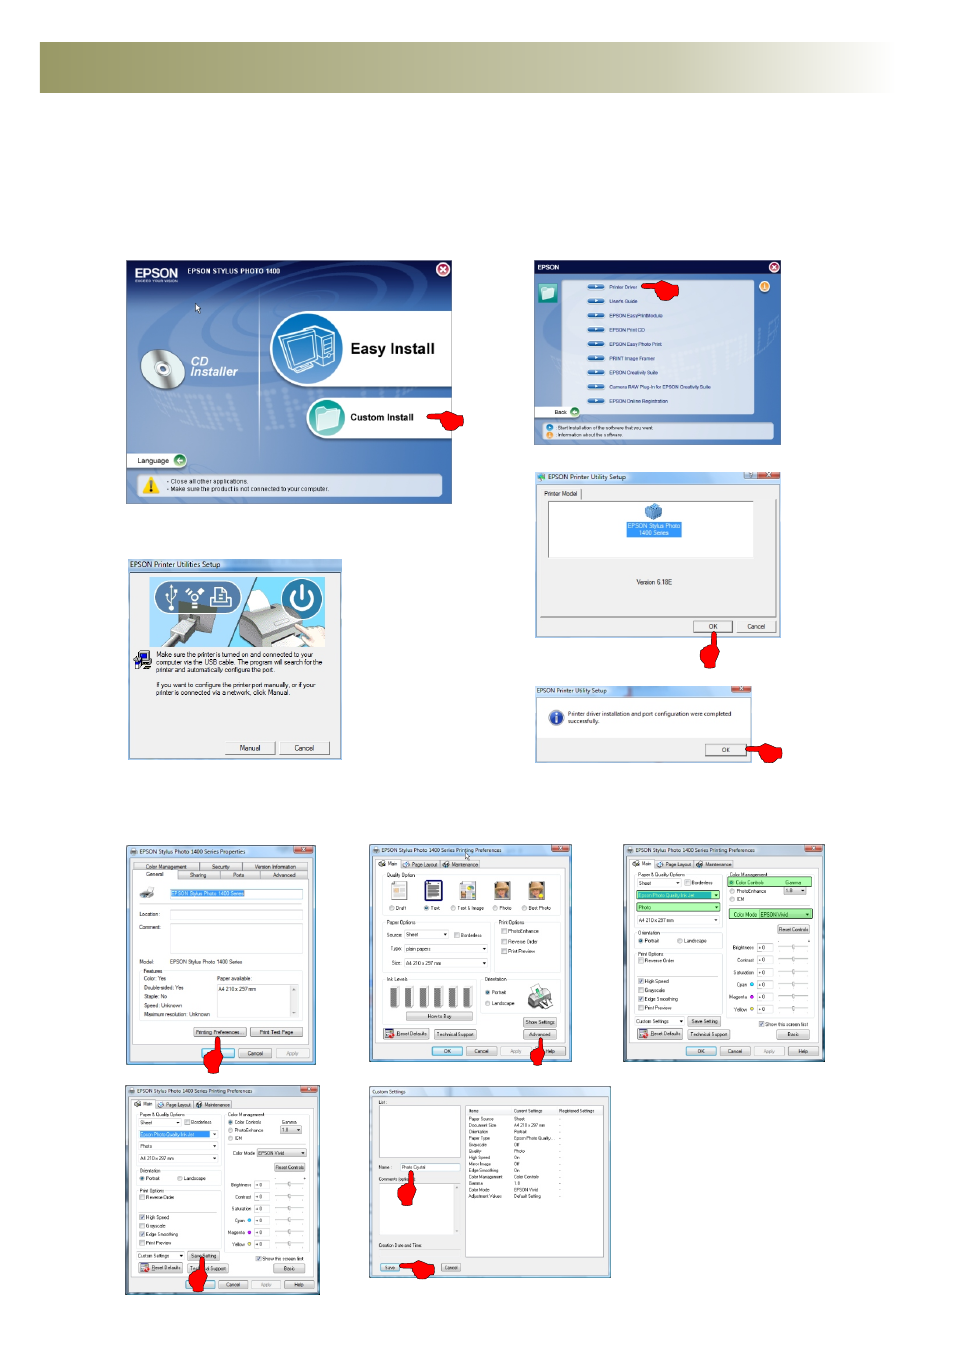
Diagram 1
Diagram 2
Diagram 5
Diagram 4
Diagram 3
Insert the Epson Stylus 1400 software CD-ROM into your CD-ROM drive. The CD will auto run. Select 'Custom
Install' from the menu, as in diagram 1 below. When Diagram 2 appears click 'Printer Driver'. It will display diagram
3, click OK and it will copy files to your computer. Make sure the USB cable is connected to the PC and printer, then
turn on the printer as instructed in diagram 4. After the utility has found your printer it will confirm this as in diagram 5.
The Epson Stylus 1400 has now been successfully installed. Click OK.
Now follow the Epson Stylus 1400 driver setup below.
Browse to the Printers and Faxes folder. Right click on the Epson 1400 printer and click on 'Properties'. Click on
'Printing preferences as in diagram 6, then follow the diagrams below.
Epson 1400 setup
Diagram 6
Diagram 7
Diagram 8
Diagram 9
Diagram 9
Click
Advanced
1
2
3
4
1
2
3
4
: Epson Photo Quality Ink Jet
: Photo
: Colour Controls selected
: Colour Mode: Epson Vivid
Click 'Save Setting'
Name it 'Crystal Print' then
click Save.
1.
- 3D SMARTone (25 pages)
- Canvas (2 pages)
- Banner (2 pages)
- Easy Dome (12 pages)
- Gem Tec (8 pages)
- Sign Vinyl Application Guide (2 pages)
- SubliJet IQ EPSON Stylus PRO 4880 (Windows Power Driver Setup): Power Driver Installation & Getting Started Guide (52 pages)
- SubliJet IQ EPSON Stylus PRO 4880 (Windows Power Driver Setup): Print & Setup Guide CorelDRAW X5 (6 pages)
- SubliJet IQ EPSON Stylus PRO 4880 (Windows Power Driver Setup): Print & Setup Guide Photoshop CS5 (5 pages)
- SubliJet IQ EPSON Stylus PRO 4880 (Windows Power Driver Setup): Print & Setup Guide Illustrator CS5 (6 pages)
- SubliJet IQ EPSON Stylus PRO 4880/4450 (Windows Power Driver Setup): Sublimation Cartridge Quick Start Guide (2 pages)
- SubliJet IQ EPSON Stylus PRO 4880 (Windows Power Driver Setup): Sublimation Ink Configuration Guide (1 page)
- SubliJet E Epson Stylus Pro 7700 (Windows Power Driver Setup): Power Driver Installation Guide (16 pages)
- SubliJet E Epson Stylus Pro 7700 (Windows Power Driver Setup): Printer Setup (4 pages)
- SubliJet E Epson Stylus Pro 7700 (Windows Power Driver Setup): Print & Setup Guide CorelDRAW 12 - X4 (3 pages)
- SubliJet E Epson Stylus Pro 7700 (Windows Power Driver Setup): Print & Setup Guide CorelDRAW X5 (6 pages)
- SubliJet E Epson Stylus Pro 7700 (Windows Power Driver Setup): Print & Setup Guide Photoshop Elements 8 - 10 (4 pages)
- SubliJet E Epson Stylus Pro 7700 (Windows Power Driver Setup): Print & Setup Guide Illustrator CS4 - CS5 (6 pages)
- SubliJet E Epson Stylus Pro 7700 (Windows Power Driver Setup): Print & Setup Guide Photoshop CS5 (6 pages)
- SubliJet E Epson Stylus Pro 7700 (Mac ICC Profile Setup): Printer/Profile Installation Guide (17 pages)
- SubliJet E Epson Stylus Pro 7700 (Mac ICC Profile Setup): Print & Setup Guide Photoshop Elements 8 - 10 (7 pages)
- SubliJet E Epson Stylus Pro 7700 (Mac ICC Profile Setup): Print & Setup Guide Photoshop CS - CS4 (8 pages)
- SubliJet E Epson Stylus Pro 7700 (Mac ICC Profile Setup): Print & Setup Guide Photoshop CS5 (7 pages)
- SubliJet E Epson Stylus Pro 7700 (Windows ICC Profile Setup): Printer/Profile Installation Guide (15 pages)
- SubliJet E Epson Stylus Pro 7700 (Windows ICC Profile Setup): Driver Configuration Guide (6 pages)
- SubliJet E Epson Stylus Pro 7700 (Windows ICC Profile Setup): Print & Setup Guide CorelDRAW 10 - 12 (4 pages)
- SubliJet E Epson Stylus Pro 7700 (Windows ICC Profile Setup): Print & Setup Guide CorelDRAW X3 - X4 (4 pages)
- SubliJet E Epson Stylus Pro 7700 (Windows ICC Profile Setup): Print & Setup Guide CorelDRAW X5 (5 pages)
- SubliJet E Epson Stylus Pro 7700 (Windows ICC Profile Setup): Print & Setup Guide Photoshop Elements 8 - 10 (4 pages)
- SubliJet E Epson Stylus Pro 7700 (Windows ICC Profile Setup): Print & Setup Guide Illustrator CS4 - CS5 (4 pages)
- SubliJet E Epson Stylus Pro 7700 (Windows ICC Profile Setup): Print & Setup Guide Photoshop CS (4 pages)
- SubliJet E Epson Stylus Pro 7700 (Windows ICC Profile Setup): Print & Setup Guide Photoshop CS2 (4 pages)
- SubliJet E Epson Stylus Pro 7700 (Windows ICC Profile Setup): Print & Setup Guide Photoshop CS3 - CS5 (4 pages)
- SubliJet IQ Epson Stylus Pro 7890 - IQ Pro Photo (Mac ICC Profile Setup): Printer/Profile Installation Guide (16 pages)
- SubliJet IQ Epson Stylus Pro 7890 - IQ Pro Photo (Mac ICC Profile Setup): Printer Setup (4 pages)
- SubliJet IQ Epson Stylus Pro 7890 - IQ Pro Photo (Mac ICC Profile Setup): Print & Setup Guide Photoshop CS6 (7 pages)
- SubliJet IQ Epson Stylus Pro 7890 - IQ Pro Photo (Mac ICC Profile Setup): Print & Setup Guide Photoshop CS - CS5 (7 pages)
- SubliJet IQ Epson Stylus Pro 7890 - IQ Pro Photo (Mac ICC Profile Setup): Print & Setup Guide Photoshop Elements 8 - 11 (6 pages)
- SubliJet IQ Epson Stylus Pro 7890 - IQ Pro Photo (Windows ICC Profile Setup): Printer/Profile Installation Guide (15 pages)
- SubliJet IQ Epson Stylus Pro 7890 - IQ Pro Photo (Windows ICC Profile Setup): Driver Configuration Guide (3 pages)
- SubliJet IQ Epson Stylus Pro 7890 - IQ Pro Photo (Windows ICC Profile Setup): Print & Setup Guide CorelDRAW 12 - X4 (6 pages)
- SubliJet IQ Epson Stylus Pro 7890 - IQ Pro Photo (Windows ICC Profile Setup): Print & Setup Guide CorelDRAW X5 - X6 (7 pages)
- SubliJet IQ Epson Stylus Pro 7890 - IQ Pro Photo (Windows ICC Profile Setup): Print & Setup Guide Illustrator CS - CS6 (8 pages)
- SubliJet IQ Epson Stylus Pro 7890 - IQ Pro Photo (Windows ICC Profile Setup): Print & Setup Guide Photoshop CS - CS5 (6 pages)