Ab c c – Workrite Willow User Manual
Page 2
2
Workrite Ergonomics 800.959.9675 www.workriteergo.com
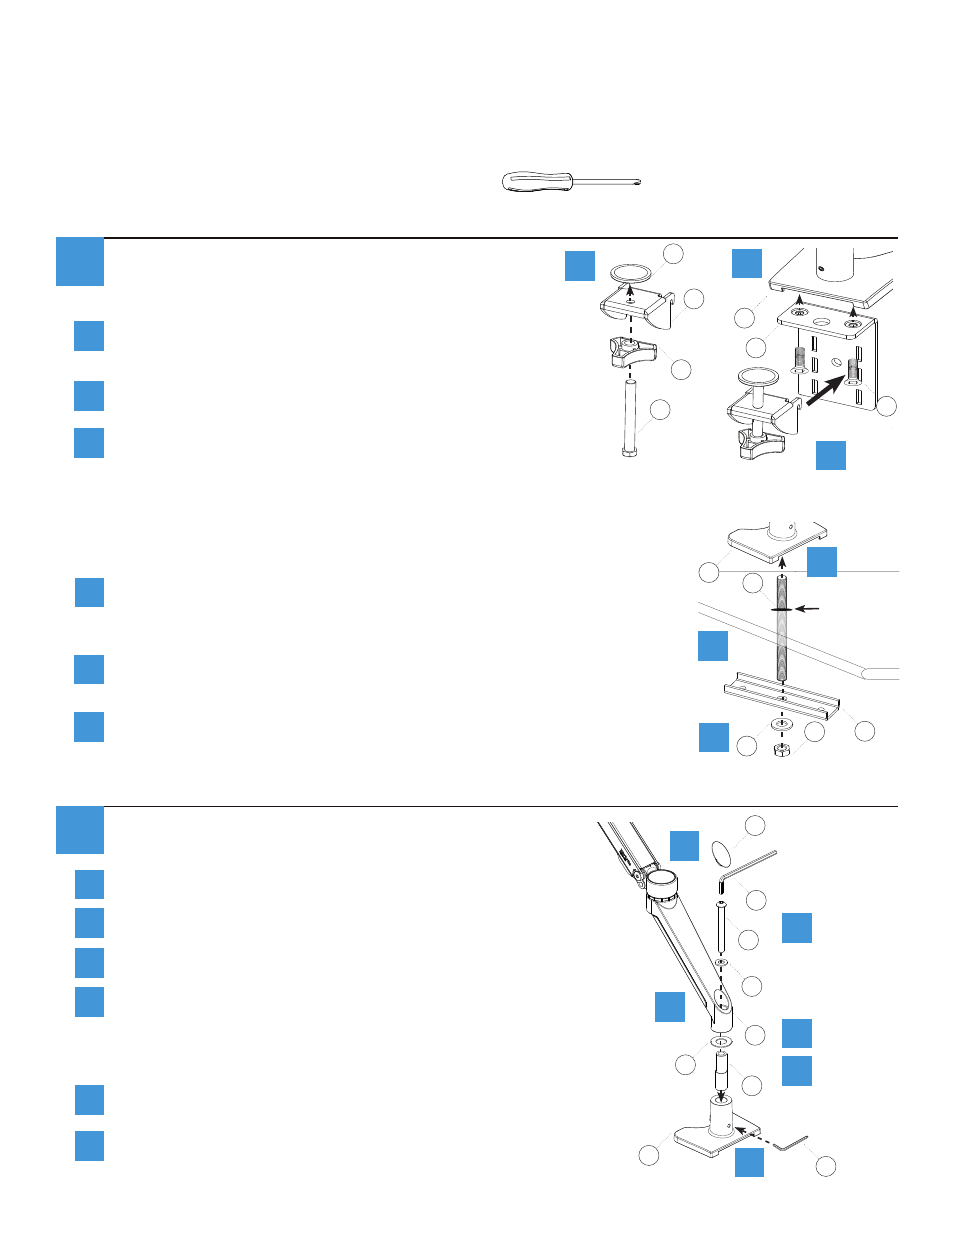
Clamp Mount:
WA1000-C-S only
To assemble Clamp, thread Hex Bolt (S) through Knob (T)
and Upper Clamp Bracket (P) and tighten securely. Press
the Plastic Clamp Pad (U) onto the end of the Hex Bolt.
Assemble Base
1
a
a
b
Put Desk Base (I) onto work surface then slide teeth of
Clamp into Bracket slots. Use the highest slots possible
for best clamping. Turn knob to tighten.
c
Mount Lower Clamp Bracket (Q) to Desk Base with Flat Head
Screws (R) and tighten using a #3 Phillips screwdriver.
b
c
Verify that you have all the hardware and tools needed for the assembly
Check your packages against the parts list on page 1 to verify that you have all the parts needed.
You will also need the following tools:
#3 tip Phillips screwdriver
U
P
T
S
I
Q
R
2
Attach Willow Arm to Base
Insert Pivot Pin (K) into Desk Base Assembly (I).
a
Put Plastic Pivot Washer (M) over Pivot Pin.
b
Put Arm Assembly (A) onto Pivot Pin.
c
Place Steel Washer (L) onto Button Head Allen Bolt (J) and
install into the Arm assembly and base. Tighten with
7
/
32
"
Allen Wrench (N) – be sure the arm is snug but rotates
freely.
d
Tighten Set Screw in back of Desk Base with ⅛" Allen
Wrench (O).
e
Snap Pivot Cover Cap (G) into top of Arm Assembly.
f
a
b
c
d
e
f
G
N
M
J
L
A
K
O
I
Grommet Mount:
WA1000-G-S only
Drill hole in worksurface minimum of ⅜" diameter if needed.
Put Desk Base (I) directly on the drilled hole of worksurface or a
grommet hole up to 3" and insert and tighten the Threaded Stud (V).
Place the U-Bracket (Y) onto the Threaded Stud with the flat bottom
of the U facing down.
Place the Steel Washer (X) followed by the Hex Nut (W) onto the
Threaded Stud and tighten securely.
a
b
Drilled
hole >
⅜" or
Grommet
a
b
c
c
W
X
Y
V
I
OR