Fitting the counterweight, Cartridge set up – Origin Live MK3C arms dual pivot User Manual
Page 4
Page4
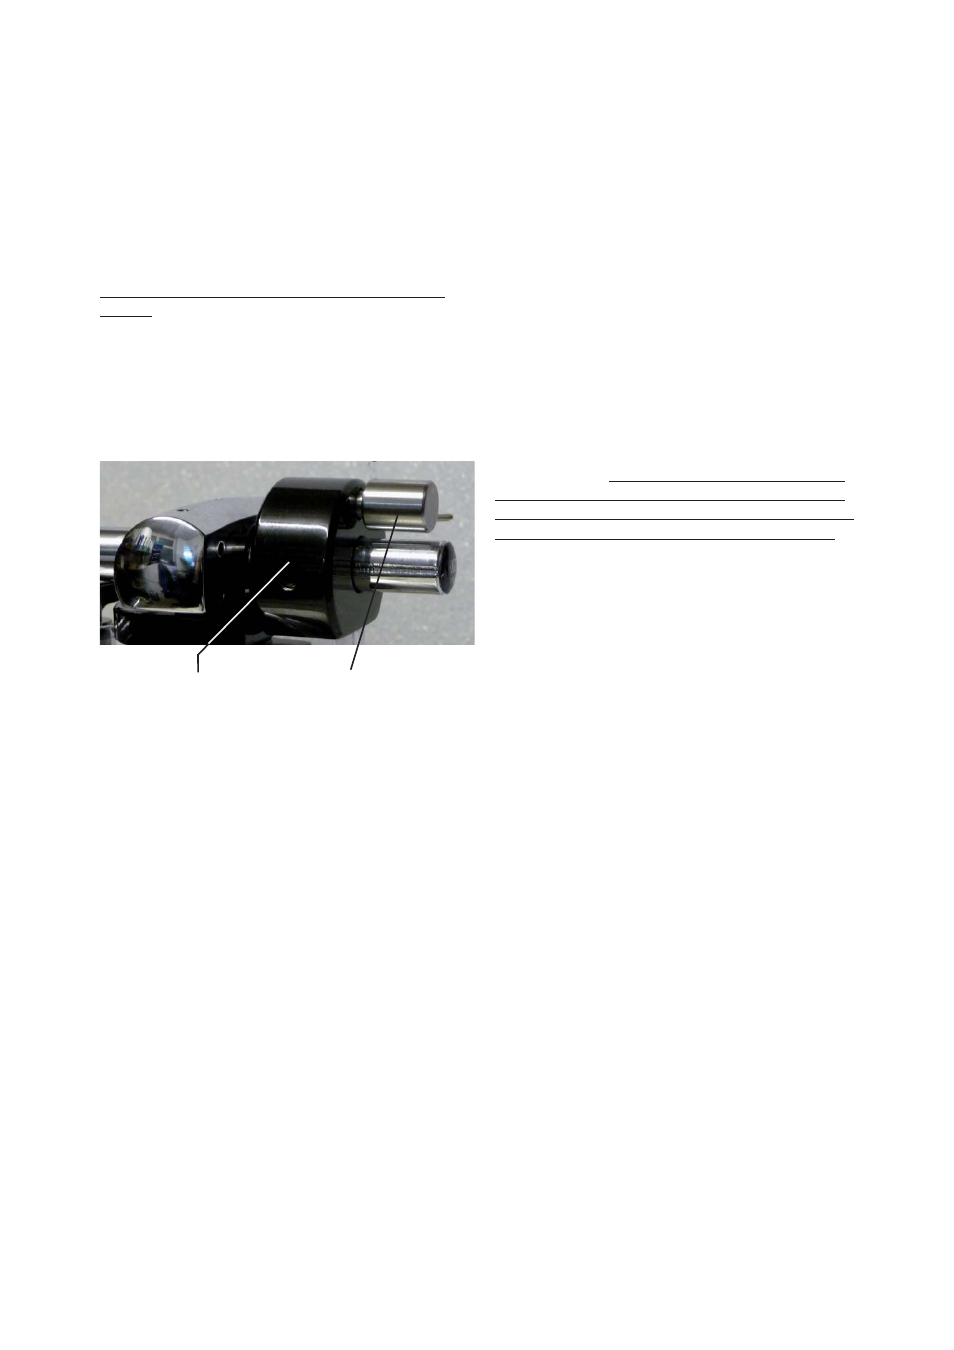
Fitting the counterweight
It is best to fi t the counterweight at this stage. Th
e
downforce on the cartridge is set by clamping the
large counterweight to approximately the correct
position on the rear stub. Th
e trick here is to lightly
nip the grub screw when it gets close to giving your
desired tracking force setting. You can then gently
twist it slightly while pushing it in the desired
direction till it gives the correct reading. Once this is
achieved, clamp up fi rmly and recheck the reading.
Th
e fi ne adjuster is not supplied unless specifi cally
ordered - it can be ordered at a later date but is
not generally used as it degrades performance
slightly. If you have the fi ne adjuster, then once the
counterweight is fi rmly clamped in approx the right
position, fi nal adjustment is carried out using the
fi ne adjuster on the rear of the counterweight - see
illustration below.
Allen grub screw to
clamp large weight
Fine adjuster weight to give
0.35grams adjustment.
Cartridge set up
If you are not familiar with fi tting cartridges then please read the
detailed section “Hi-Fi Cartridges explained” found towards the
end of this manual.
MOUNTING
Mount the cartridge in the headshell of the arm.
Cartridge mounting screws (usually 2.5mm allen
bolts) should be tight. Stainless steel allen bolts are
the best for mounting hi-fi cartridges - aluminum or
brass are OK but diffi
cult to tighten in comparison to
allen heads. Avoid steel bolts as they are magnetic and
degrade your cartridge magnets.
Th
is is best done with the stylus guard in place but
it may be necessary to remove it during at least one
phase of the installation. If you do, replace it as soon
as possible. Be especially careful when the stylus
guard is off , as many MC cartridges have a strong
magnetic fi eld at the base of the cantilever. If this
attracts the tip of a steel-bladed screwdriver, it can
destroy the stylus - there is no hope of resisting it. Th
e
best precaution is to keep the screwdriver well away
from the cantilever, use a nonferrous screwdriver,
or keep the stylus guard on when you’re using the
screwdriver near it. Th
e headshell screws should be
fi nger-tightened just enough that the cartridge cannot
fall off but is still loose enough that the cartridge is
easily moved around. Work whenever possible with
the stylus’s guard in place. Now carry out the set
up procedures outlined below. Do not deviate from
this sequence as each step aff ects the subsequent one
— change the order and the setup will be wrong.
SET TRACKING FORCE
Set the tracking force to the cartridge manufacturer’s
recommendations using a stylus force gauge (stylus
balance). Th
is will need to be re-set later on so do not
worry about getting it too exact at this stage - within
0.3 grams of recommended tracking force is fi ne.
First screw in the fi ne adjuster on the rear of the
counterweight as far as possible. Now set the tracking
force to within 0 to 0.35 grams OVER the correct
reading using the grub screw in the side of the major
counterweight. Do this, by sliding the counterweight
along the rear stub until the required tracking force
is attained, then clamp up the grub screw so that it
locates in the groove in the side of the rear stub. i.e
When adjusting the counterweight, set it so that the
Allen bolt is at the side of the arm (not at the top)
see fi gure “Rear end view of counterweight”. You
will need a stylus force gauge to measure the force
underneath the cartridge tip.
HINT - Th
e counterweight is deliberately a very
loose fi t on the stub for best performance. Because of
this, it helps to just lightly “nip” the allen bolt in the
side of the counterweight onto the stub – this way
the counterweight has a little friction to hold it in
position as you slide it backwards and forwards. Once
you have set the tracking force correctly you can
tighten the allen bolt in the counterweight as fi rmly
as possible to secure it tightly to the rear stub. Re-
check that the tracking force is still 0.3 to 0.35 grams
over the manufacturers recommendation.
USE OF STYLUS FORCE GUAGE
Most stylus force gauges work on the same principle
as a set of scales or balances. For example with the
Ortofon Stylus Force Gauge, fi rst place the stylus
on the inscribed or graduated portion of the scales.
Th
en try the stylus at diff erent points until you fi nd
the point where the beam “balances” freely in a
roughly level position. You then read the force that
is being exerted –( 1gram = 10 mN if the scale is
in mN). From this number you can assess whether
you need to increase the tracking force or vica-versa.
Move the tonearm counterweight accordingly and
re-measure the tracking force. Repeat this procedure
until the correct tracking force is obtained. A digital
force gauge works slightly diff erently so follow the
manufacturer’s instructions.
SET TANGENCY ALIGNMENT (LATERAL
TRACKING ANGLE)
First of all set the cartridge overhang, which is 17mm for
all Origin Live and Rega arms. The overhang of the cartridge