Mounting origin live arms, For other makes of tonearm – Origin Live Aurora Gold Platter Driven User Manual
Page 4
Page 4
F I T T H E T O N E A R M
Mounting Origin Live arms
Thread the threaded vta adjuster onto your arm if it is an Origin Live
Encounter or above. If your deck is a Sovereign and you have an Encounter
arm or above - do not fit the threaded vta adjuster ( the exception to this
rule is when the Sovereign uses the heavyweight platter which should use
the threaded vta adjuster). The adjuster must be oriented such that the
largest diameter is uppermost. Insert your tonearm into the armboard hole
such that the vta adjuster locates centrally. Next fit the cork washer as shown
in the diagram below before threading on the large clamping nut. You can
set the arm to the correct height later but for now just clamp the arm in
position using the large nut. To adjust the height of the arm, screw the vta
adjuster up or down and reclamp the arm using the large base clamping
nut.
NOTE - For Origin Live arms with integral vta adjuster i.e Encounter
and above you should raise the arm height to just below the right level
using the threaded vta adjuster and then use the arm vta wheel for fine
adjustment.
A R M
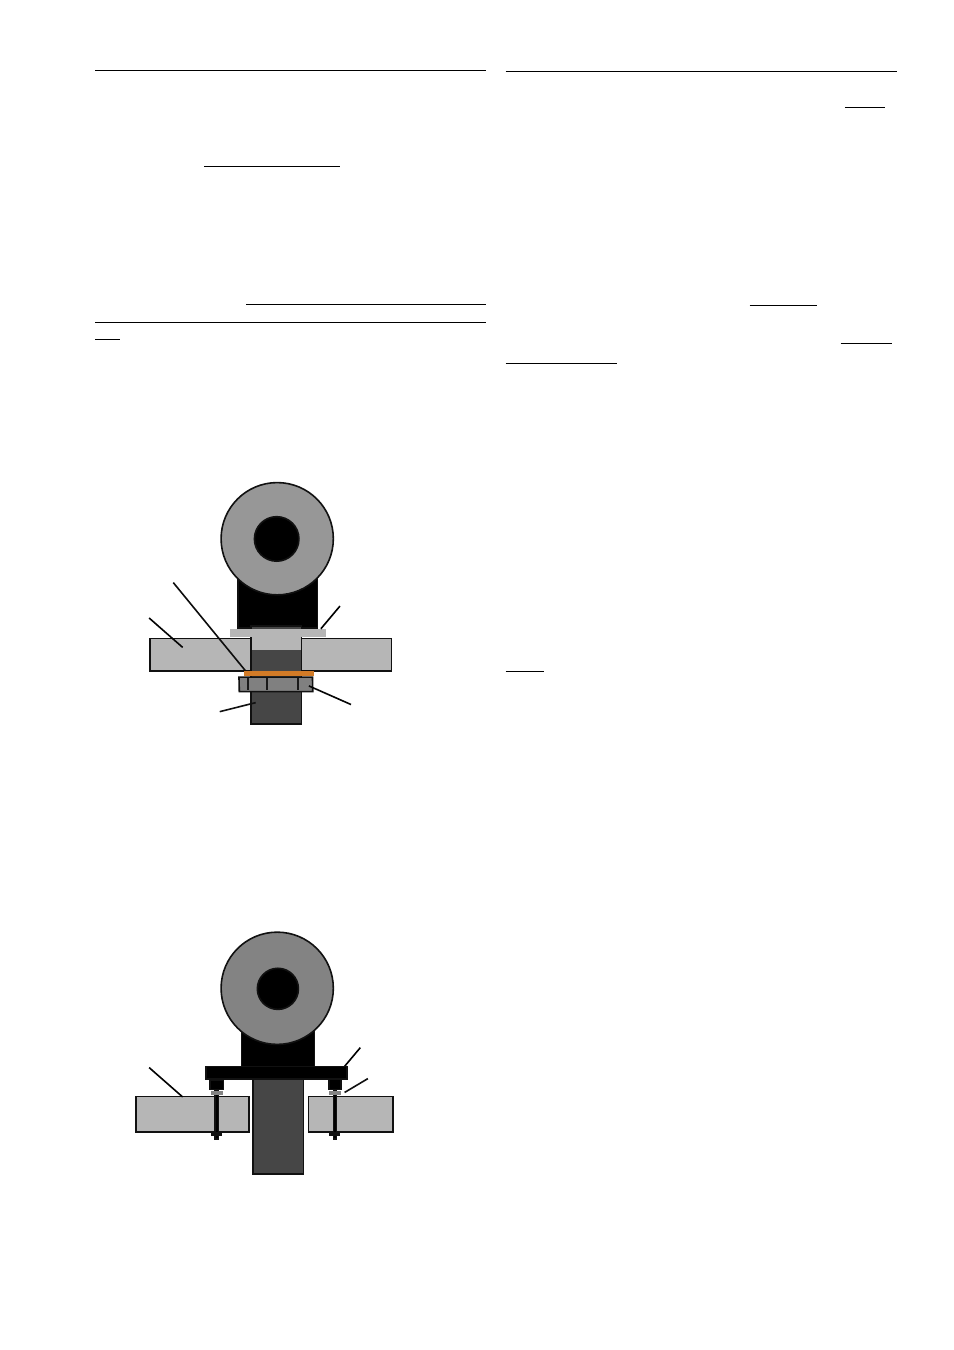
REAR VIEW OF ARM ON ORIGIN LIVE DECK WITH
THREADED VTA AND CORK WASHER
ARM MOUNT
SURFACE
CORK WASHER
LARGE CLAMPING NUT
THREADED ARM BASE
THREADED
VTA ADJUSTER
If you have the OL1 or Rega arm with 3 hole
mounting
The arm is bolted or screwed to the deck using the 3 mounting holes in the
base of the arm. To raise the arm for VTA adjustment you will need to fit
3 or more spacing washers under the arm base holes. One peice spacers are
available from Rega if you want a neater looking solution.
3 POINT ARM MOUNTING
Sub-chassis or
armboard
3 off bolts or
wood screws
Spacers
For other makes of tonearm
Origin Live can provide the correct cut out in the sub-chassis or armboard
for other makes of arm and after this refer to your arm installation
instructions.
F I T T H E P L A T T E R
NOTE - On newer decks (April 2009 onwards) the platter is a “loose” fit
over a metal bush on the spindle. This means the platter can be removed
from the spindle. TIP - Once the platter is fitted over the bush it pays to
spin it slowly by hand while holding the top of the spindle stationary with
your other hand - this helps the platter to “bed down” onto the bush and
become more level.
Oil the bearing - with the small oil bottle supplied, run approx 10 drops of
oil into the top of the bearing house.
Insert the spindle - Wipe the platter spindle surface first
to ensure that it is absolutely clean and very gently insert it
into the bearing house (If the oil does not overflow when the
spindle touches the bottom then try 2 drops at a time till you
achieve overflow - wipe away excess oil without withdrawing
the spindle. Ideally you should spin the spindle slowly as it
settles into the bearing to ensure distribution of oil.
When you oil the bearing you can get a false impression of
overflow if the spindle has oil on it - the oil simply scrapes off
as the bearing goes in and ends up on the top of the bearing
house. You can “feel” overflow when inserting the spindle, it
meets resistance at the bottom which is not a “thud” of the
spindle hitting the bottom but rather a build up of pressure
of the bearing landing on a bed of oil. By further pressing,
you can then see the oil being squeezed out at the top. Lastly,
if applicable, carefully lower the platter over the spindle till it
rests on the lower flange of the platter bush (ensure mating
surfaces are clean).
gently insert the platter spindle into the bearing house (If the
oil does not overflow when the spindle touches the bottom
then try 2 drops at a time till you just achieve overflow - wipe
away
N O T E :
The bearing needs a few minutes to “run in” and should run
silent when truly vertical and full of oil
- if it doesn’t do so,
there has probably been contamination with dust and you
will need to clean it out with a lint free paper towel or similar
wrapped around a thin rod. If you do this, be sure to also wipe
the oil off the spindle as this also may contain microscopic
contamination that is not visible.
Fit the belt over the motor pulley and platter.
Set the belt tension by positioning the motor housing relative to the
turntable. Ideally the centre of the pulley should be approximately 225mm
from the centre of the bearing house.
Note: It is very common for people to set the belt tension too
tight, which can slightly degrade performance. The optimum
setting is where there is enough tension to turn the platter
without audible wow and flutter but no more. This may take
some experimentation.
It also aids performance to clean all the running surfaces with
mentholated or surgical spirit.
Ensure that the motor pod is not touching any other plates on
the deck.