Operation, Opera t ion, 2 remote set-up – Modern AG 15' Raptor User Manual
Page 29: 3 remote set-up
15’ Raptorrr - 29
OPERATION SECTION
Operating Cutter Hydraulics with Three Tractor Hydraulic Ports
Connect one hose into each hydraulic port. Connect lines to correspond with position of hydraulic
control levers.
Operating Cutter Hydraulics with Two Tractor Hydraulic Ports
the lines that operate the wings must be plumbed together and will be controlled using one
hydraulic control valve and the center section with the remaining control valve. Ensure that the
operator is aware that each wing cannot be controlled independently nor will they raise and lower
simultaneously.
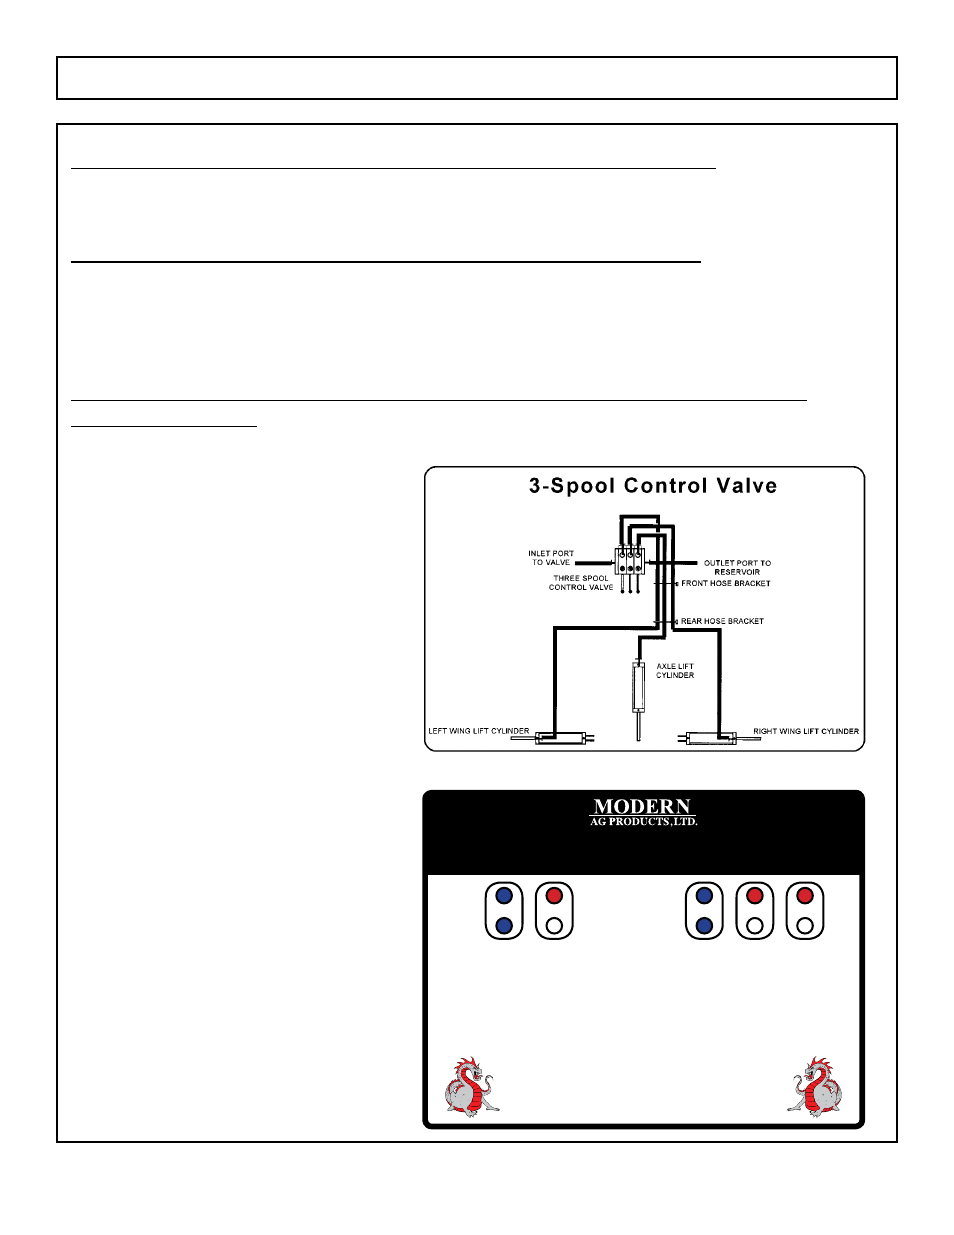
Operating the Cutter Hydraulics with a 3-Spool Hydraulic Control Valve
(Extra Equipment)
Ensure the valve matches the hydraulic
operating system of the tractor (open
or closed center). Refer to the assembly
Section for additional information on
equipping the tractor with a 3-spool
control valve.
mount the valve bank to a tractor fender
or other accessible location. Connect valve
bank inlet and outlet lines to outlets of
the same tractor hydraulic port. Connect
the cutter hydraulics to the control valve
bank with the center section line to the
right port. Connect the wing cylinder
lines to the control valve positioned to
correspond with the left and right wing.
to activate the 3-spool hydraulic control
valve, tie the tractor’s hydraulic control
lever back to keep hydraulic oil
continuously fed to the valve bank.
OPERaTION
FL15M 02/07
Operation Section 4-12
© 2007 Alamo Group Inc.
OPERa
T
ION
Operating Mower Hydraulics with Three Tractor Hydraulic Ports
Connect one hose into each hydraulic port. Connect lines to correspond with position of hydraulic control
levers.
Operating Mower Hydraulics with Two Tractor Hydraulic Ports
The lines that operate the wings must be plumbed together and will be controlled using one hydraulic control
valve and the center section with the remaining control valve. Ensure that the operator is aware that each wing
cannot be controlled independently nor will they raise and lower simultaneously.
Operating the Mower Hydraulics with a 3-Spool Hydraulic Control Valve (Extra Equipment)
Ensure the valve matches the hydraulic operating system
of the tractor (open or closed center). Refer to the
Assembly Section for additional information on equipping the tractor with a 3-spool control valve.
Mount the valve bank to a tractor fender or other accessible location. Connect valve bank inlet and outlet lines
to outlets of the same tractor hydraulic port. Connect the mower hydraulics to the control valve bank with the
center section line to the right port. Connect the wing cylinder lines to the control valve positioned to
correspond with the left and right wing.
To activate the 3-spool hydraulic control valve, tie the tractor’s hydraulic control lever back to keep hydraulic oil
continuously fed to the valve bank.
TROUBLE SHOOTING:
1. Raise
PHaSING CyLINdERS
(attached to axles) up and hold continuously
for 1 minute allowing oil to cycle and remove any air pocket.
2. Reverse Phasing
(blue tape)
hoses on remote 1 and repeat Trouble Shooting Step 1.
OPERaTION:
For optimum cutting,
wING CyLINdERS
(red cylinders) should be in the "float" position.
Cycle
PHaSING CyLINdERS
(attached to axles) every hour (raise and lower).
Cylinder locks (doughnuts) are recommended on all axle cylinders.
Remote 1
Remote 2
Remote 3
Remote 1
Remote 2
2 REMOTE SET-UP:
PHaSING CyLINdER
(attached to axles):
Plug both hoses
(blue tape)
into Remote 1.
wINGS CyLINdERS
(transport/lift):
"T" the hoses together
(red tape)
and plug into Remote 2.
3 REMOTE SET-UP:
PHaSING CyLINdER
(attached to axles):
Plug both hoses
(blue tape)
into Remote 1.
wINGS CyLINdERS
(transport/lift):
Plug each wing cylinder hose
(red tape)
into Remote 2 and 3.
TyPICaL SET-UP FOR 15’ aNd 20’ BaTwINGS
wITH HydRaULIC PHaSING CyLINdERS