Notice, Warning, Powerreclinexr – La-Z-Boy PowerReclineXR after 01/19/2015 User Manual
Page 4: Powerreclinexrw, Recliner assembly instructions
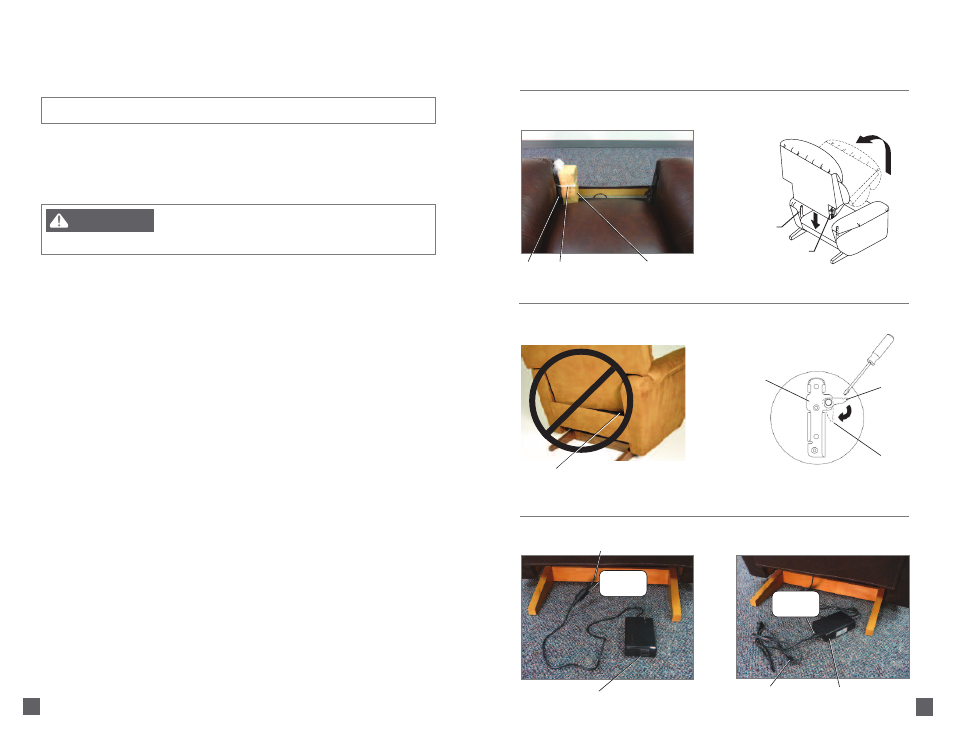
Back Bracket
Body
Bracket
7
6
PowerReclineXR
®
& PowerReclineXRw
™
Recliner
Assembly Instructions
Hand
Wand
F
IGURE
1
F
IGURE
2
F
IGURE
3
F
IGURE
4
F
IGURE
5
F
IGURE
6
Plastic
Tie
Power
Transformer Box
120 Volt
Power Cord
Back
Bracket
Locking
Lever
at 90
Degree
Angle
Locked
Position
– To reduce the risk of injury:
• Do not operate the unit until the back is installed and locked.
WARNING
3. Install the back.
•
Lay the back across the arms of the chair. Turn the locking levers, located on the brackets attached
to the back (one on each side), to a 90 degree angle (F
IGURE
4). Lift the back at a slight angle and
align the brackets on the back with the brackets on the body (F
IGURE
2).
•
Lower the back onto the body, making sure the back and body brackets are completely engaged.
-
To make sure the back is properly installed with both sets of back and body brackets
engaged, stand behind the chair and twist the back from side to side. If one or both sides
move out of position the brackets are not engaged (F
IGURE
3). Remove the back and repeat
the steps above.
-
If you are unable to install the back properly, contact your La-Z-Boy
®
dealer for assistance.
•
Lock the brackets by using a screwdriver to push down the locking levers (F
IGURE
4).
4. Locate the power supply connector behind the chair. Connect the power transformer connector into
the power supply connector. If your connector has a locking cover, close the locking cover to secure
the connection (F
IGURE
5). If your connector does not have a locking cover, plug the power supply
connector directly into the power supply until it is fully seated.
5. Connect the 120 volt power cord to the power transformer (F
IGURE
6). Do not plug in until
instructed in the Operating Instructions.
6. If assembling a PowerReclineXR
®
Rocking Loveseat, proceed to the PowerReclineXR
®
Rocking Loveseat Assembly Instructions.
7. If assembling a PowerReclineXR
®
or PowerReclineXRw
™
chair, proceed to the Battery Backup
Assembly Instructions.
8. To remove the back, unplug the 120 volt power cord from the electrical outlet, and
disconnect the power transformer connector from the power supply connector. Reverse
the Assembly Instructions steps.
PowerReclineXR
®
& PowerReclineXRw
™
Recliner
Assembly Instructions
NOTICE:
Do not plug in until instructed.
1. Carefully cut the plastic tie holding the power transformer box to the body bracket (F
IGURE
1).
NOTE:
The hand wand will also be tied to the body bracket for units ordered with the optional
hand wand.
2. For units with a hand wand, remove the hand wand from the bubble wrap, and lay the hand
wand on the seat.
Power Transformer*
Make this
connection
Make this
connection
Power
Transformer
Power Supply Connector
Back and body brackets on this side are not
engaged. Remove the back and reinstall.
Illustrations show a PowerReclineXR
®
Recliner
*Power transformers/connections will vary by style.