11 9a 9b – Kidco G2401 User Manual
Page 6
U S E R G U I D E
6
6
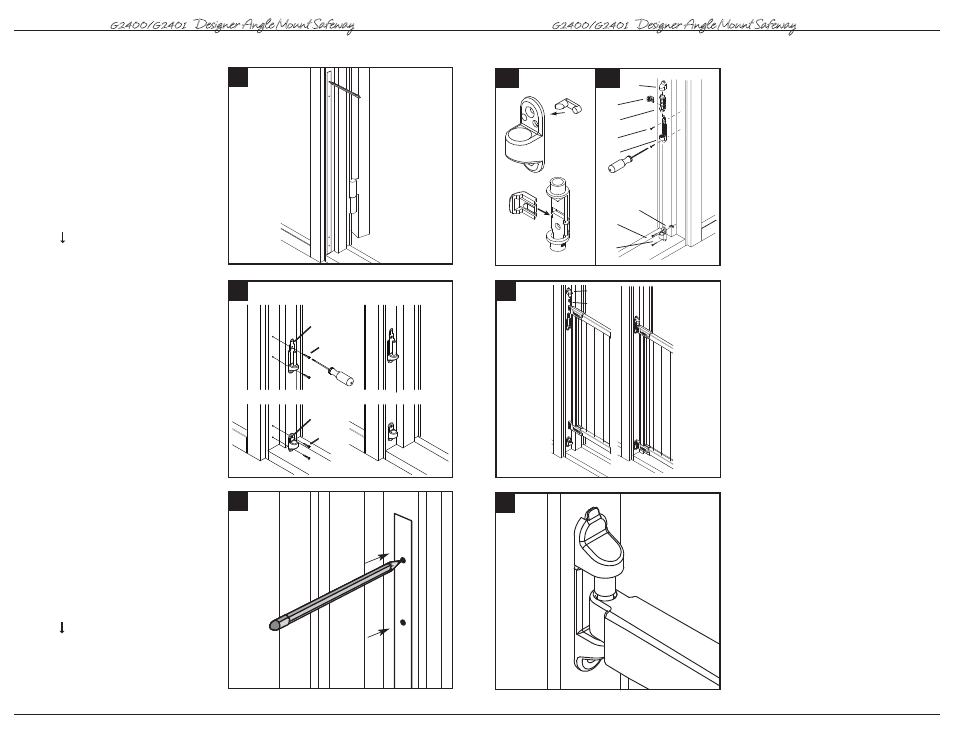
Hinge side mounting
Screws provided are for mounting
directly into wood. If mounting into
brick, drywall or other surfaces, use
appropriate hardware. If installing into
hardwood (i.e. oak), drilling a pilot
hole may be necessary. Cut out
templates along all dotted lines, separating
template (a) from (b). Hold template (a)
vertically and completely outstretched
against mounting surface with the end
marked ” ” even with the floor. Mark screw
hole positions. Remove the template.
7
Use longer screws for mounting
into studs behind drywall. Using 2 wood
screws (K) mount upper hinge bracket (L)
with the hole and the post pointing up, in
top 2 screw hole positions. Using 2 wood
screws (K) mount lower hinge bracket (M)
with angled side facing down, in bottom 2
screw hole positions.
8
Locking Side Mounting
Screws provided are for mounting
directly into wood. If mounting into
brick, drywall or other surfaces, use
appropriate hardware. If installing into
hardwood (i.e. oak), drilling a pilot
hole may be necessary. Hold template
(B) vertically and completely outstretched
against mounting surface with the end
marked ” ” even with the floor. Mark screw
hole positions. Remove the template.
7
8
L
K
M
K
6
G2400/G2401
Designer Angle Mount Safeway
®
G U Í A D E L U S U A R I O
23
9
Determine la dirección hacia la cual se
va a abrir la reja.
Cuando se instale en
la parte superior de las escaleras, la
reja nunca se debe abrir sobre las
escaleras. Introduzca el pivote de tope (N)
en los orificios del soporte inferior del
mecanismo de cierre (O). Introduzca el clip
de tope (P) en la cerradura superior (Q). La
porción más larga del pivote de tope y el
borde externo del clip de tope deben quedar
del mismo lado.
Use tornillos más largos para hacer el
montaje en los montantes que se
encuentran detrás del muro seco.
Importante: La reja no se puede abrir hacia
el lado del pivote de tope. Con dos tornillos
para madera (K) monte el soporte inferior del
mecanismo de cierre (O) con el orificio
orientado hacia arriba, en los dos orificios
inferiores para tornillos. Instale el soporte
superior del mecanismo de cierre (K) con
dos tornillos para madera (R). Coloque la
pieza (Q) en el soporte superior del
mecanismo de cierre (R).
10
Coloque la reja en las piezas
abisagradas. A continuación, coloque un
resorte (U) y una tapa de bisagra (T) en el
poste de la bisagra superior.
11
IMPORTANTE: ASEGÚRESE DE QUE
LA TAPA DE LA BISAGRA NO SE PUEDA
EMPUJAR HACIA ARRIBA Y QUE ESTÉ
FIJA EN SU LUGAR.
11
9a
9b
N
O
P
Q
S
R
K
Q
O
N
K
P
G2400/G2401
Designer Angle Mount Safeway
®
T
U
10