Code 3 SuperVisorTL for 2007 Chevy Tahoe User Manual
Page 3
3
Mounting Hardware - All mounting hardware is packed in a small box inside the main carton. There are four brackets used to mount the
Supervisor TL to the vehicle. These are discussed in detail later.
Utilizing non-factory supplied screws and/or mounting brackets and/or the improper number
of screws may result in loss of warranty coverage on the equipment.
WARNING!
!
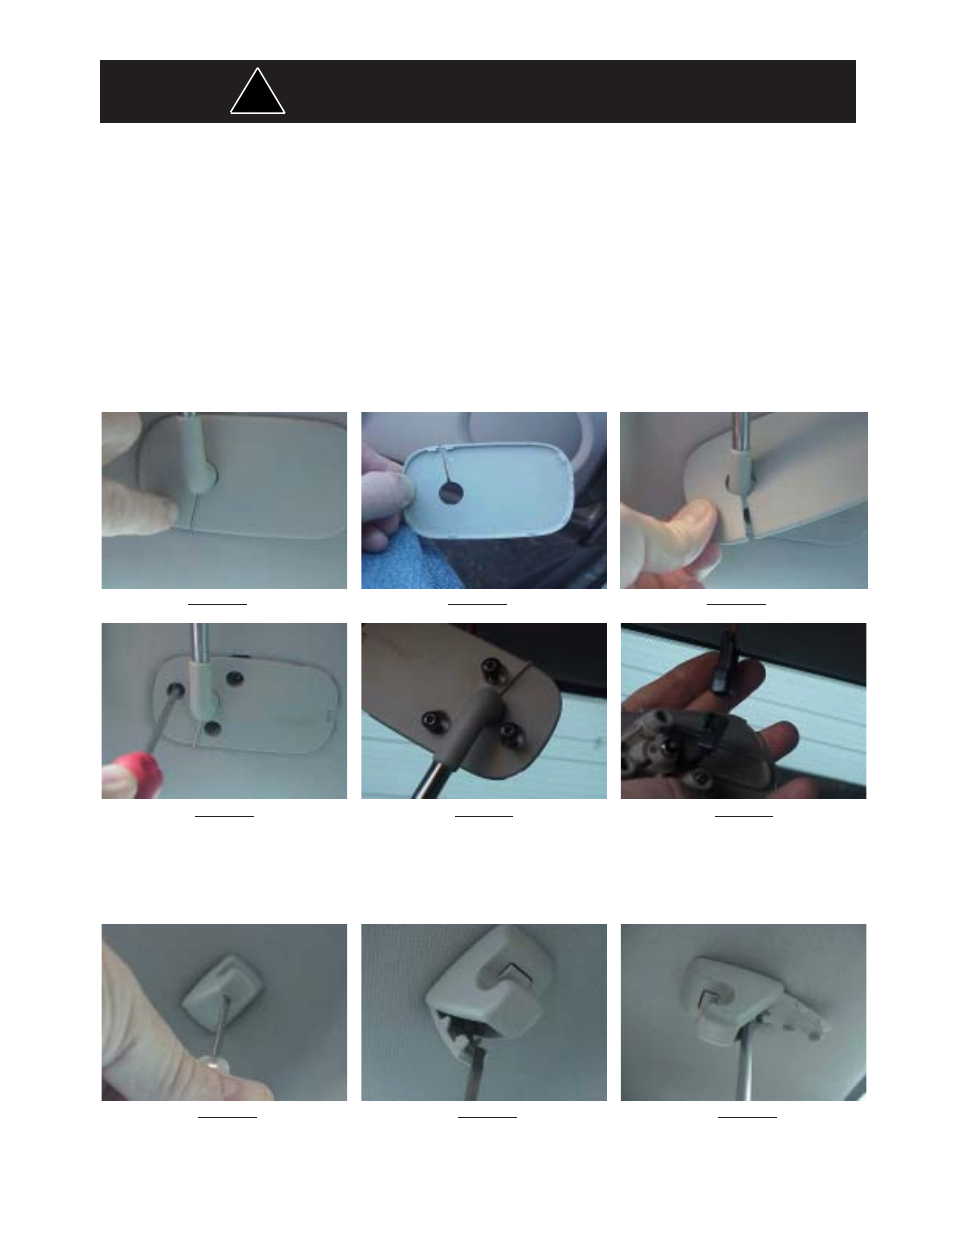
FIGURE 1 FIGURE 2 FIGURE 3
Step 1-Removing Sun Visors
Begin the installation by removing the driver and passenger sun visors. Identify each visor with tape or other marking to indicate the driver
from the passenger side unit; they are not always identical. First remove the plastic visor pivot bracket cover by prying the cover apart at
the thin slit shown in Figure 1 with a thin instrument like a putty knife. There are small keeper tabs which hold the cover to the pivot bracket
(Figure 2 shows the locations of the tabs). You have to pry the slit open and pull the cover down and away from the headliner at the same
time. It helps to pull the edge of the cover outward and down in the area of each tab to help release the cover from the pivot bracket. When
one of the tabs is released, it is easier to release the cover at the other tab locations (Figure 3 shows the cover removed). Next there are
three screws that hold the pivot arm bracket of the sun visor to the headliner. Remove the three screws using a small #15 torx screwdriver
as shown in Figure 4. The screws do not have to be completely removed from the plastic pivot arm bracket to release the pivot arm (see
Figure 5). Unplug the visor vanity mirror light wire if the vehicle is so equiped (see Figure 6).
Step 2 Remove the visor retaining clips
Pry open the small cover on the sun visor retaining clip with a very small flat bladed screwdriver to gain access to the sun visor retaining clip
screw (see FigureS 7 and 8). Remove the single #15 torx screw that holds each clip in place as shown in Figure 9.
FIGURE 4 FIGURE 5 FIGURE 6
FIGURE 7 FIGURE 8 FIGURE 9