Touch button control panel – AVer SPC300+ User Manual
Page 13
11
T
T
o
o
u
u
c
c
h
h
B
B
u
u
t
t
t
t
o
o
n
n
C
C
o
o
n
n
t
t
r
r
o
o
l
l
P
P
a
a
n
n
e
e
l
l
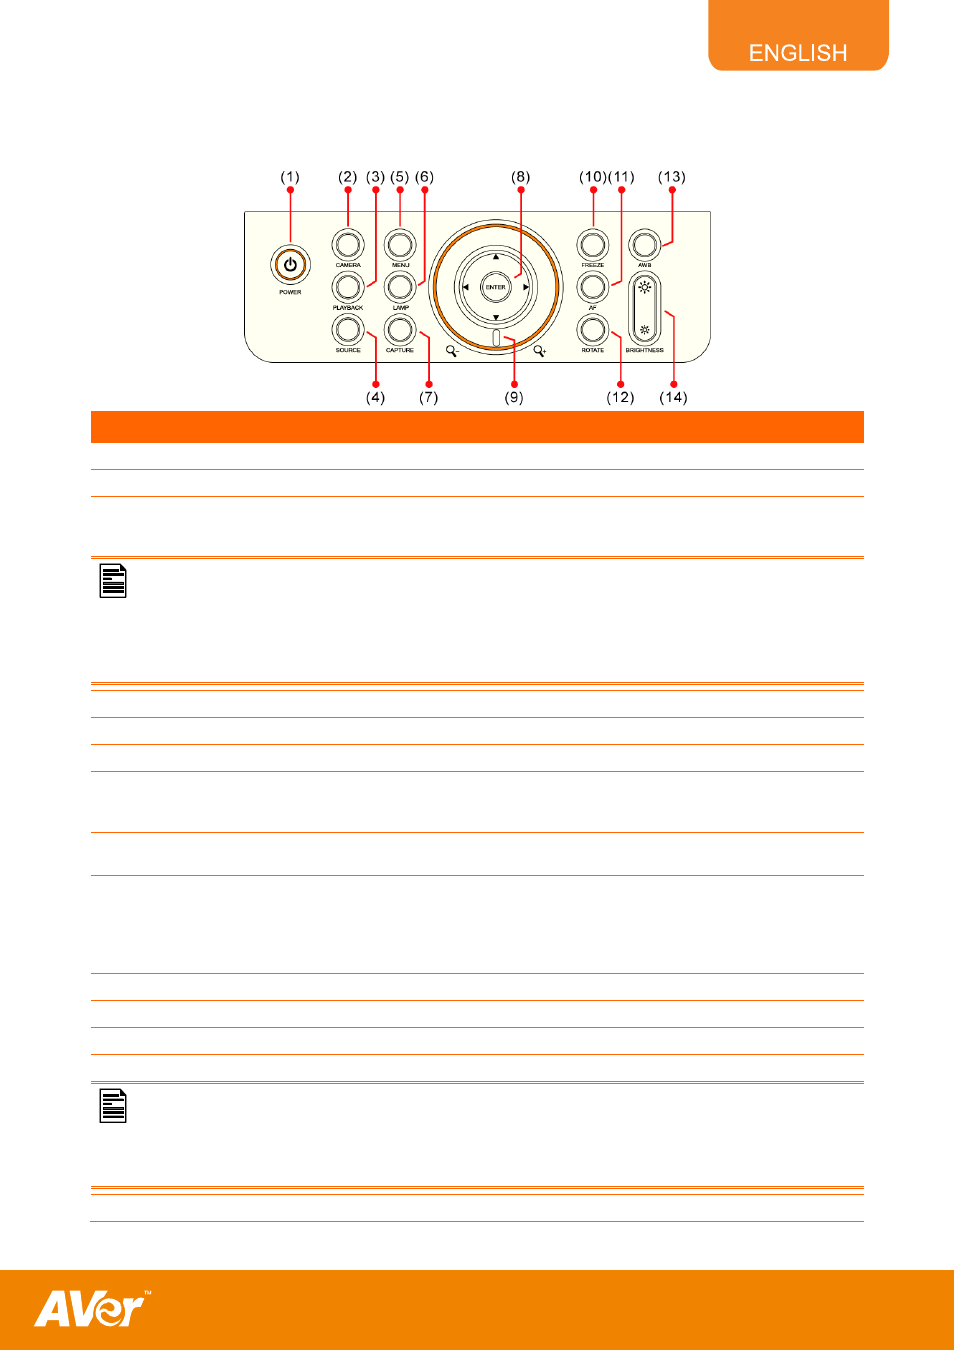
The touch button control panel located on the top side of AVerVision SPC300+ provides quick access to
commonly used functions.
Name
Function
(1) POWER
Turn the unit on/off.
(2) CAMERA MODE
Display the image from the SPC300+ built-in CMOS camera.
(3) PLAYBACK MODE
Display the captured image either from the built-in memory or SD card in 16-thumbnail
preview. Use the ▲,▼,◄, &► buttons to make a selection and ENTER to display the
selected image in full screen.
In Playback Mode, press MENU to access the ff:
SLIDE SHOW - start to automatically display from the selected image to the next one and repeatedly
display all the images in a loop. To pause or resume slide show, press ENTER. To manually move to the
previous or next image, press ◄ or ►.
MEMORY SOURCE - select the image source between the built-in memory or SD card.
DELETE - permanently remove the selected image.
(4) SOURCE
Display the video signal from the RGB input port.
(5) MENU
Pull up and exit the OSD main-menu and sub-menu.
(6) LAMP
Turn the LED light on or off.
(7) CAPTURE
Capture a still image in Camera mode. The captured image is saved in the memory and
can store up to 80 images. The image size can be saved either in 1024 x 768 (default) or
2016 x 1520 pixels.
(8) ▲ ,▼, ◄, ►, &
ENTER
Use these buttons in Playback, Box, Pointer, Visor, Resize, Split Screen, PIP function,
and Menu to make a selection and adjustment (See Menu Functions, for more details).
(9) ZOOM SHUTTLE
- Zoom in and out the image digitally 8X in Playback and 3X in Box mode.
- Zoom in and out the image to 6X AVerOptical zoom and 8X digitally in Camera mode.
AVerOptical zoom is a combination of optical zoom with AVERZOOM. AVERZOOM is
an AVer patented technology which digitally zooms in and pans on an image while
maintaining optical zoom image quality.
(10) FREEZE
Toggle to pause and resume the image from SPC300+ built-in CMOS camera.
(11) AF
Automatically adjust the focus.
(12) ROTATE
Turn the image by 90° each time this button is pressed in camera mode.
(13) AWB
Lock/unlock Auto White Balance (AWB).
The camera constantly looks at the overall color of the image and calculates the best-fit white balance. Each
time when the layout of the captured image changes the color shifts.
To lock the reference point which represent the white, place a piece of white paper, adjust till it fills the screen
then press AWB and wait till “AWB LOCK” appear on the screen. To set to AWB AUTO, press the button
again.
(12) Brightness
Adjust the brightness level in camera mode.