Alumax P-DR2W-48-60-CRP User Manual
Page 14
14
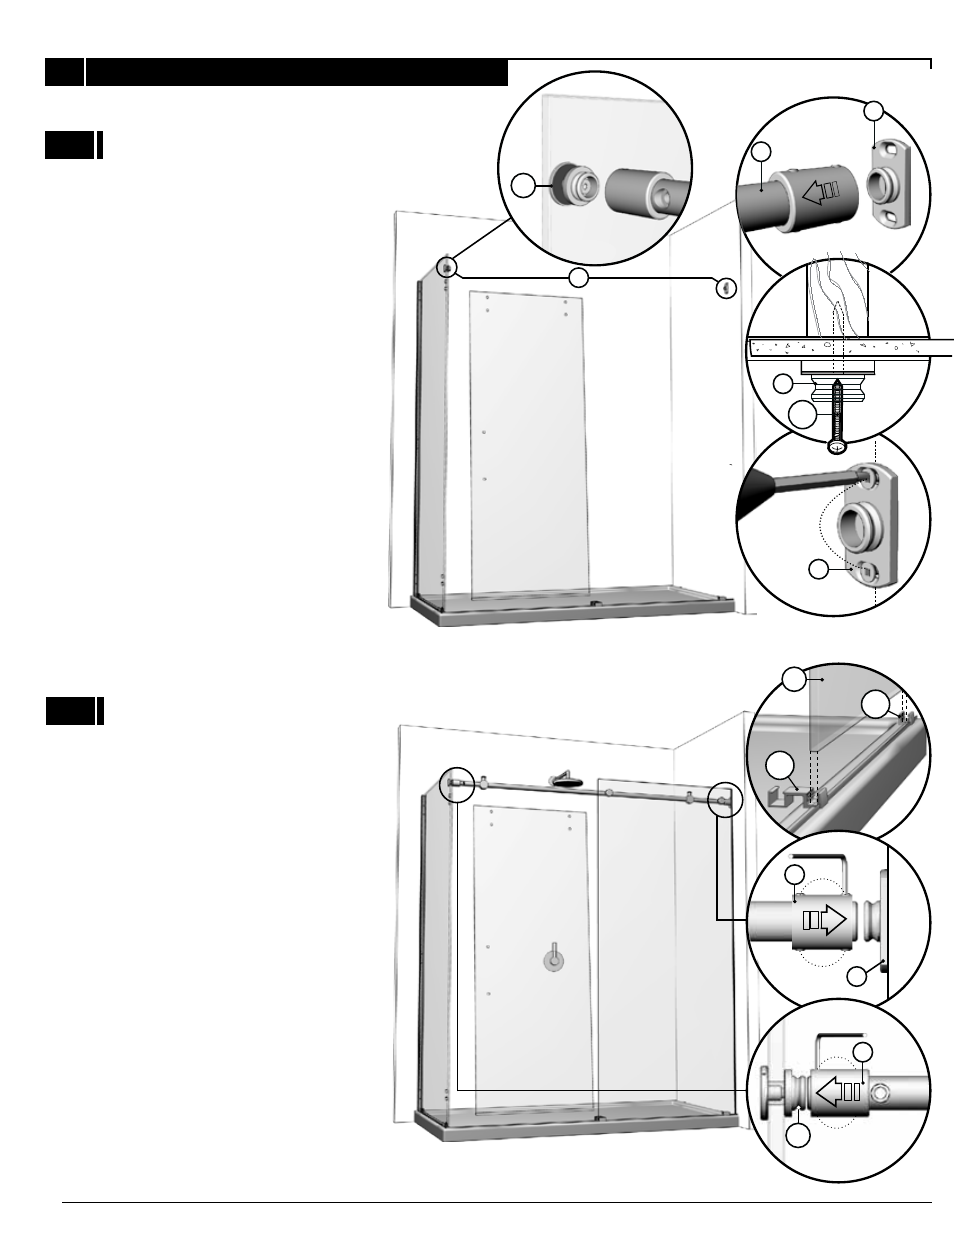
Remove running rail (1) from brackets (3) (14).
Drill holes in walls with a drill bit, intended for
ceramic tiles, through to the wall stud.
Fasten the wall brackets (3) with #12-3 (20).
Insert large fixed panel (18) back, ensuring
that it’s placed in the bottom glass clip (6)
and bottom center guide (7).
Slide expanders (E) to bridge the gap over
wall bracket for running rail (3) as well as
glass mount bracket for return panel (14) .
Fasten set screws.
10A
10
10A
WIDE FIXED PANEL
3
OSSATURE
WALL STUD
3
1
3
1
21
20
3
E
18
3
14
E
14
6
7
See also other documents in the category Alumax For Home:
- 300c (9 pages)
- 300cv (8 pages)
- 300d (9 pages)
- 338 (9 pages)
- 340 (9 pages)
- 340 Deluxe (9 pages)
- 390c Supplement (5 pages)
- 390cv Supplement (4 pages)
- 391 (12 pages)
- 392 (11 pages)
- 393 (11 pages)
- 394 (11 pages)
- 640S (8 pages)
- 640 (8 pages)
- 640D (7 pages)
- 641 Side Panel (6 pages)
- 694 (6 pages)
- 700c (7 pages)
- 733 (8 pages)
- 738 (8 pages)
- 738 Towel Bar (1 page)
- 740D (8 pages)
- 790c Supplement (4 pages)
- 791 (11 pages)
- 792 (12 pages)
- 793 (12 pages)
- 793 Buttress Supplement (1 page)
- 794 (11 pages)
- 794s (9 pages)
- 795 (10 pages)
- 890 (9 pages)
- 890c (8 pages)
- 1040 (9 pages)
- Deluxe Towel Bar (1 page)
- Transportation Latch (1 page)
- DesignLine Hinge (5 pages)
- P-DR1W-48-60 (14 pages)
- P-DR1W-72 (15 pages)
- P-DR1WT-60 (14 pages)
- P-DR2W-48-60-CW (19 pages)
- P-DR2W-72-CRP (19 pages)
- P-DR2W-72-CW (19 pages)
- P-DR3W-60 (32 pages)
- P-DRA1Y (16 pages)