Alumax 300c User Manual
Page 6
Page 5 of 8
EPH-N00-06086
6-3-02
4
6
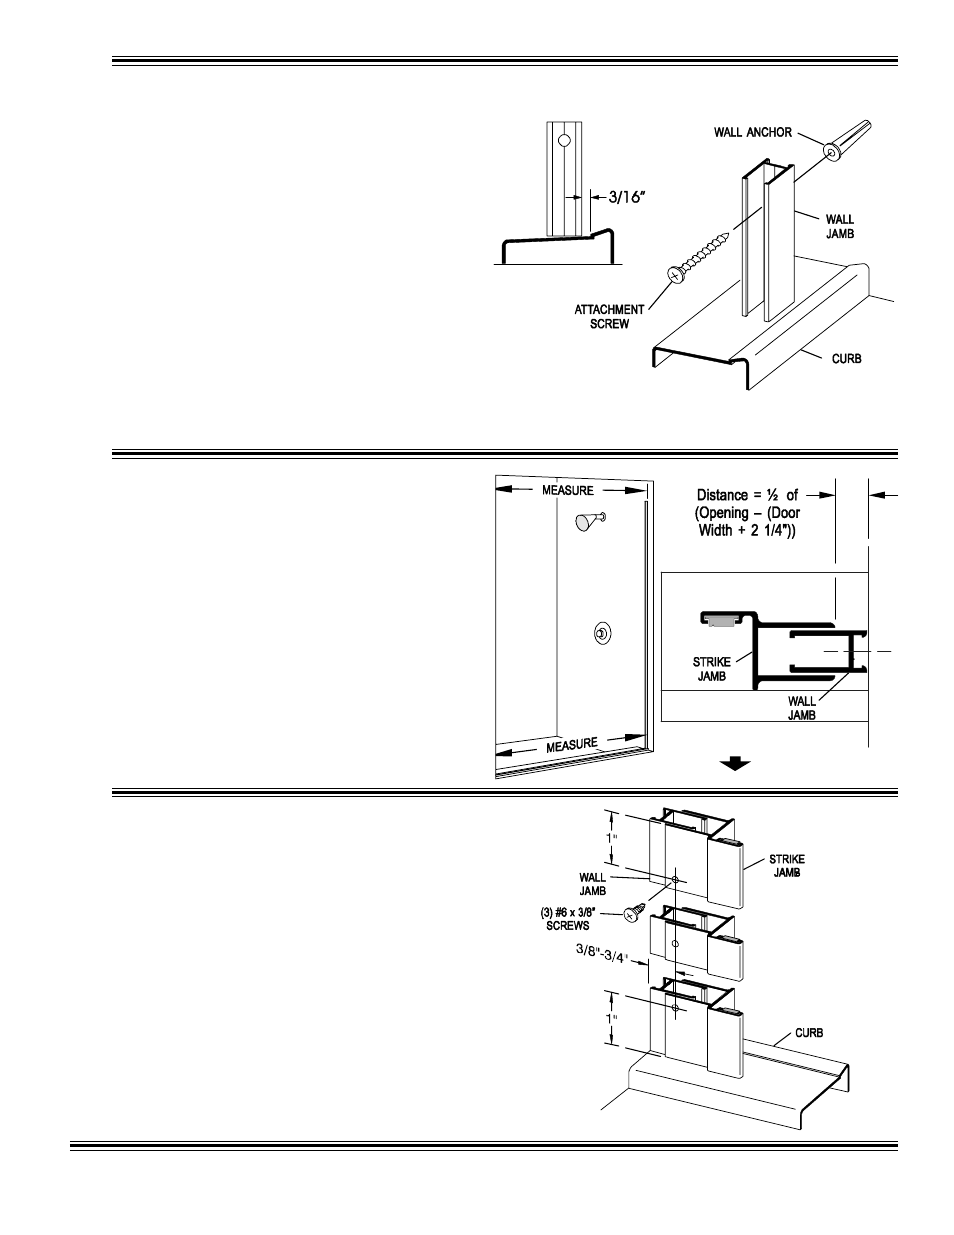
Place one of the wall jambs [D] against the wall
with the bottom end 3/16" from the raised side of the
curb [A]. Plumb the jamb and mark the hole locations
on the wall. Repeat for the other wall jamb. Remove
all parts and drill the walls for mounting hardware.
For tile or marble walls, drill six 3/16" diameter holes
and insert the plastic wall anchors [E].
Attachments to fiberglass or acrylic units can be made
in two ways. If a reinforcement is built into the wall
of unit, drill six 1/8" holes and install mounting screws
directly into the reinforcement. If walls are not
reinforced, drill 3/16" holes and install plastic wall
anchors or toggle bolts (toggle bolts not supplied by
(Alumax).
Replace each wall jamb and attach them to the wall
with three #8 x 1 1/2" truss head screws [K].
5
Slide the strike jamb [H] over one of the mounted
wall jambs [D] with the magnet facing outward.
Measure the wall-to-wall opening at the top and at the
bottom of the wall jambs and note the smaller
dimension. Measure the entire width of the door panel
[B] from the outside edge of the side rail to the edge of
the glass on the strike side. Add 2 1/4" to the door
width, subtract the total from the minimum wall-to-
wall opening and divide the result by two. This should
be the distance from the wall to the strike jamb at the
closest point. Plumb the strike jamb vertically and
mark its location on the wall jamb with a pencil.
Inside the shower enclosure, drill two 1/8"
holes thru the strike jamb [H] and into the wall jamb
[D] 3/8" to 3/4" from the wall and approximately 1"
vertically from each end of the strike jamb. Drill a
third hole centered between the first two, then enlarge
the three outer holes with a 3/16" drill for clearance on
the self-tapping screws. Attach the strike jamb
permanently with three #6 x 3/8" pan head screws
[G].
(;7(5,25