Front wheel camber, To remove wheel for repairs (see fig. 28), To start engine with a weak battery (see fig. 29) – Craftsman 944.602951 User Manual
Page 22: To replace headlight bulb, Interlocks and relays, To replace fuse, To remove hood and grill assembly (see fig. 30), Service and adjustments
Attention! The text in this document has been recognized automatically. To view the original document, you can use the "Original mode".
SERVICE AND ADJUSTMENTS
FRONT WHEEL CAMBER
The front wheel camber is not adjustable on your tractor. If
damage has occurred to affect the front wheel camber,
contact your nearest authorized service center/department.
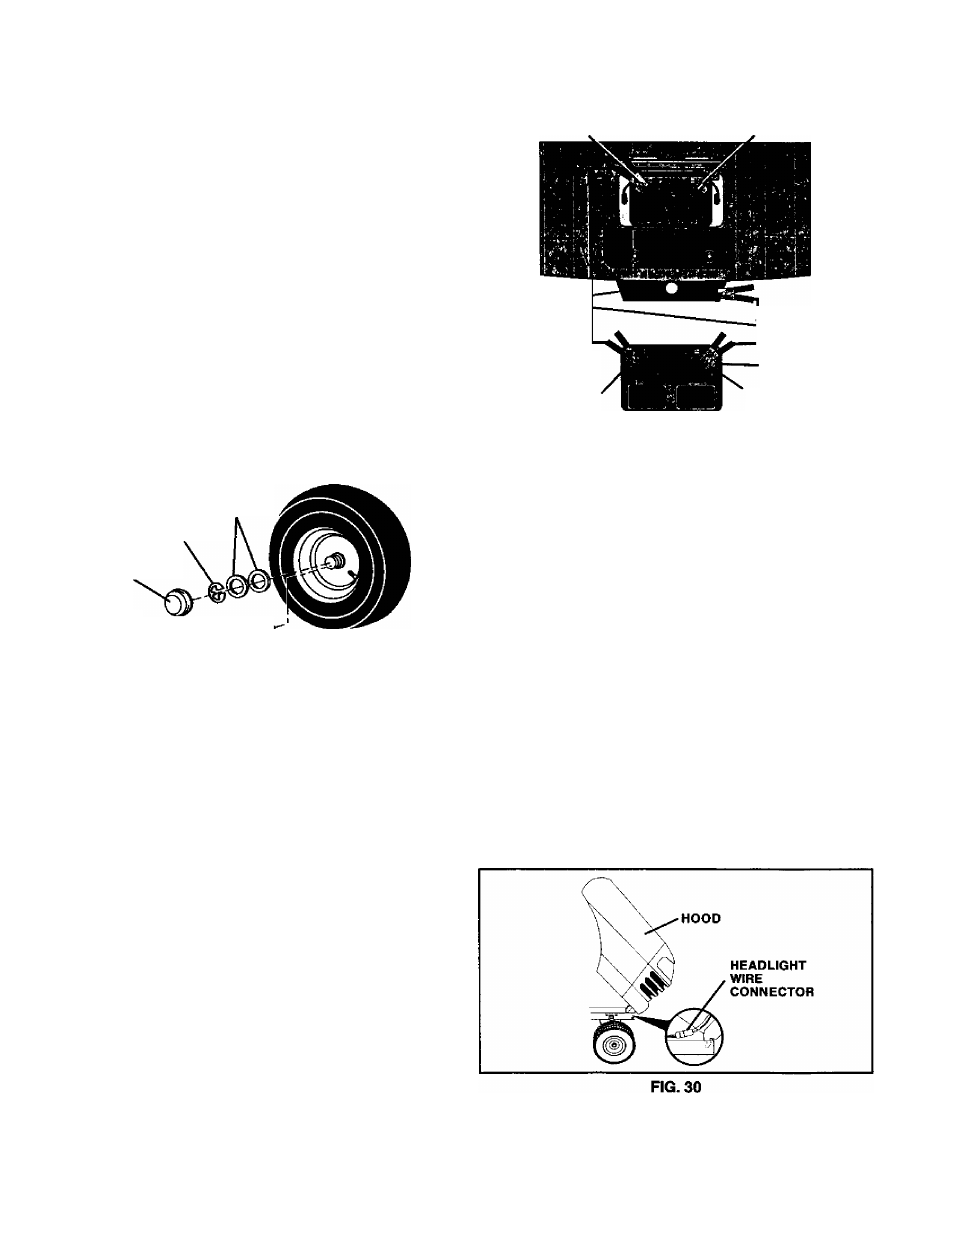
TO REMOVE WHEEL FOR REPAIRS
(See Fig. 28)
Block up axle securely.
Remove axle cove r, retaining ring and washers to allow
wheel removal (rear wheel contains a square key ~ Do not
lose).
Repairtireand reassemble.
On rear wheels only: align grooves in rear wheel hub and
axle. Insert square key.
Replace washers and snap retaining ri ng securely in axle
groove.
Replace axle cover.
NOTE: To seal tire punctures and prevent flat tires due to
slow leaks, tire sealant may be purchased from your local
parts dealer. Tire sealant also prevents tire dry rot and
corrosion.
WASHERS
RETAINING
RING
AXLE
COVER
SQUARE KEY
(REAR WHEEL ONLY)
FIG. 28
TO START ENGINE WITH A WEAK BATTERY
(See Fig. 29)
A
CAUTION: Lead-acid batteries generate
explosive gases. Keep sparks, flame
and smoking materials away from bat
teries. Alwaysweareye protection when
around batteries.
if your battery is too weak to start the engine, it should be
recharged. If “jumper cables” are used for emergency
starting, follow this procedure:
IMPORTANT: YOUR TRACTOR IS EQUIPPED WITH A 12
VOLT NEGATIVE GROUNDED SYSTEM. THE OTHER
VEHICLE MUST ALSO BE A 12 VOLT NEGATIVE
GROUNDED SYSTEM. DO NOT USE YOUR TRACTOR
BATTERY TO START OTHER VEHICLES.
TO ATTACH JUMPER CABLES -
•
Con nect each end of the R ED cable to the POSITIVE (+)
terminal of each battery, taking care not to short against
chassis.
•
Connect one end of the BLACK cable to the NEGATIVE
(-) terminal of fully charged battery.
•
Connect the other end of the BLACK cable to g jod
CHASSIS GROUND, away from fuel tank and battery.
TO REMOVE CABLES, REVERSE ORDER -
• BLACK cable first from chassis and then from the fully
charged battery.
•
RED cable last from both batteries.
POSITIVE TERMINAL
NEGATIVE TERMINAL
CHASSIS
POSITIVE
TERMINAL
CABLES
CHARGED
BATTERY
NEGATIVE
TERMINAL
HG.29
TO REPLACE HEADLIGHT BULB
•
Raise hood.
•
Pu 11 bulb holder out of the hole in the backside of the g hit.
•
Replace bulb in holder and push bulb holder securely
back into the hole in the backside of the grill.
• Close hood.
INTERLOCKS AND RELAYS
Loose or damaged wiring may cause your tractor to run
poorly, stop running, or prevent it from starting.
• Check wiring. See electrical wiring diagram in the Repair
Parts section.
TO REPLACE FUSE
Replace with 20 amp automotive-type plug-in fuse. The fuse
holder is located behind the dash.
TO REMOVE HOOD AND GRILL ASSEMBLY
(See Fig. 30)
•
Raise hood.
•
Unsnap headlight wire connector.
•
Stand in front of tractor. Grasp hood at sides, liit toward
engine and iift off of tractor.
•
To replace, reverse above procedure.
22