Tool set up, Safety opera tion maintenance setup – Harbor Freight Tools Chicago 91938 User Manual
Page 8
Page 8
For technical questions, please call 1-800-444-3353.
SKU 91938
SAFETY
OPERA
TION
MAINTENANCE
SETUP
Operating Instructions
Read the ENTIRE IMPORTANT SAFETY INFORMATION section at the beginning of this manual
including all text under subheadings therein before set up or use of this product.
Tool Set Up
TO PREVENT SERIOUS INJURY FROM ACCIDENTAL OPERATION:
Release the Trigger, unplug the tool from its electrical outlet and allow the wheel to cool
completely before performing any inspection, maintenance, or cleaning procedures.
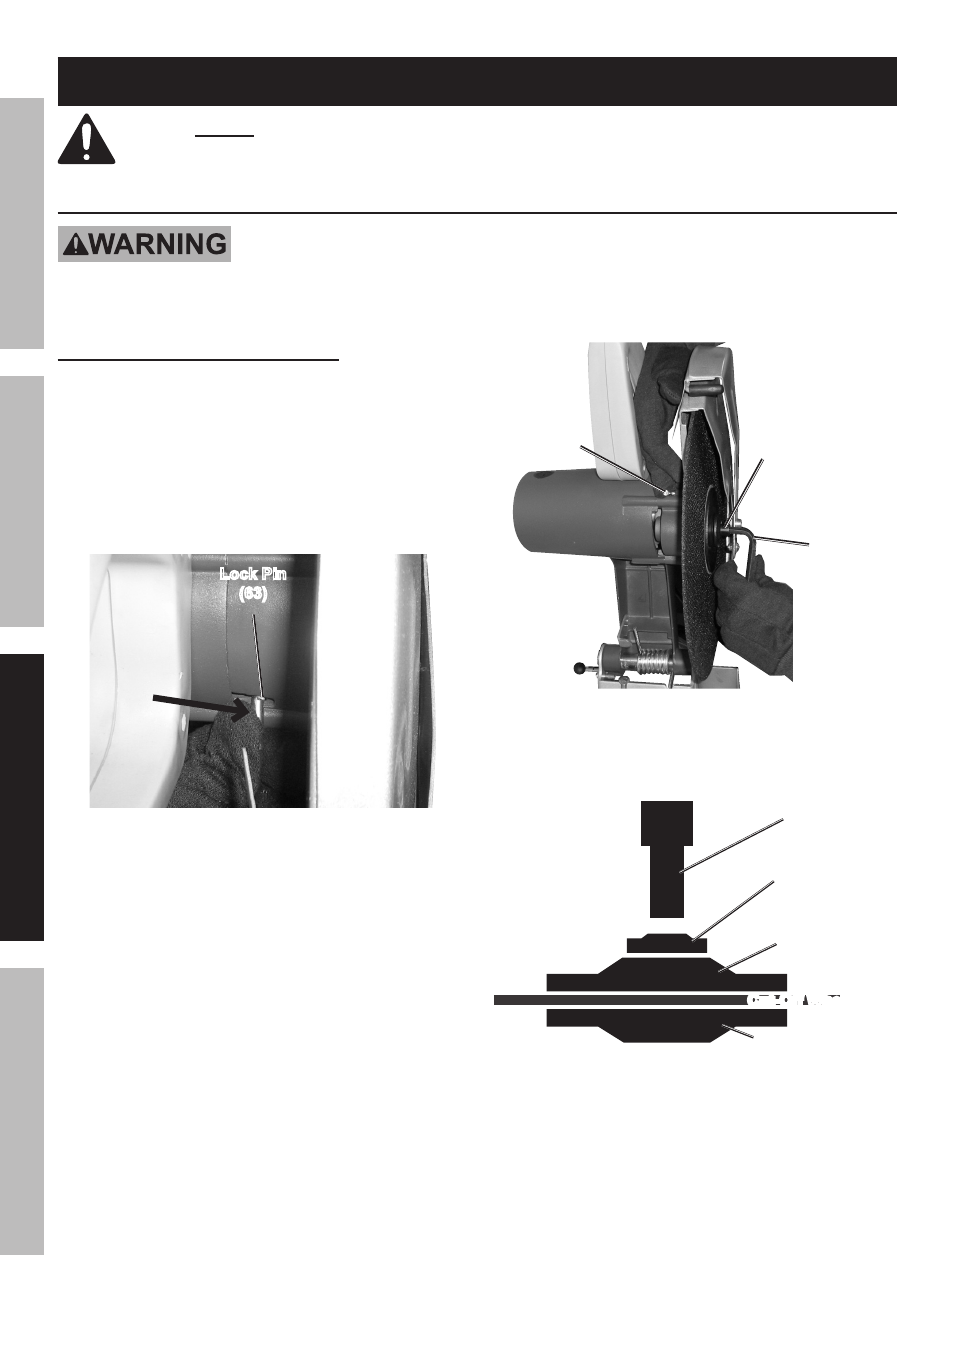
To Remove or Install a Cut-Off Wheel
1. Raise the Saw if it is locked down by pushing
down on it and pulling out the Lock Ball (25).
2. Open the Swing Guard (53) and tighten the Bolt (112)
to secure it while working on the Wheel.
3. Push the Lock Pin (63) towards the Fixed Guard (60)
as shown in
Figure A. Rotate the wheel
until the Lock Pin (63) slides into place.
Figure A: Lock Pin
Lock Pin
(63)
Fixed
Guard (60)
Handle
4. While continuing to hold down the Lock Pin (63),
use the Hex Key (111a) to loosen the
Socket Head Bolt (54). See
Figure B.
Figure B: Socket Head Bolt
Lock
Pin (63)
Hex Key
(111a)
Socket Head
Bolt (54)
5. Remove the Socket Head Bolt (54),
the Flange Washer (96), the Outer Flange (55),
and the Cut-Off Wheel (56). See
Figure C.
Socket Head
Bolt (54)
Flange
Washer (96)
Outer
Flange (55)
Cut-Off Wheel (56)
Inner Flange (57)
Figure C: Cut-Off Wheel Hardware
6. Replace with a new Cut-Off Wheel (56), and
reassemble the parts listed above in number 5.
The concave side of the Outer Flange (55) must face
the wheel. While holding the Lock Pin (63), tighten
the Socket Head Bolt (54) with the Hex Key (111a).
7.
LOOSEN THE BOLT (112) and make sure
that the Swing Guard (53) moves freely
back into place before operation.