Programming wm5 96 – Carlo Gavazzi WM5-96 User Manual
Page 26
24
WM5-96 Instruction Manual
Programming WM5 96
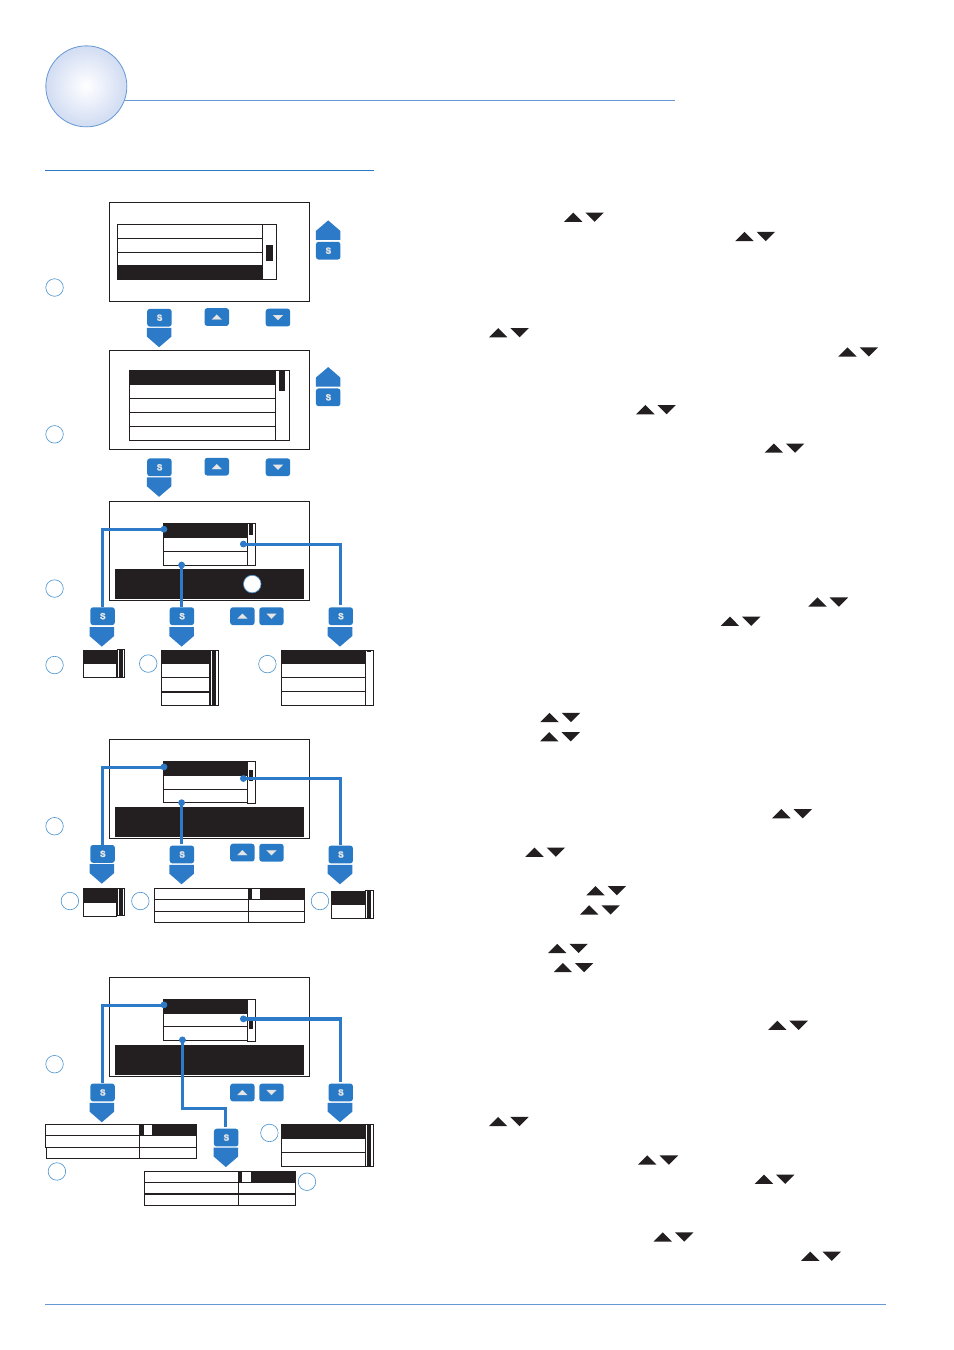
This function allows you to set the alarm parameters. The instrument is
able to manage up to 16 alarms (real or virtual). Select the ALARMS func-
tion
(1)
by means of the “
” keys and confirm with “S”. Then select
the alarm to be programmed
(2)
by means of the “
” keys and con-
firm with the “S” key, then set the following parameters:
ENABLE
(3)
: enable (ON) or disable (OFF) the alarm; the instrument dis-
play the existing programming
(a)
. Select the ENABLE function
(3)
by
means of the “
” keys and confirm with the “S” key. Then select ON
(3a)
to enable or OFF
(3a)
to disable the alarm by means of the “
”
keys, then confirm with the “S” key.
VARIABLE
(3)
: set the variable to be coupled to the alarm. Select the VARI-
ABLE submenu
(3)
by means of the “
” keys and confirm with the “S”
key. Then select the variable to be coupled to an alarm (the list of variables
depends on the selected system)
(3c)
by means of the “
” keys, then
select with the “S” key.
TYPE
(3)
: set the operating mode of the alarm. UP: up alarm, the alarm
will be enabled if the measured value exceeds the set-point. DO: down
alarm, the alarm will be enabled if the measured value goes below the set
point. IN: internal window alarm, the alarm will be activated if the value is
brtween the two set points. OUT: the alarm will be activated if the value
is outside the two set points. See details on next page “Logic and alarm
parameters”. Choose the TYPE
(3)
function by means of the “
” and
confirm with “S”. Then, select by means of the “
” keys the desired
alarm mode
(3b)
and confirm with “S”.
LATCH
(4)
: set the latch function. The alarm will remain ON even if the
cause that has generated it is not present any more. The alarm can be
reset only manually after the user has noticed it. Choose the LATCH func-
tion by means of the “
” keys and confirm with “S”. Then select ON
(4a)
by means of the “
” keys to enable the latch or OFF
(4a)
to dis-
able it, then confirm with “S”.
DISABLE: set the DISABLE function. When the instrument is switched
on, the first alarm condition will be ignored (useful also in case of DOWN
alarm). Choose the DISABLE function by means of the “
” keys and
confirm with “S”. Then select ON
(4b)
to enable it or OFF
(4b)
to disable
it by means of the “
” keys and confirm with “S”.
SET 1 (Set point 1)
(4)
: set the first alarm set point of the variable. Choose
SET 1
(4c)
by means of the “
” keys and confirm with “S”. Then set
the value by means of the “
” keys and confirm with “S”.
SET 2
(5)
: set the second alarm set point of the variable. Choose SET 2
(5a)
by means of the “
” keys and confirm with “S”. Then set the
value by means of the “
” keys, then confirm with “S”.
OUT
(5)
: select the output to be enabled in case of alarm. The list will dis-
play all the outputs that in the menu “Digital outputs” have been set as
“alarm”. Choose the OUT function by means of the “
” keys and
confirm with “S”. NONE-FFT, virtual alarm with trigger function for sig-
nal FFT analysis. The analysis relevant to the 10s that precede the
alarm event will be stored (FIFO) and available for the remote down-
loading by means of a specific software PowerSoft.Then select by
means of the “
” keys the desired output
(5b)
then confirm with “S”.
DELAY ON
(5)
: set a delay on activation of the alarm. Choose the func-
tion DELAY ON by means of the “
” keys and confirm with “S”.
Then set the value in seconds
(5c)
by means of the “
” keys quindi
confermare con “S”.
DELAY OFF
(6)
: set a delay on deactivation of the alarm. Choose the
DELAY OFF function by means of the “
” keys and confirm with “S”.
Afterwards set its value in seconds
(6a)
by means of the “
” keys
then confirm it with “S”.
Alarm
**********MMAAIINN MMEENNUU**********
RREEVV.. 11..44..22..66 ((AAVV55))
DISPLAY PAGE
DIGITAL INPUTS
DIGITAL OUTPUTS
ALARMS
**********AALLAARRMMSS MMEENNUU**********
**********AALLAARRMMSS MMEENNUU**********
AALLAARRMM:: 0011
EENNAABBLLEE:: OOFFFF
ENABLE
VARIABLE
TYPE
1
2
3
> 2s
> 2s
Measure
Go back
ALARM 01 (OFF)
ALARM 02 (ON)
ALARM 03 (ON)
ALARM 04 (ON)
ALARM 05 (ON)
a
UP
DO
IN
OUT
OFF
ON
V1
A1
W1
var1
**********AALLAARRMMSS MMEENNUU**********
AALLAARRMM:: 0011
LLAATTCCHH:: OOFFFF
LATCH
DISABLE
SET 1
4
OFF
ON
OFF
ON
SET 1 ?
9
.000
0.
min
-9999G
max
9999G
**********AALLAARRMMSS MMEENNUU**********
AALLAARRMM:: 0011
DDEELLAAYY OONN 22:: 00..000000
SET 2
OUT
DELAY ON
5
SET 2 ?
0
.000
0.
min
-9999G
max
9999G
DELAY ON ?
00000
s
min
0
0000
s
max
255
00
s
OUT D0
OUT D3
NONE-FFT
3a
3b
3c
4a
4c
4b
5a
5c
5b