Putting into operation, Care, maintenance and repair – Amico Mira 45 User Manual
Page 9
www.amico.com
9
Operating manual
(GB)
Page
18/40
9.
Putting into Operation
Before placing the light into operation, the user has to check whether mains
voltage and frequency specified on the rating plate are identical.
10. Care, Maintenance and Repair
Disconnect the light from the mains before carrying out any
maintenance or repair work!
This work must be carried out only by a qualified electrician!
As replacement parts only use part approved by the manufacturer.
10.1. Regular checks
The mains line must be checked minimum once a a year for damage
(only MIRA 45 Floor Stand). In case of damage the manufacturer must replace the
defective mains line.
10.2. Adjustment of the counter-balance (Fig. c)
Figure c
The counter-balance arm will already have been factory set for best possible
operation. Should adjustment become necessary: Set the spring tension as
illustrated, and using a clearance of 4 mm.
10.3. Changing the lamp
Note: Let the halogen lamp cool down before changing it!
1. Lift the hinged protective back cover of the head (see Fig. c)
2. The required Allen wrench is located inside the back cover (see Fig. d).
Remove the lamp head retaining screw (see Fig. e)
3. Remove the cover ring and reflector
4. Change the halogen lamp (use a soft cloth and do not touch the glass
surface of either the old or new lamp, see Fig. f)
5. Replace the reflector an cover ring. Replace an tighten the screws.
6. Replace the Allen wrench (see Fig, d)
Note: Only use lamp types approved of by the manufacturer
(see ‚
Technical Data
’ on page
11
).
c
d
e
c
f
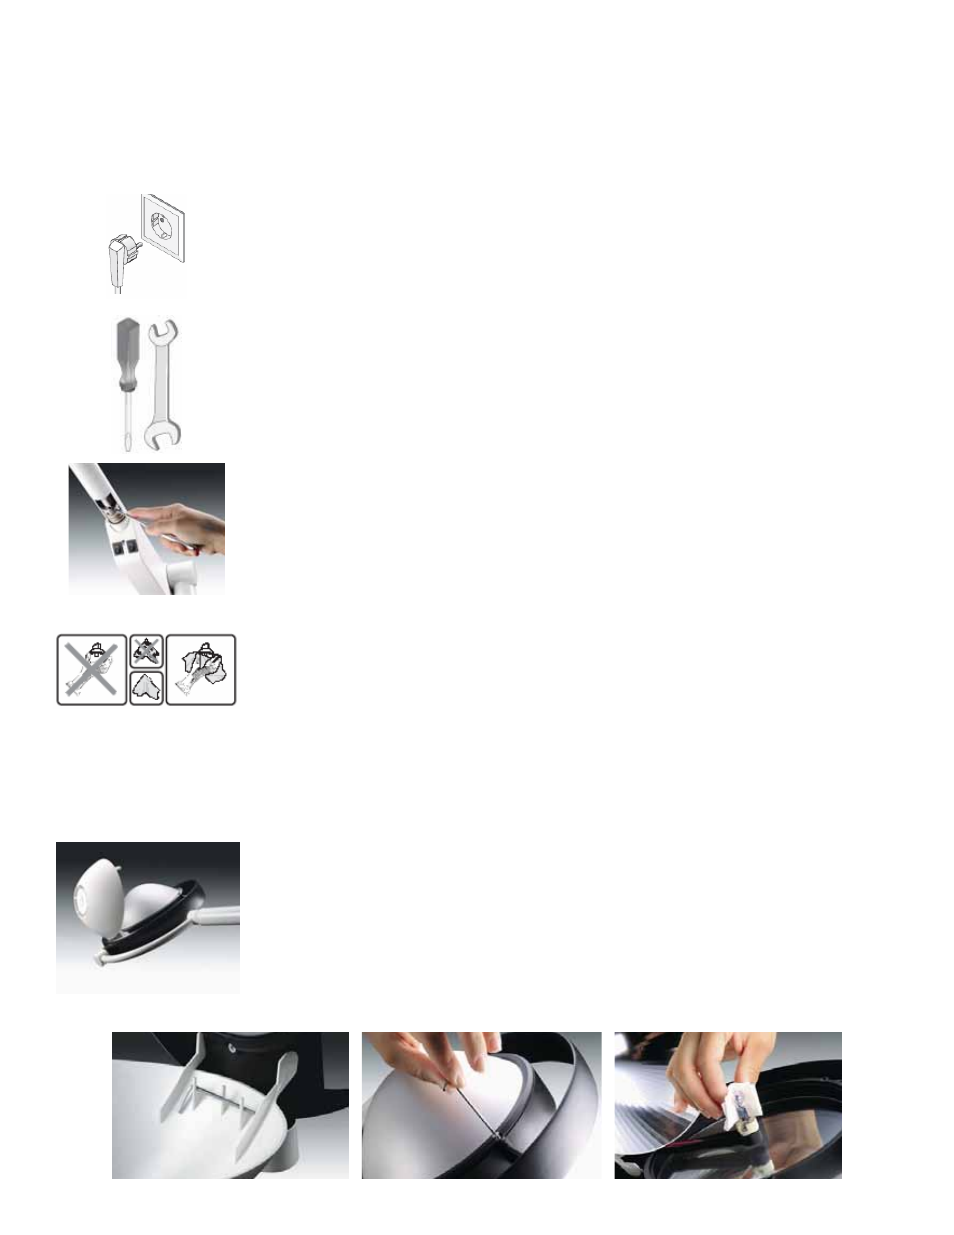
Before placing the light into operation, the user has to check whether mains voltage and
frequency specified on the rating plate are identical.
Care, Maintenance and Repair
Disconnect the light from the mains before carrying out any maintenance or repair
work! This work must be carried out only by a qualified electrician!
As replacement parts only use part approved by the manufacturer.
Regular Checks
The mains line must be checked minimum once a year for damage (only MIRA 45 Floor
Stand). In case of damage the manufacturer must replace the defective mains line.
Adjustment of the counter-balance (Fig. 1)
The counter-balance arm will already have been factory set for best possible operation.
Should adjustment become necessary: Set the spring tension as illustrated, and using a
clearance of 4 mm.
Changing the Lamp
Note: Let the halogen lamp cool down before changing it!
1. Lift the hinged protective back cover of the head (see
Fig. 1
)
2. The required Allen wrench is located inside the back cover (see Fig. 2). Remove the
lamp head retaining screw (see
Fig.3
)
3. Remove the cover ring and reflector
4. Change the halogen lamp (use a soft cloth and do not touch the glass surface of either
the old or new lamp, see
Fig. 4)
5. Replace the reflector an cover ring. Replace an tighten the screws.
6. Replace the Allen wrench (see
Fig. 2
)
Note:
Only use lamp types approved of by the manufacturer (see Technical Data on page
11)
Putting into Operation
Operating manual
(GB)
Page
18/40
9.
Putting into Operation
Before placing the light into operation, the user has to check whether mains
voltage and frequency specified on the rating plate are identical.
10. Care, Maintenance and Repair
Disconnect the light from the mains before carrying out any
maintenance or repair work!
This work must be carried out only by a qualified electrician!
As replacement parts only use part approved by the manufacturer.
10.1. Regular checks
The mains line must be checked minimum once a a year for damage
(only MIRA 45 Floor Stand). In case of damage the manufacturer must replace the
defective mains line.
10.2. Adjustment of the counter-balance (Fig. c)
Figure c
The counter-balance arm will already have been factory set for best possible
operation. Should adjustment become necessary: Set the spring tension as
illustrated, and using a clearance of 4 mm.
10.3. Changing the lamp
Note: Let the halogen lamp cool down before changing it!
1. Lift the hinged protective back cover of the head (see Fig. c)
2. The required Allen wrench is located inside the back cover (see Fig. d).
Remove the lamp head retaining screw (see Fig. e)
3. Remove the cover ring and reflector
4. Change the halogen lamp (use a soft cloth and do not touch the glass
surface of either the old or new lamp, see Fig. f)
5. Replace the reflector an cover ring. Replace an tighten the screws.
6. Replace the Allen wrench (see Fig, d)
Note: Only use lamp types approved of by the manufacturer
(see ‚
Technical Data
’ on page
11
).
c
d
e
c
f